How you transfer full licenses to another device

This Article describes how you transfer full licenses to another device.

Article created 2011-09-08 by Tim Eifler.

This Article describes how you transfer full licenses to another device.

The Article is applicable to all versions of EventReporter, MonitorWare Agent and WinSyslog.

1. Start the application.

2. Export the Settings to a XML file.

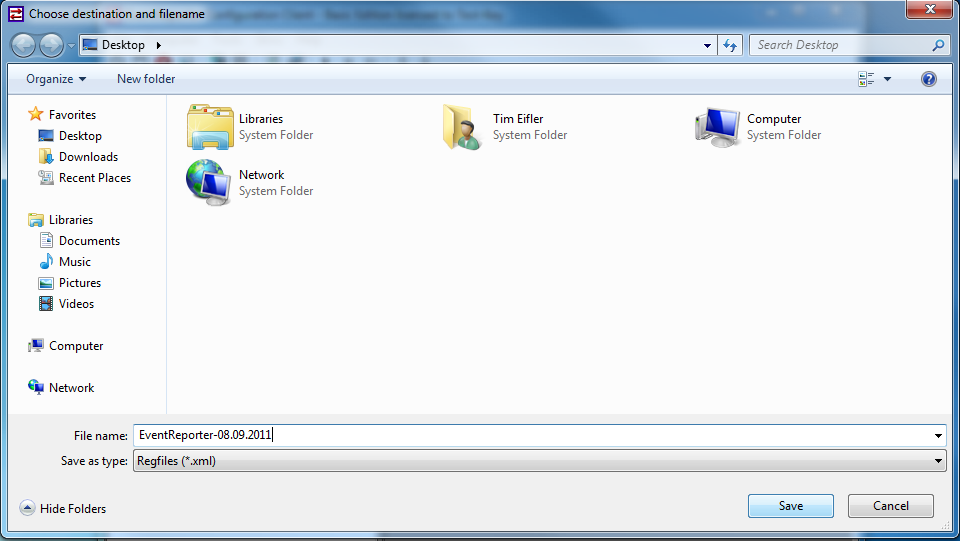
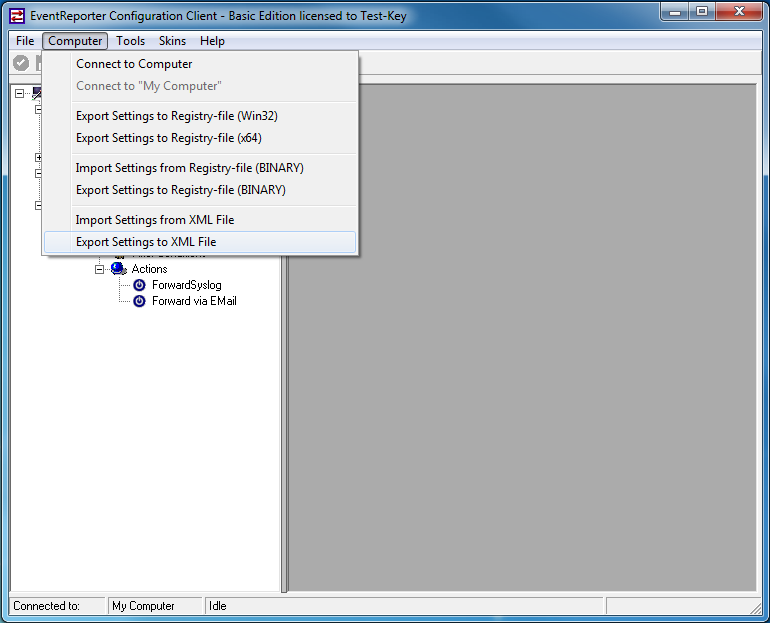
Left-click on “Computer”. A new menu will appear. Select “Export Settings to a XML File” from this menu. On the screen, it looks as follows:

Edit the file name to whatever you like and save the XML File.

3. Transfer the XML File to your new machine

4. Install the application on the new machine.

5. Import the saved Settings from the XML File.

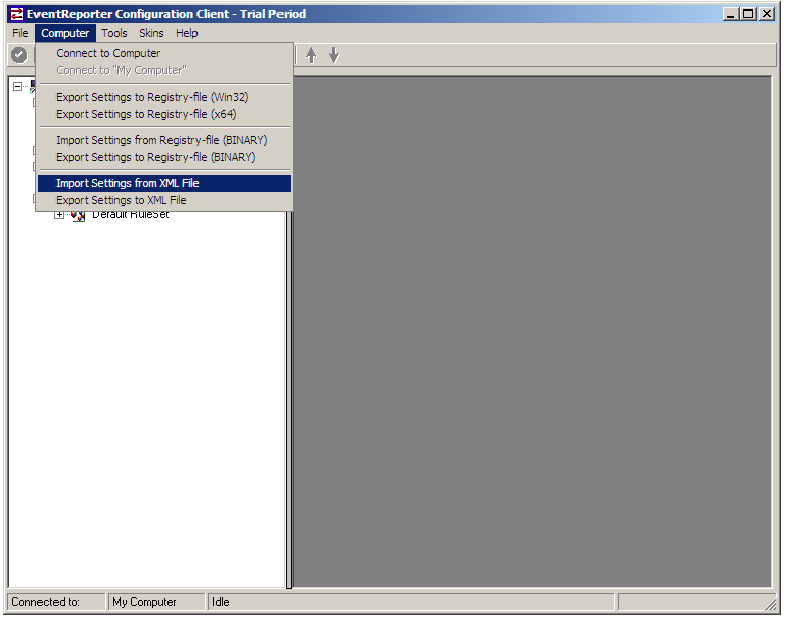
Left-click on “Computer”. A new menu will appear. Select “Import Settings to a XML File” from this menu. On the screen, it looks as follows:

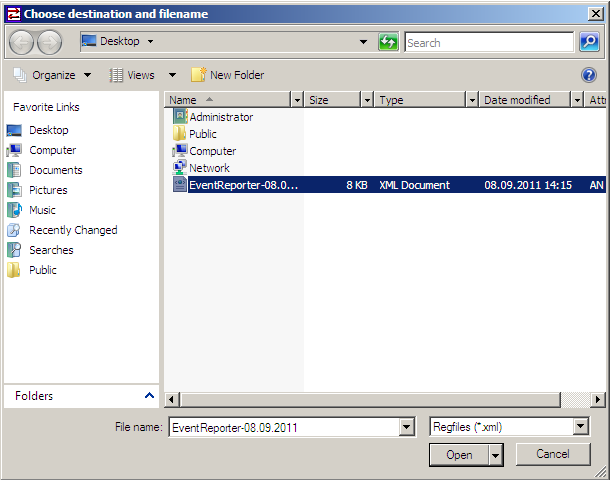
Search your XML File and make a Left-Click on the file. Then press on Open.

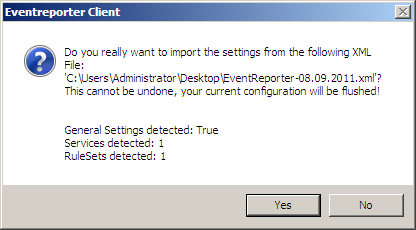
6. Click “Yes”.  After this please restart the program.

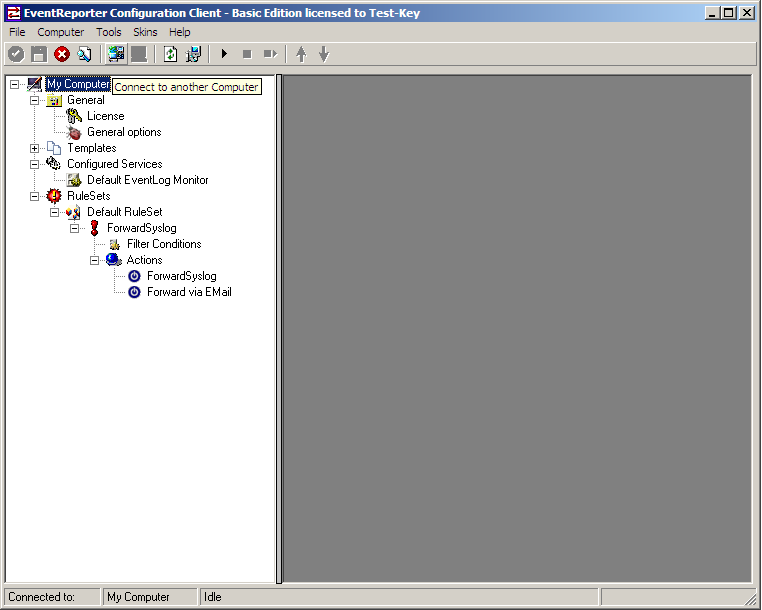
7. Check if the license key has been transferred correctly and start the service. You can see it in the Headline “Basic Edition licensed to Test-Key(Your name)”

That was it.

Conclusion

And this is all you need to do to transfer your License to a new machine.

70-486 pdf   ,
AWS-SYSOPS pdf   ,
220-902 pdf   ,
101 pdf   ,
VCP550 pdf   ,
9L0-012 pdf   ,
C_TFIN52_66 pdf   ,
70-411 pdf   ,
LX0-104 pdf   ,
300-115 pdf   ,
102-400 pdf   ,
300-320 pdf   ,
1V0-601 pdf   ,
70-412 pdf   ,
LX0-103 pdf   ,
70-347 pdf   ,
OG0-091 pdf   ,
JN0-102 pdf   ,
1Z0-051 pdf   ,
70-178 pdf   ,
70-980 pdf   ,
70-532 pdf   ,
220-901 pdf   ,
300-135 pdf   ,
210-260 pdf   ,
200-120 pdf   ,
CAS-002 pdf   ,
9L0-066 pdf   ,
NSE4 pdf   ,
NS0-157 pdf   ,
SSCP pdf   ,
ITILFND pdf   ,
HP0-S42 pdf   ,
ICBB pdf   ,

Database Logging with MSSQL

Step-By-Step Guides

Article created 2004-09-14 by Timm Herget.
Last Updated 2011-07-27 by Florian Riedl.

Database Logging with MSSQL

This is a very quick step-by-step guide. It essentially is a step in multiple
configurations. You can refer to this guide whenever you need to add
database logging to one of your services.

Though we need to add some sidenotes for issues with 32/64bit systems. If you have a operating system
which is a 64bit edition, the installer for EventReporter, MonitorWare Agent or WinSyslog will automatically
install the appropriate binaries (64bit) on the system. The problem is now, that generally the 32bit drivers for ODBC
would work fine, but 64bit applications can only use drivers that are for 64bit as well. Therefore it is best
to make sure, that you have installed the 64bit ODBC drivers as well. This does only apply for MSSQL and MySQL databases. If you are trying to use a JET database with Adiscon’s products on a 64bit system, you’re in bad luck, since there are no 64bit ODBC drivers available.

MSSQL Enterprise Manager

1. To create a new Database, open up the Microsoft SQL Enterprise Manager.

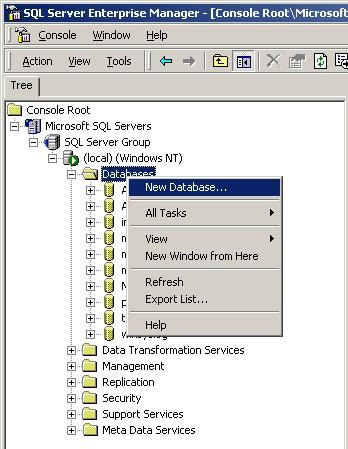
2. Right-click on “Databases” and select “New Database”.

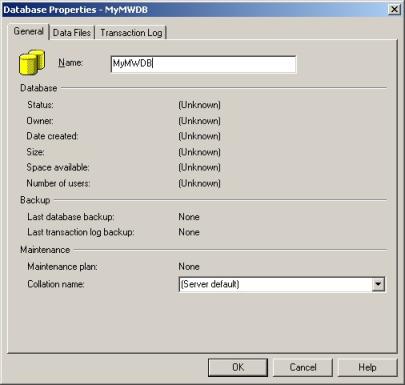
3. Select a Database Name there and click “OK”.

ODBC Data Source Administrator

After you created the new Database, go to the Control Panel -> Administrative Tools and open up “Data Sources (ODBC)”.
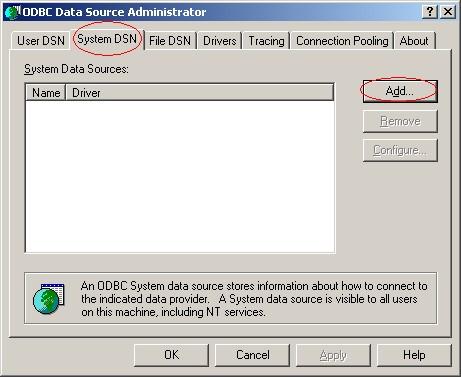
The following Window will appear:

4. Click on “System DSN” and then “Add…”.

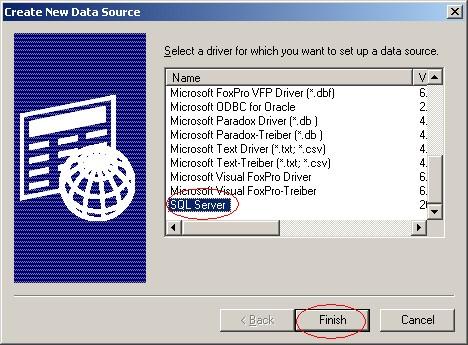
5. Select “SQL Server” as Driver from the List and click “Finish”.

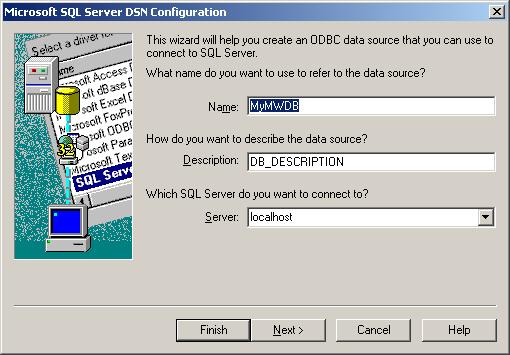
6. Choose a Datasource Name, Description and select the Server where the Database is. In our example we use “localhost”.
Click on “Next”.

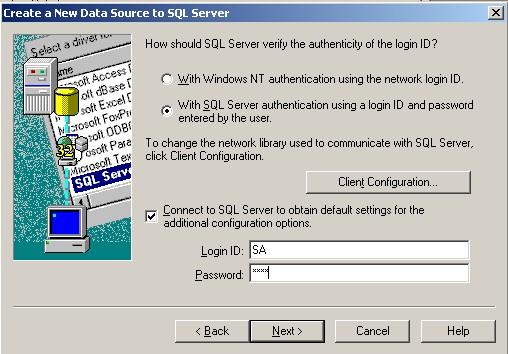
7. Select “SQL Server Authentication” and type in your MSSQL Login ID and Password. Click on “Next”.

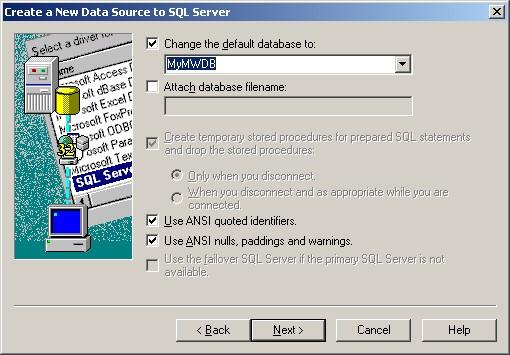
8. Select “Change the default Database to:” and choose your new created Database, in our example we use “MyMWDB”. Click on “Next”.

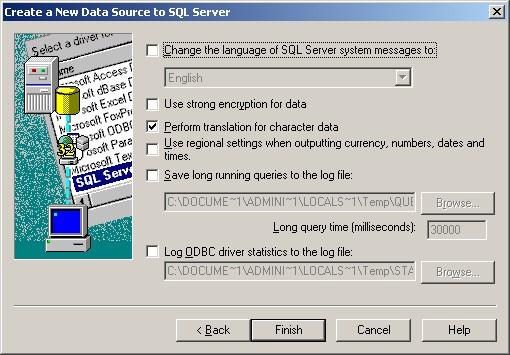
9. Leave all at default settings and click “Finish”, a test Window will appear:

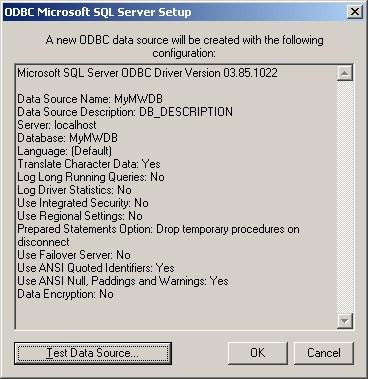
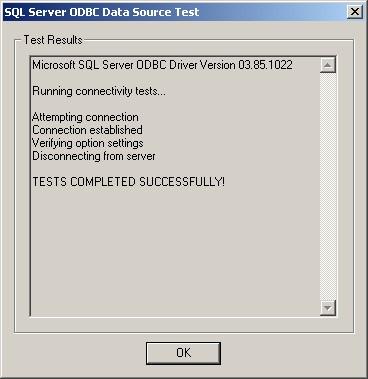
10. Click on “Test Data Source”, normally the following Window should be displayed:

11. If not, go back and check your Settings, if yes, Click “OK” and exit the System-DSN Wizard.

Monitor Ware Line Product

12. To define a new rule set, right click “Rules”. A pop up menu will
appear. Select “Add Rule Set” from this menu.

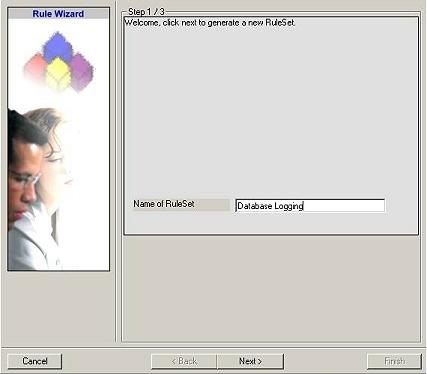
13. Then, a wizard starts. Change the name of the rule set to whatever name you
like. We will use “Database Logging” in this example. The screen
looks as follows:

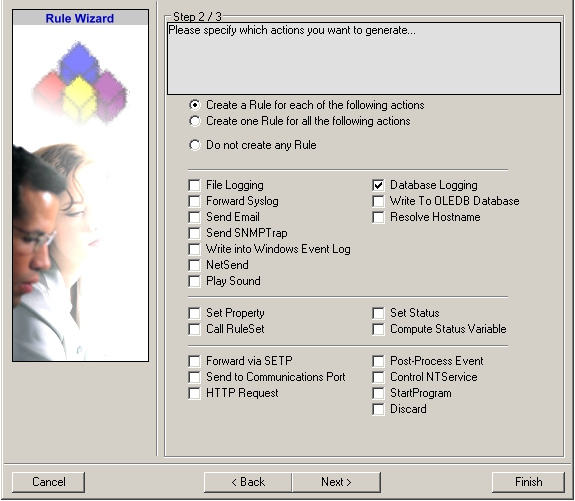
14. Click “Next”. A new wizard page appears:

15. Select only Database Logging. Do not select any other options for this sample.
Also, leave the “Create a Rule for each of the following actions”
setting selected. Click “Next”. You will see a confirmation page.
Click “Finish” to create the rule set.

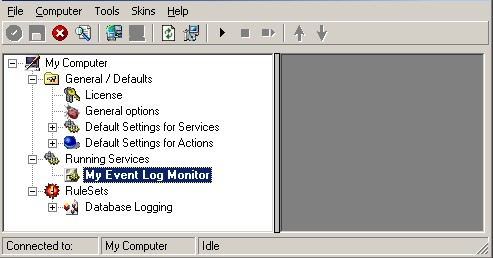
16. The wizard closes and the client shows a newly created rule set.

17. As you can see, the new Rule Set “Database Logging” is present. Please
expand it in the tree view until the action level of the “Database
Logging” Rule and select the “Database Logging” action to
configure.
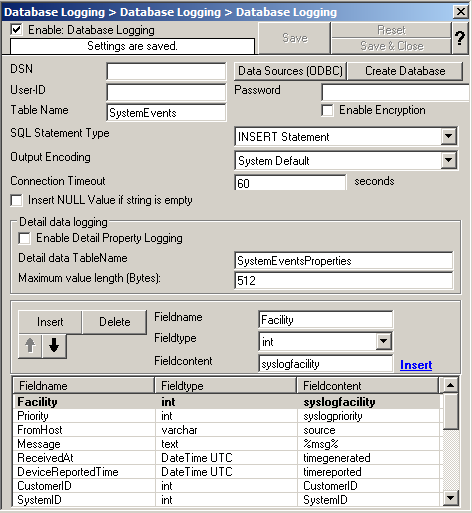
You will see the following Window now:

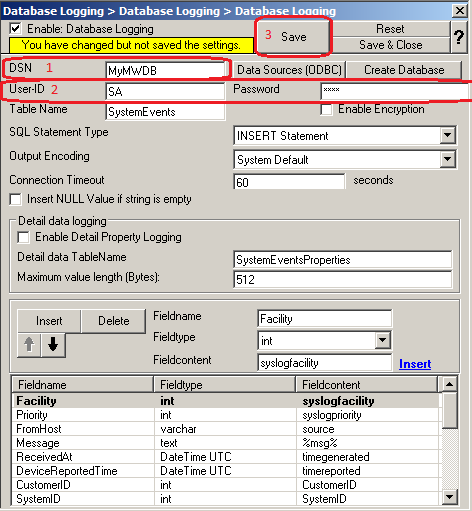
18. Type in your DSN, User-ID and Password now and press “Save”.

19. Click on the “Create Database” Button to let the Programm create the Adiscon-Table-Layout in your Database.

Done 🙂

Creating a simple Syslog Server

Last updated 2016-08-26 by Jan Gerhards, using Winsyslog 13.2.

In this scenario, a simple Syslog server will be created. No other services are configured. The Syslog server will operate as a standard Syslog server on the default port of 514/UDP. All incoming data will be written to a single text file.

Step 1 – Defining a Rule Set for File Logging

The rule set specifies what action to carry out. You might be tempted to define the service first, but starting with the rule set makes things easier as it will be already present when the service is defined later and needs to be bound to a rule set.

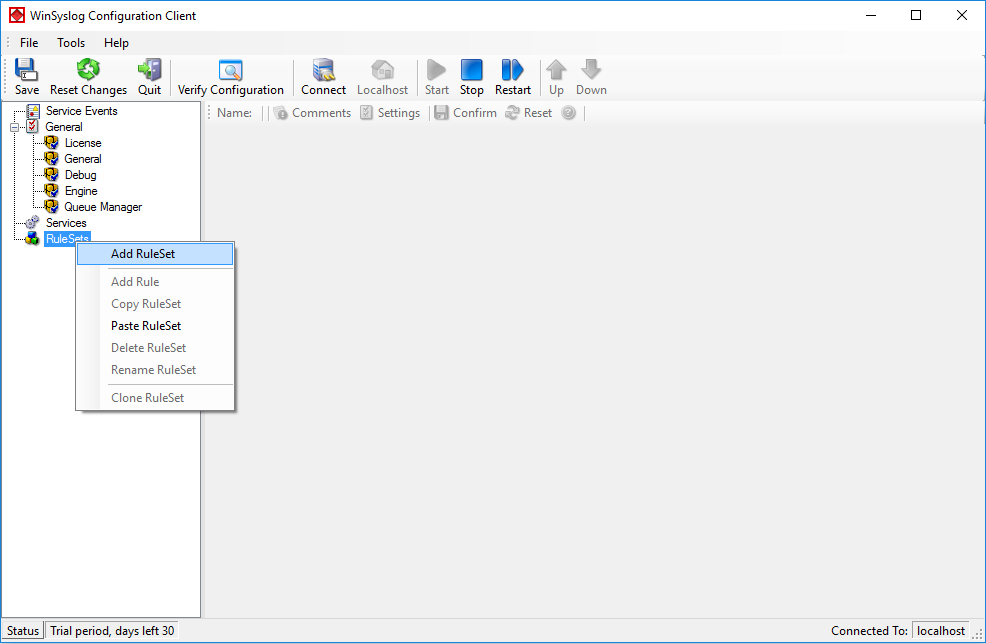
To define a new rule set, right click “RuleSets”. A pop up menu will appear. Select “Add Rule Set” from this menu. On screen, it looks as follows:
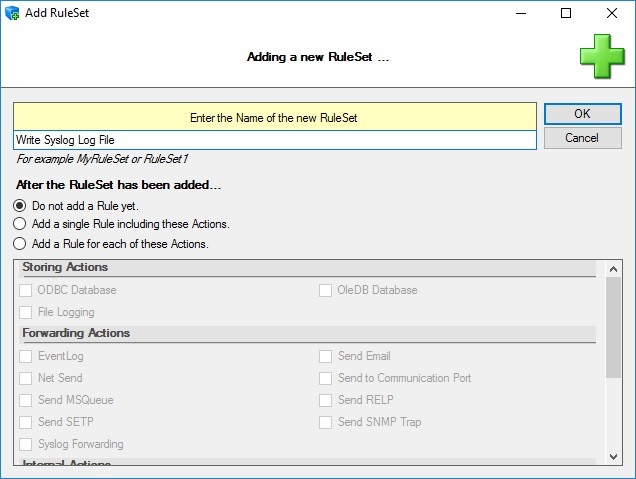
Then, a wizard starts. Change the name of the rule set to whatever name you like. We will use “Write Syslog Log File” in this example. The screen looks as follows:
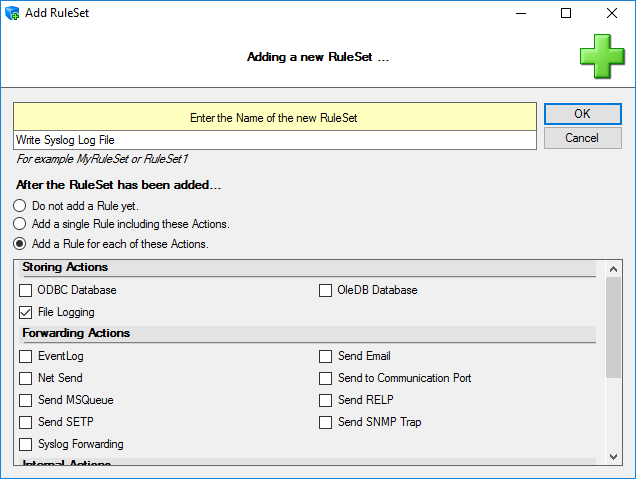
After that, select “Add a Rule for each of these Actions”. You should then be able to change settings in the before greyed-out area. There, select “File Logging” (subitem of “Storing Actions”). Your screen should now look like this:
After that, click “OK” and the wizard will close. The client will now show a newly created rule set.
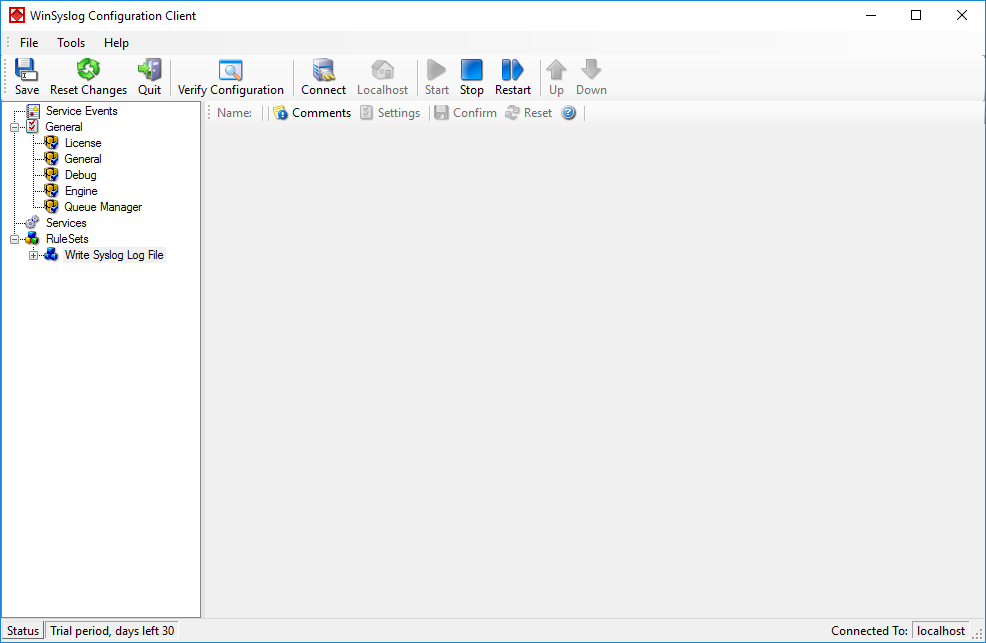
As you can see, the “Write Syslog Log File” rule set is now present. Please expand it in the tree view until you have the following screen contents:
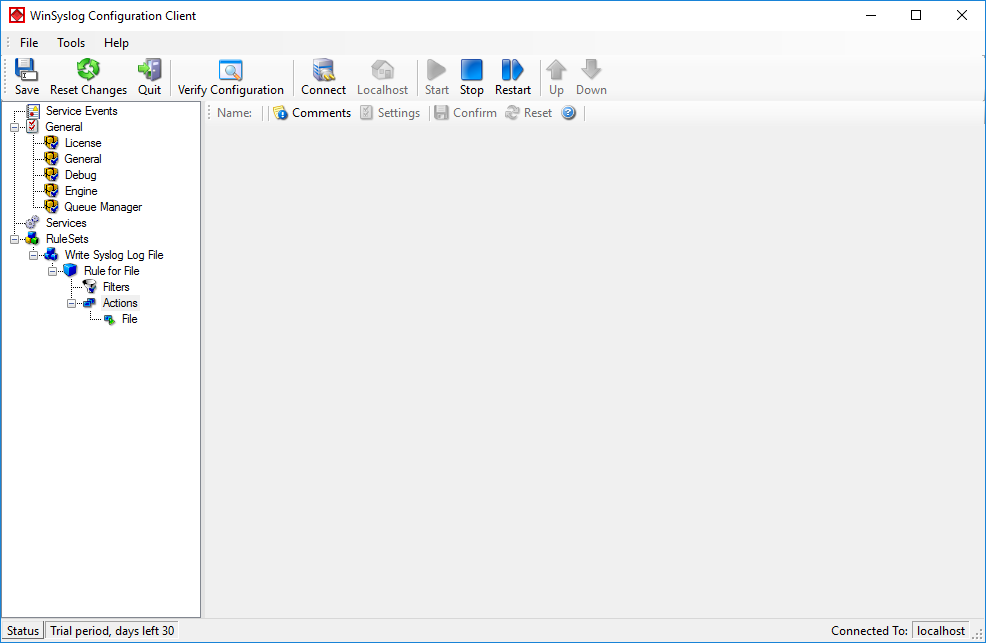
As you can see, we have a “File” action configured. We will review the settings just for your information. Click on “Filters”:
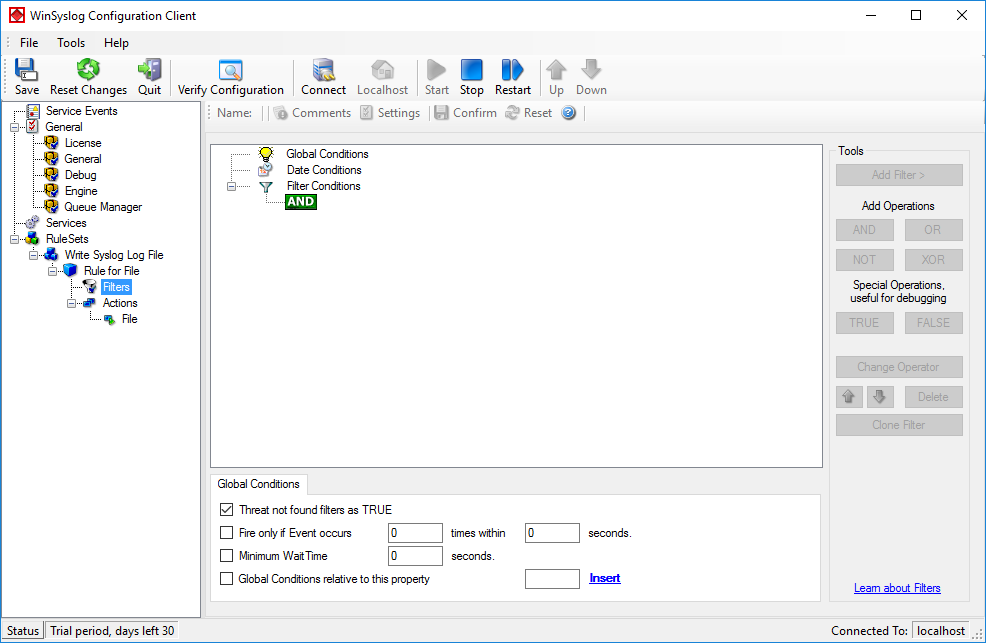
As you can see, none of the filter conditions are enabled. This means that the all information units (incoming messages) will be matched by these filter conditions. As such, the rules for the “File Logging” action will always be carried out for all messages.

Please note that this also means that all Syslog priorities and facilities will be written to the same file.

Now let us check the “File” action itself. Please select it in the tree view:
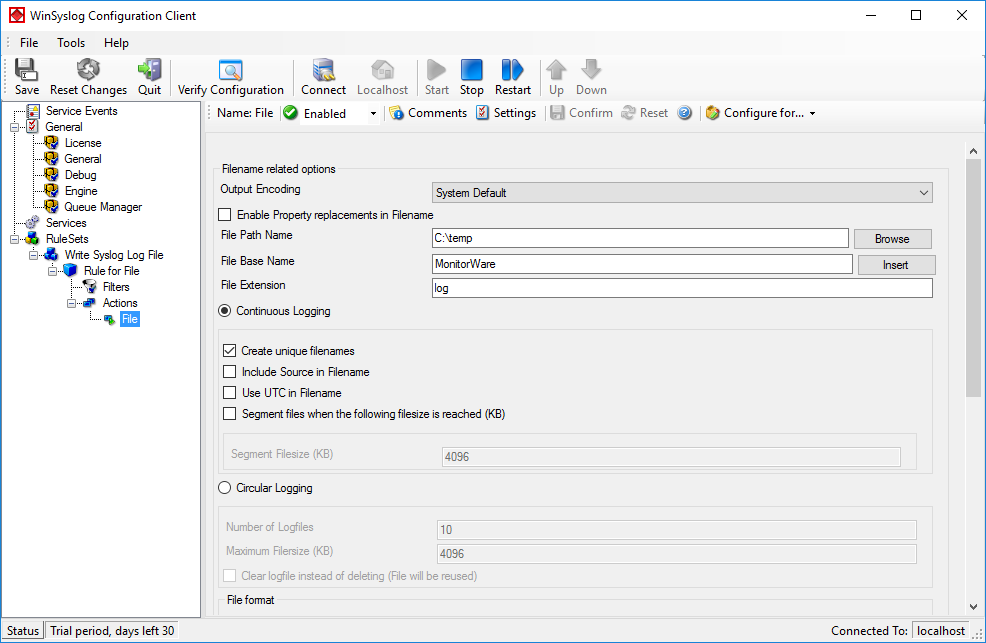
As you can see, it has been created with the default parameters. Each day, a file will be created in the C:\temp directory and its base name will be MonitorWare (meaning the name of the generated file will be MonitorWare-*date*, i.e. “MonitorWare-2016-08-26.log”). It will include all information items in the file (you can select the information items that will be in the file by scrolling down and ticking the boxes).

If you would like to store it into a separate directory or change the file name, here is the place to do it. Important: please make sure the directory you specify exists! If it does not yet exist, please create it before you start the service. If the directory does not exist, the service is not able to store any files.

In our example, we would like to save it to “C:\logfiles” with a base name of “Syslog”. Therefore, we change these properties.

After doing so, please remember to save your changes. To do so press “Save” (upper left corner).
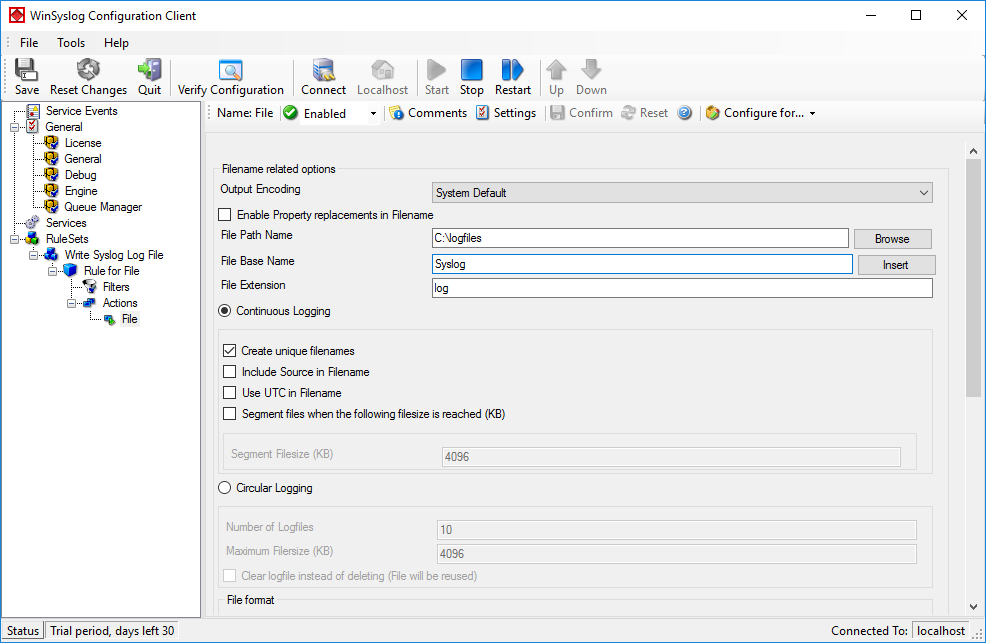
Now you have a useable rule set for logging incoming messages to a text file.

Step 2 – Create a Syslog Server Service

Now we need to define a Syslog server service. A Syslog server is also sometimes called a “Syslog daemon”, “Syslogd” or “Syslog listener”. It is the process that receives incoming messages.

To define it, right click on “Services”, then select “Add Service” and the “Syslog Server”:

Once you have done so, a configuration pane opens.

Also, you will see a newly created service beneath the “Services” part of the tree. View and can rename it if you want (in this example, we will name it “My Syslog Server”). After this, press save.

Your screen should now look like this:
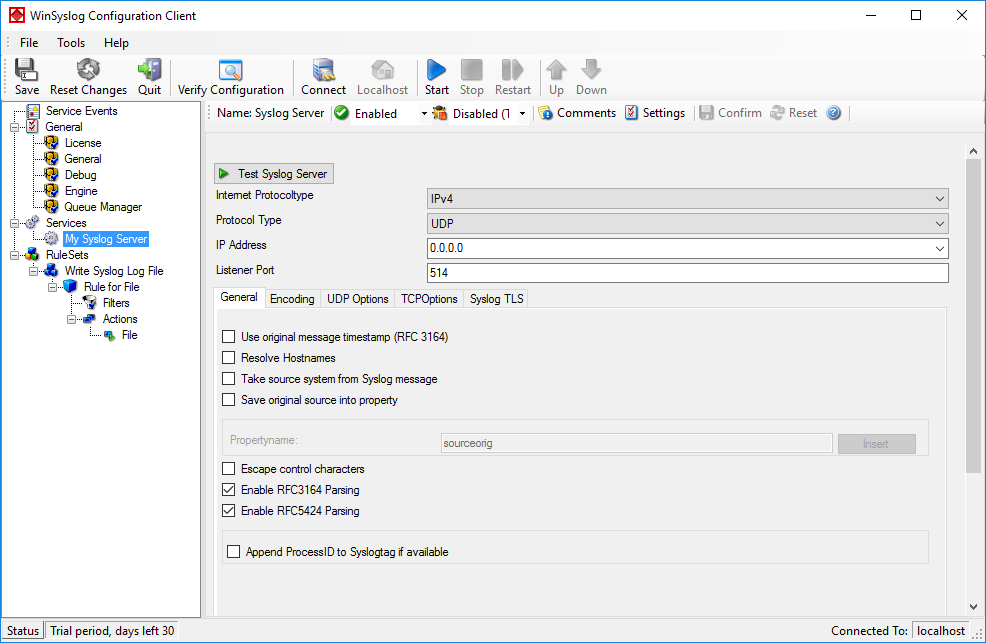
As you can see, the service has been created with the default parameters. As such, it operates as a RFC compliant standard Syslog server.

Please note that the “Write Syslog Log File” has been automatically assigned as the rule set to use. This is the case because we already created it and it is the only rule set. If another one is to be used, you can change it to another ruleset here (you might have to scroll down to view the option):
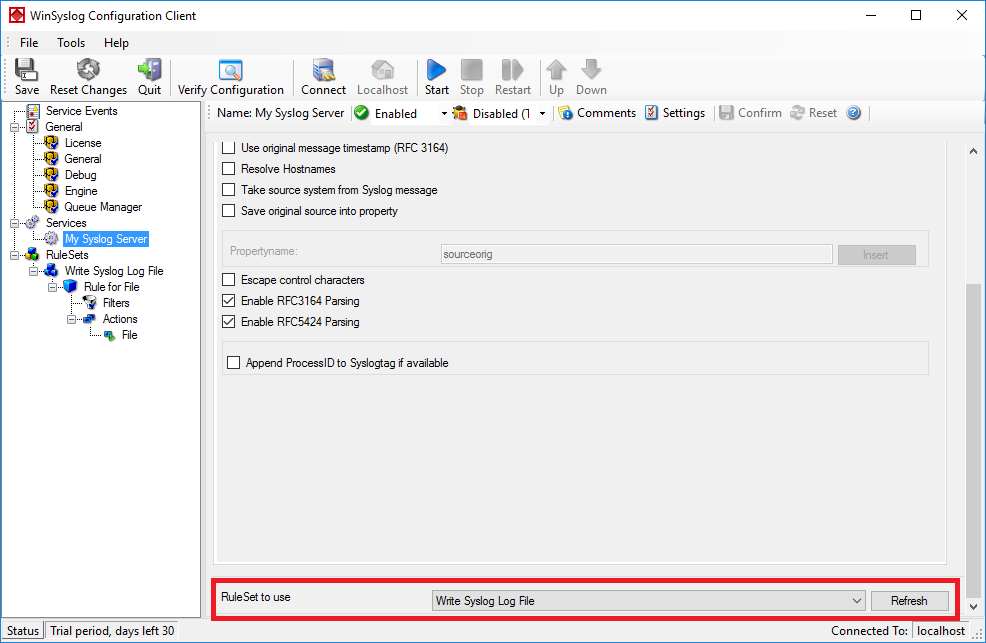
This procedure completes the configuration of the Syslog server.

Step 3 – (Re-) Start the Service

The application cannot dynamically read changed configurations. As such, it needs to be restarted after such changes. In our example, the service was not yet started, so we simply need to start it. If it’s already running, you need to restart it.

Service control can be done with both the respective operating system capabilities or with the configuration client. These are highlighted in the screenshot below:

The buttons resemble Windows service manager – start, stop and restart. In this example, stop and restart are grayed out because the service is not running.

After service restart, the new definitions are active and the application is ready to accept and store incoming messages.

Step 4 – Configure your Syslog-Enabled Devices

Even though application is now ready, it can only receive messages if some devices send them. Remember, Syslog is a protocol where the server is passively waiting for incoming messages. As long as no device sends message, the Syslog server will not log anything.

Since there are a large variety of devices, we unfortunately cannot provide device specific instructions. However, almost all devices need to be configured with their specific configuration tool. Typically, only two settings need to be made: one to activate Syslog messages at all and one with the Syslog server IP address or name.

Remember: the computer running application now acts as a Syslog server. As such, you need to find out its IP address or name and supply it to the device as the Syslog server. Please note that not all devices can operate with computer names. Use the IP address, if in doubt.
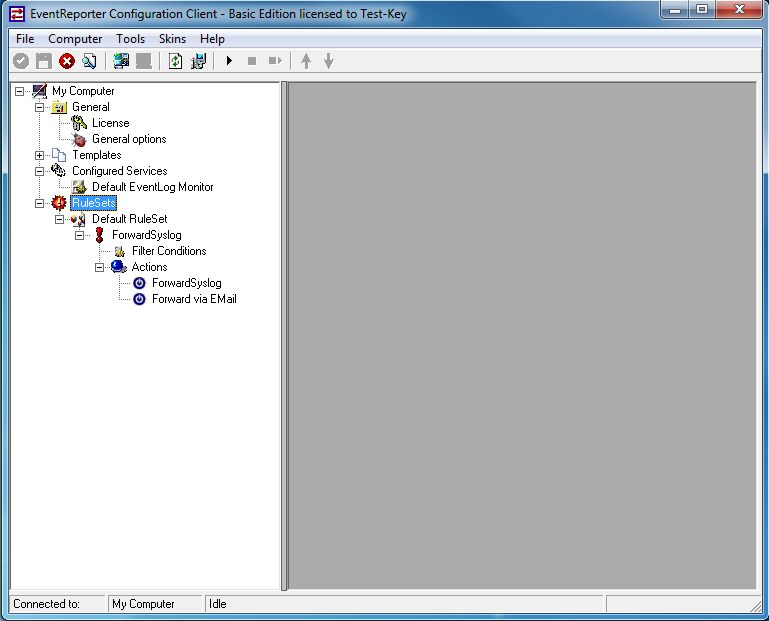
SMTP

SMTP

The “Simple Mail Transfer Protocol”. This is an Internet standard for
sending email messages. Virtually all major email systems are either based on SMTP or at
least offer gateways to SMTP capable systems.

SMTP is used for sending email. It can not be used to pick up email messages.
For this purpose, protocols like POP3 or IMAP4 are required.

SMTP is highly standardized. As such, a standard email client can work with
all SMTP compliant servers. In the public Internet, almost all providers offer
SMTP compliant mail servers for their customer’s use.

2011-05-16 MonitorWare Agent 7.3a and 8.0a released

Adiscon is proud to announce the 7.3a  and 8.0a release of MonitorWare Agent. This is a bugfixing release.

This release only consists of bugfixes:

  • Fixed a memory leak in all TCP releated actions that could occur if the TCP session timeout was set to a low value.
  • Fixed a problem with the session timeout calculation for TCP releated actions. If the value was set above 3 minutes, the calculation became inaccurate and could even cause a TCP session to immediately expire.

For more details read the version history.

Version 7.3a and 8.0a is a free download. Customers with existing 6.x keys can contact our Sales department for upgrade prices. If you have a valid Upgrade Insurance ID, you can request a free new key by sending your Upgrade Insurance ID to sales@adiscon.com. Please note that the download enables the free 30-day trial version if used without a key – so you can right now go ahead and evaluate it.

MonitorWare Agent 8.0a Released (Build-IDs: Service 8.0.412, Client 8.0.1343)

MonitorWare Agent 8.0a Released

Build-IDs: Service 8.0.412, Client 8.0.1343

Bugfixes

  • Fixed a memory leak in all TCP releated actions that could occur if the TCP session timeout was set to a low value.
  • Fixed a problem with the session timeout calculation for TCP releated actions. If the value was set above 3 minutes, the calculation became inaccurate and could even cause a TCP session to immediately expire.
  • You can download Free Trial Version of MonitorWare Agent.

    MonitorWare Agent 7.3a Released (Build-IDs: Service 7.3.402, Client 7.2.0.1326)

    MonitorWare Agent 7.3a Released

    Release Date: 2011-05-16

    Build-IDs: Service 7.3.402, Client 7.2.0.1326

    Bugfixes

    • Fixed a memory leak in all TCP releated actions that could occur if the TCP session timeout was set to a low value.
    • Fixed a problem with the session timeout calculation for TCP releated actions. If the value was set above 3 minutes, the calculation became inaccurate and could even cause a TCP session to immediately expire.

    You can download Free Trial Version of MonitorWare Agent.

    MonitorWare Agent 8.0 Released (Build-IDs: Service 8.0.411, Client 8.0.1342)

    MonitorWare Agent 8.0 Released

    Build-IDs: Service 8.0.411, Client 8.0.1342

    New Additions

  • Added new Action called Send MSQueue:
    This action can send messages to the Microsoft Message Queuing Server. It is possible to customize the Queue Label, Priority    and Queue Body. The Queue Body contains the message property by default as UNICODE (UTF16) string. In order to use this action, you need to have the Microsoft Message Queuing (MSMQ) Server installed.
  • Added support for IPv6:
    Support for IPv6 has been added into all network related facilities of the engine. All network related actions will automatically detect IPv6 and IPv4 target addresses if configured. You can also use DNS resolution to resolve valid IPv6 addresses. Network related Services can either use IPv4 or IPv6 as internet protocol. In order to support both protocols, you will need to create two services. The only exception is the RELP Listener, which uses IPv4 and IPv6 automatically if available.
  • SMTP Listener Service:
    Added support for accepting connections using the extended SMTP EHLO command.
  • SETP service / Action:
    Extended MonitorWare SETP Protocol to V3. If Sender and Server support V3 or higher, UTF8 is now used to encode/decode messages. This maintains the correct character encoding after the messages is received and rebuild internally.
  • ODBC / OLEDB Action:
    Implemented OutputEncoding for 8Bit (var)char fields. This means we can now write UTF8 encoded messages into varchar fields.
  • Syslog Listener Service:
    Added option to add ProcID into SyslogTag for RFC 5424 Header parsing. This was previously default. The Option is disabled by default now making it easier to filter for the SyslogTag.
    Added option to Force UTF8 Decoding in Syslog Service. A new Encoding configuration tab lets you decide, if you which to automatically detect the encoding, force UTF8 decoding, or use system default encoding.
  • Core Engine:
    Added Performance fix for UTF conversion for empty strings.
    Enhanced SSL Security in all network related Services.
  • EventLog Monitor V2:
    Added support for polling EventLog Records. This works almost like in the old EventLog Monitor, the Eventlog channel is polled frequently and new EventLog records are processed only. By default, the “Subscription Model” is used which processed events in Realtime.
    Added support to read and process EVTX files. This requires the new “Eventlog Polling” method. It is also possible to update the EVTX files while MonitorWare Agent is running.
  • Upgraded internal NET-SNMP library to version 5.6.1.
  • SNMP Trap Receiver / Monitor / Send SNMP Action:
    Added support for IPv4/IPv6 and TCP/UDP. A combination of UDP/TCP and IPv4/IPv6 can now be configured. Continue reading “MonitorWare Agent 8.0 Released (Build-IDs: Service 8.0.411, Client 8.0.1342)”
  • 2011-05-03 MonitorWare Agent 8.0 released

    Adiscon is proud to announce the 8.0 release of MonitorWare Agent. This new major release focusses on international support. First of all, it now provides full IPv6 support throughout the complete engine, including all services and actions. This provides an easy transition to the new protocol just in time when the migration becomes more important to many customers. Also, the new release provides far better support for Unicode, both in messages being processed as well as internal handling, like the write to database actions.

    The improved Unicode support increases interoperability for example in Asia. Not only is it easier to have the correct character set persisted to files and databases, it now also is possible to send Unicode via RFC5424-formatted messages to standards-compliant remote hosts.

    The new IPv6 support is currently of most benefit for customers in countries with very limited IPv4 address ranges. However, it enables a smooth transition to the new protocol to customers everywhere. It is considered an important milestone towards the next generation of the Internet.

    In addition to these top features, the new version includes additional new capabilities, like native support for backup EVTX files. There are various use cases for this capablity. An important one is that some SAN devices export their event log in the form of an ETVX file, which now can natively be read by EventReporter. The new release also contains some bug fixes.

    The new version also includes additional new capabilities, like native support for the Microsoft Message Queuing Server. It also contains some bug fixes.

    Detailled information can be found in the version history.

    Version 8.0 is a free download. Customers with existing 11.x keys can contact our Sales department for upgrade prices. If you have a valid Upgrade Insurance ID, you can request a free new key by sending your Upgrade Insurance ID to sales@adiscon.com. Please note that the download enables the free 30-day trial version if used without a key – so you can right now go ahead and evaluate it.

    2011-04-05 MonitorWare Agent 7.3 released

    Adiscon is proud to announce the 7.3 release of MonitorWare Agent. This is a bugfixing release.

    This release only consists of bugfixes:

    • Fixed a bug in conjunction with RawXML.
    • Hardened SSL transmission send or receive handling.
    • Corrected a SSL Error.
    • Fixed a bug causing a crash on startup if a configured Syslog Port was blocked by another application.

    For more details read the version history

    Version 7.3 is a free download. Customers with existing 6.x keys can contact our Sales department for upgrade prices. If you have a valid Upgrade Insurance ID, you can request a free new key by sending your Upgrade Insurance ID to sales@adiscon.com. Please note that the download enables the free 30-day trial version if used without a key – so you can right now go ahead and evaluate it.