Step 4 – Setting up the Linux Clients
We still need to implement the Linux clients into our logging network. This could be Linux workstations or servers. Currently, rsyslog is already shipped with many Linux Distributions as the default syslog daemon already. Though, often a rather old version is installed (mostly v3), this will be sufficient for our current goals.
For our example we will use a Fedora system and alter the configuration accordingly. In the end, rsyslog should use the logs, that are logged locally and forward them via TCP to the central log server.
Please note: The example has been made with Fedora 13. Some steps may vary with other Linux distributions. Since there are so many possibilities, we cannot list them all. So we only concentrate on one version.
Step 4.1:
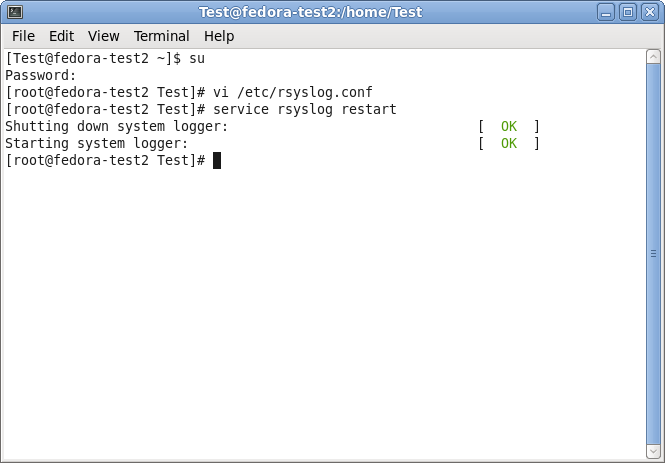
First of all, we need a terminal or command line and go into root mode with su. We do not need the root rights desperately, but it is a bit easier to achieve our goals.
Step 4.2
We need to alter the configuration accordingly. We will use the vi text-editor to do so. If you are not familiar with vi, you should consider getting some knowledge first with the vi man page.
You can find the default configuration file in
/etc/rsyslog.conf
This configuration file will be loaded once rsyslog is started.
Open the configuration file by the following command:
vi /etc/rsyslog.conf
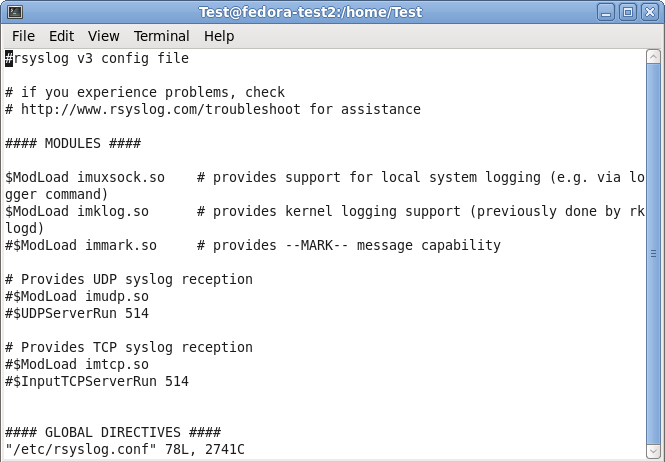
Your terminal should look like this:

Step 4.3
Under the header “#### MODULES ####” you can see the loaded modules. The ones we need are already loaded. For sending syslog, we do not need a extra module to be loaded. Basically, the imuxsock.so is listening to the local log socket and imklog.so provides the support for kernel logging. More is currently not needed.
When going further down in the configuration, we see parts that are called UDP and TCP syslog reception. They are uncommented. We don’t need them, so we leave them that way. As you can see, there is the command to load a module (introduced my $ModLoad) and then a specific command that is given to the module which tells it to run as a syslog server on a specific port.
Step 4.4
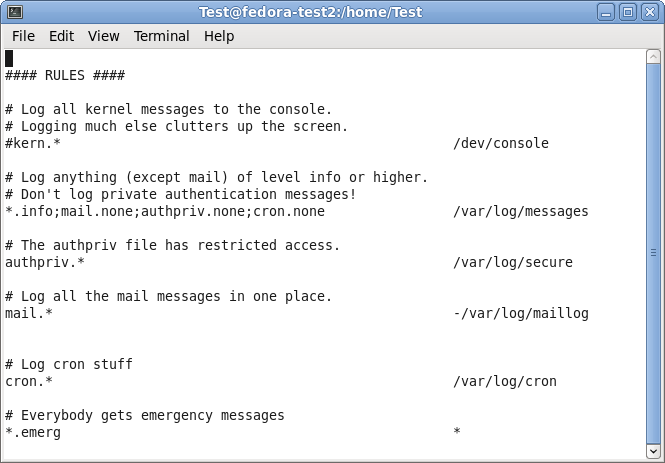
When scrolling further down in the configuration file, we will find the header “#### RULES ####“.

Here, some rules are defined about which logs are stored in which location. These rules have a basic format. Basically, this looks like this:
facility.severity storage_location
The facility roughly determines, what has generated the log message. The severity tells you, how urgent the message is. And the storage location determines, where to store the logs. In the default config, there are several rules for some important log files. They will all be stored in the folder /var/log.
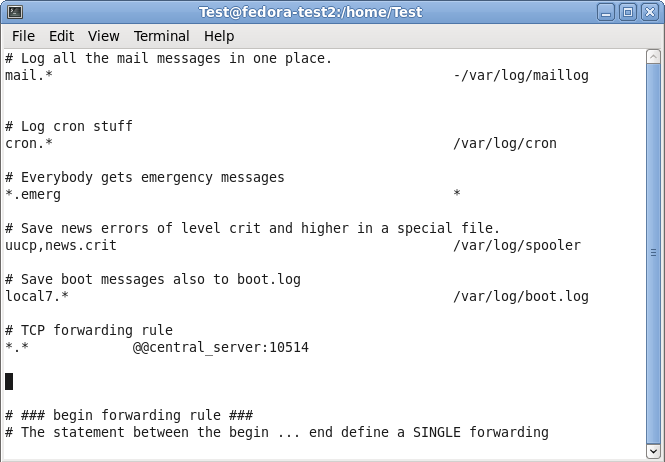
We need to add another rule for forwarding all log messages via TCP syslog. For now, go to the last of the rules and insert the following:
*.* @@central_server:10514
This rule means that all messages, no matter the facility or severity, will be forwarded via TCP to the central server on port 10514. We need to choose port 10514, since our central server will listen to TCP syslog on this port.
In the configuration file, this should look like this:

You can now save and quit vi.
Step 4.5
Now that we have altered our configuration according to our needs (which hasn’t been too much), we still have one more thing to do. We need to restart the service.
Now that we are back on the command line, we can easily use the following command:
service rsyslog restart
This will tell the rsyslog service to stop and start again. Thus, the configuration will be loaded with the changes we made.

Step 4 – finished
We are now finished with setting up rsyslog correctly. It will take all the logs it receives and forwards them to our central log server via TCP on port 10514. In addition to that, the default log rules still exist and will log messages to the local harddrive.
Though, there could be many more scenarios and configurations. We decided to keep it simple for a basic setup.