How To setup MonitorWare Console 2.0
Article created 2004-04-22 by
Tamsila-Q-Siddique.
After installation, once MonitorWare Console 2.0 is started, a dialog box similar to the one shown below would be displayed.
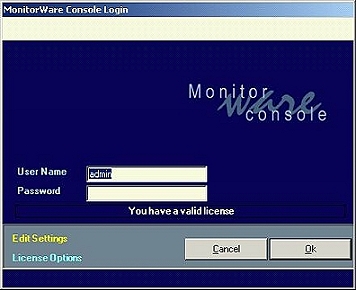
Figure 1: MonitorWare Console: Startup Dialog Box
The default user name is “admin” and password is nothing (as shown above).
Please note that the password is not the word “nothing” but actually it is
empty. Once a user enters into the application, this password can be changed.
At the bottom left corner of this dialog box, there are two links “Edit
Settings” and “License Options” The latter one is self-explanatory. If you
click on it, a license dialog appears where you can view or change your license
key and license name. There is also a link to order the product directly via
our online ordering system. Please note that MonitorWare Console has Modular
Licensing now. For getting more details on License, please see
License Options.

Figure 2: License options Dialogue Box
The other link in the login dialog, “Edit Settings” is used if the user wants to
change the database connection or other settings. Currently MonitorWare Console
supports Microsoft Access, SQL Server and MySQL. Once the above mentioned link
is clicked, a dialog box, as shown in figure, will pop up. Using this dialog
box, the user can change the underlying database or other settings.
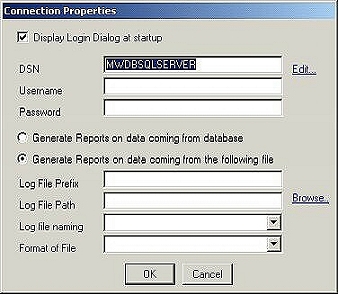
Figure 3: Dialog Box to change the underlying database or log file
Display Login Dialog at Startup
If checked the dialog box in figure 2 appears every time at the startup of the
MonitorWare Console application. If unchecked it will directly take you into
the Monitorware Console main application without displaying Figure 1.
DSN
This field is mandatory. This will point to the DSN of the database which will
store all the settings related to the MontitorWare Console . And later on this
will work as the underlying database to which MonitorWare Console is connected.
Edit
This options opens up a dialog box for creating the DSN. A dialog similar to
the one displayed opens where you can configure the settings according to your
environment.
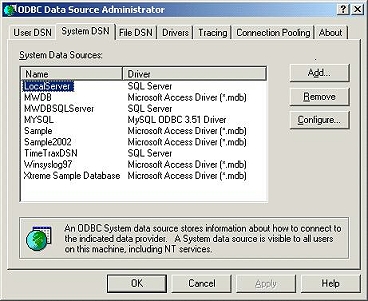
Figure 4: Dialog Box to create a DSN
Once the provider and the connection has been selected, Test Connection button
can test whether the connection with the specified database has been
established or not.
If the dialog box, as shown in figure 5, is displayed, it means that the
connection with the specified database has been set up properly and the user
can proceed further by pressing the OK button.
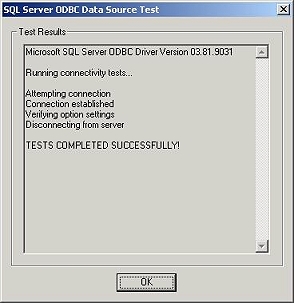
Figure 5: Success dialog
On the other hand, if a dialog box, as shown in figure 6 is displayed, it means
that there is something wrong and the connection with the mentioned database
has not been established.

Figure 6: Connection Failure Dialog Box
User Name
This option allows you to configure the User Name for connecting to the
database.
Password
This option allows you to configure the Password for connecting to the
database.
Note: If you had created the DSN with the “Windows Integerated Security”, then
you don’t need to give any user name or password.
Generate Reports on data coming from database
If this option is checked then in Windows Reporting Module and Pix Reporting
Module the reports would be generated on the basis of the underlying database.
We have provided this option so that if your main data on which you want to
generate reports is present in some other database, then you can give its DSN
over here.
Generate Reports on data coming from the following file
If this option is checked then in Windows Reporting Module and Pix Reporting
Module the reports would be generated on the basis of the configured log files
and not on any database
Log File Prefix
This option allows you to enter the prefix of the log files that have been
generated by our other products. MonitorWare Console will go in the specified
path and will look for files starting with this prefix.
Log File Path
This option allows you to enter the path of the folder which contain the log
files.
Browse
This option will open a dialog box from where you can select the path of the
log files. A dialog similar to the one below opens up.
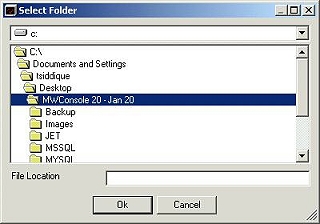
Figure 7: Browse – Select Folder Form
Log File Naming
This option allows you to select the naming convention for your log files.
Options available are:
1). Adiscon(LogPrefix-yyyy-mm-dd.log)
2). Single
Type of Parser
This option allows you to select the type of the parser used for parsing the
log files. Options available are:
1). Adiscon Parser for PIX
2). Adiscon Parser for XML
Note: If you are interested in PIX Reports then choose Adiscon Parser for PIX.
If you are interested in Windows Report then choose Adiscon Parser for XML.
OK
Saves the settings and quits the form.
Cancel
Quits the form without saving the settings.
Note: Please note that the settings for this dialog box are global settings. It
means that whenever you open up any report, it will be opened up with these
settings. You can overwrite these settings for each report on individual basis.
After saving the settings, click on OK. This will take you back to Figure 1.
After setting up the database or the log file, the OK button in the top most
figure will take the user inside the MonitorWare Console application.
There
could be following Six cases that can happen when starting MonitorWare Console.
Case 1: Your login and password is validated and is correct and there is
no update required for the underlying database that you set in Figure 3. If
this is the case, you will enter MonitorWare Console successfully and you will
see a form similar to the one shown below:
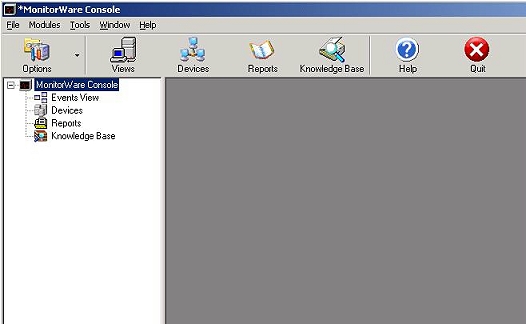
Figure 8: Main Form of MonitorWare Console
Case 2: Your login and password fails because you have either entered
wrong login and wrong password. If this is the case, you will stay on this
dialog box and it will ask you for the correct login and password again.
Following message box will be displayed to you:
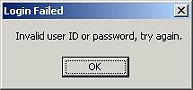
Figure 9: Login Fail Dialog
Case 3: Your database to which the DSN in figure 3 is pointing to is not
a valid DSN. By valid DSN, we mean that the DSN is not pointing to the database
that contains SystemEvents table. In this case, you will get the following
message box:

Figure 10: Invalid Database
Case 4: Your database to which the DSN in figure 3 is pointing to is
valid but you don’t have sufficient permissions to query it. In this case, once
again a dialog box similar to the one shown in figure 10 will be displayed.
Case 5: You don’t have sufficient permissions to write something to the
registry. In this case, again a dialog box complaining that you don’t have
sufficient permissions will be displayed to you.
Case 6: Your login and password is valid and your DSN is pointing to the
correct MonitorWare database but the database is old. MonitorWare Console will
display you the following message:
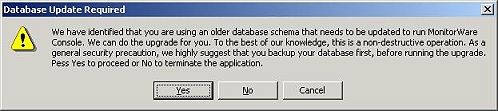
Figure 11: Database Update Required Dialog
If you click on Yes, the database will be updated (because console needs some
additional tables for house keeping). If you click on No or Cancel, the dialog
box will disappear taking you to the main dialog in figure 1.