How to send generic SNMP Traps with MonitorWare Agent.
Article created 2008-03-06 by Andre Lorbach.
This article will guide you to use MonitorWare Agent to generate generic SNMP Traps and send them to your SNMP management software. It is also possible to use WinSyslog instead of MonitorWare Agent in some cases, however this article will target the more powerful MonitorWare Agent. This article also requires at least MonitorWare Agent 5.2 or higher, and the custom ADISCON mibs which are included since MonitorWare Agent 5.2.
- You can download a preconfigured configuration from here, which you can import on your target system. The configuration sample will have comments for better understanding. The MonitorWare Agent Client can import the XML/REG configuration file by using the “Computer Menu”.
- To obtain the most recent custom ADISCON mib files, download these two files und put them into your mibs directory of your MonitorWare Agent installation.
ADISCON-MIB.txt
ADISCON-MONITORWARE-MIB.txt
As you know MonitorWare Agent has many different input sources (services) from which we can generate useful traps. In this article, I will show you how to generate a SNMP Trap from a received Syslog message, so we are going to use the Syslog Service.
Table of Contents
1. Configuring MonitorWare Agent
1.1 Download and Install MonitorWare Agent
1.2 Setup a Syslog Server in MonitorWare Agent
2. Configuring the SNMP Trap
2.1 Create SNMP Trap Action
2.2 Filtering Syslog messages (Optional)
2.3 Sending a test SNMP Trap
1. Configuring MonitorWare Agent
1.1 Download and Install MonitorWare Agent
| So if you haven’t done so already, go to www.mwagent.com and download the latest MonitorWare Agent Version. It is always recommended to use the latest Version of MonitorWare Agent. Once the Download is done, go ahead and install it. You may have to restart after installation, this depends on your System. |
1.2 Setup a Syslog Server in MonitorWare Agent
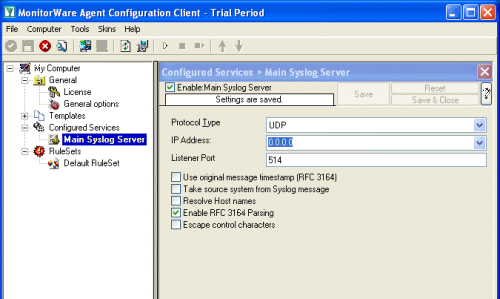 Start the MonitorWare Agent Client and skip the wizard on startup. Start the MonitorWare Agent Client and skip the wizard on startup.Then add a new Syslog Service called “Main Syslog Server”. We use default values here, Port 514 UDP. Leave the other Options as they are. |
2. Configuring the SNMP Trap
2.1 Create SNMP Trap Action
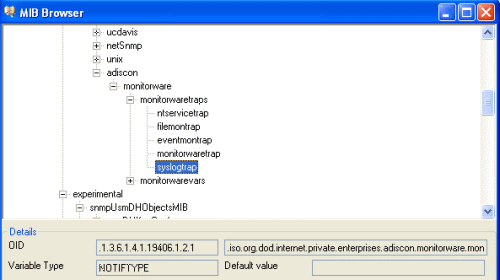 First add a new Rule under your Default RuleSet called SendTrap. Then add a Send SNMPTrap Action. The default values will already generate a generic “monitorwaretrap”, which is fine for most cases. But we are going to configure our own trap properties. So you have noticed that the Trap OID and the variable OID’s are represented numeric. Once you click on the Browser Button, the Client will automatically load and display the installed mibs. You can configure the Configuration Client to automatically load the mibs during each startup in the Client Options. So as you can see you have a few trap OID’s available, in this article we will use the syslogtrap OID which is “.1.3.6.1.4.1.19406.1.2.1”, or in human readable form “ADISCON-MONITORWARE-MIB::syslogtrap”. You can actually define the one or the other form as OID, both will work but the textual representation only if you have the ADISCON Mibs installed. |
| Back to Top |
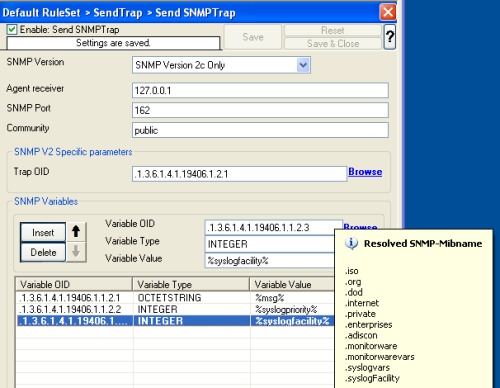 Now what you don’t see in the mib browser is the list of variables which are connected with the SNMP Trap. For the syslogtrap, we need syslogMsg, syslogSeverity and syslogFacility. Now what you don’t see in the mib browser is the list of variables which are connected with the SNMP Trap. For the syslogtrap, we need syslogMsg, syslogSeverity and syslogFacility.So we are going to remove the default configured variable, and add our own ones, for the message, syslog severity and syslog facility. Kindly add 3 new variables, you use the Mib Browser to select the suitable OID’s and also the correct variable values (See the screenshot for more). |
2.2 Filtering Syslog messages (Optional)
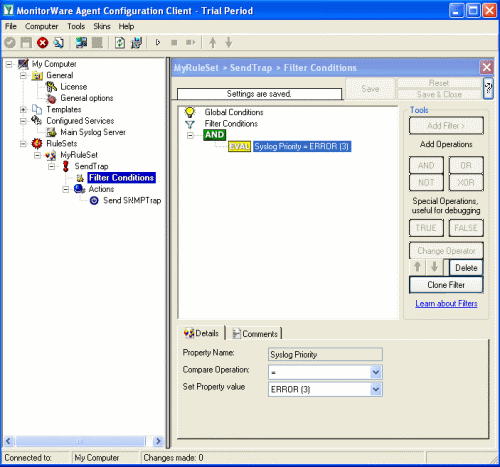 With our current setup, you would send one SNMP Trap for each incoming Syslog messages. But you may not want this, so you can optionally add some filters to reduce the number of outgoing SNMP Traps. With our current setup, you would send one SNMP Trap for each incoming Syslog messages. But you may not want this, so you can optionally add some filters to reduce the number of outgoing SNMP Traps.For example you can add a Syslog Severity (Priority) filter, so that only syslog error messages will be send as trap to your SNMP Manager. |
2.3 Sending a test SNMP Trap
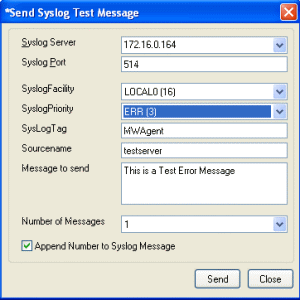 The easiest way to create a SNMP Trap for testing now is use the “Send Syslog Test Message” from the Configuration Client tools menu. If you configured filters, don’t forget to set the correct syslog facility and priority. |
| Back to Top |
To show you how the result looks like, here is the output of snmptrapd on a linux machine. There are many SNMP Manager utilities out there, you can even receive SNMP Traps with MonitorWare Agent itself if you like. 2008-03-07 15:18:31 172.16.0.122 [UDP: [172.16.0.122]:1119]: When you receive the trap with MonitorWare Agent, the message output will look like this: MonitorWare: source=”172.16.0.122″ community=”public” version=”Ver2″ variables: snmp_var_1 = ‘DISMAN-EVENT-MIB::sysUpTimeInstance: ‘Timeticks: (741870389) 85 days, 20:45:03.89” , snmp_var_2 = ‘SNMPv2-MIB::snmpTrapOID.0: ‘OID: ADISCON-MONITORWARE-MIB::syslogtrap” , snmp_var_3 = ‘ADISCON-MONITORWARE-MIB::syslogMsg: ‘STRING: “MWAgent: This is a Test Error MEssage no. 1″” , snmp_var_4 = ‘ADISCON-MONITORWARE-MIB::syslogSeverity: ‘INTEGER: error(3)” , snmp_var_5 = ‘ADISCON-MONITORWARE-MIB::syslogFacility: ‘INTEGER: local0(16)” |
Final Thoughts
I hope this article will help you solving your tasks or shows you the potential of MonitorWare Agent, and what you can archive with it. Feel free to email me for recommendations or questions. Of course, the outlined actions are only samples and you may do other things with them.