How to store custom properties of a log message in a database
Created 2006-03-27 by Timm Herget
This step-by-step guide describes a scenario where WinSyslog receives syslog data from a Fortigate firewall, parses the messages via post processing action and writes the custom parsed properties into a database.
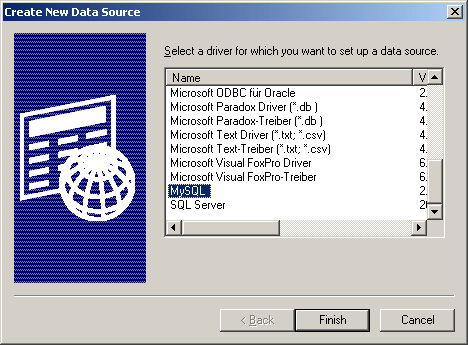
Step 1 – Creating the Syslog Server
First, please create the syslog server service by right clicking on “Running Services” and selecting “Add Service” and “Syslog Server” from the upcoming dropdpwn menu. After creating it, leave the settings default at this time:
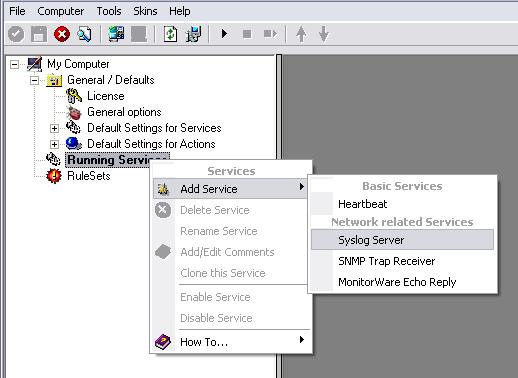
Figure1: creating the syslog server service
Step 2 – Creating the RuleSet
Now, right click on “RuleSets” and select “Add RuleSet”, type in a name for the ruleset and click on “Finish”:
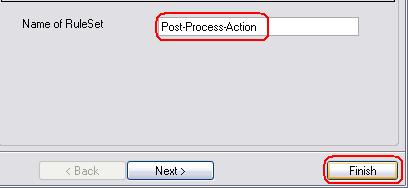
Figure2: creating the ruleset
Step 3 – Creating the Rule and its Action
Right click on the newly created RuleSet and select “Add Rule”, again type in a name and click on “Add Rule”. Now right click on “Actions”, select “Add Action” and then “Post-Process Event”:
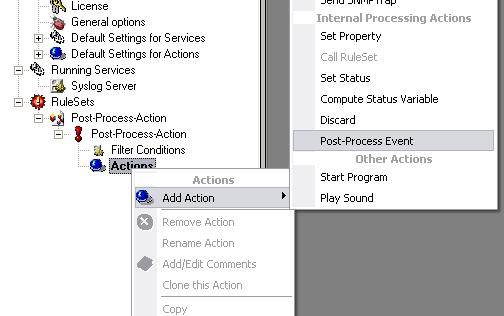
Figure3: creating the rule and action
Step 4 – The Syslog Data from the Fortigate Firewall
Below you can see a sample logfile of a Fortigate firewall. All properties are seperated by a space. The highlited properties we want to parse and log them to a databse in our step-by-step guide:
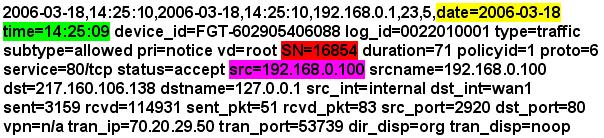
Figure4: the sample logfile
Step 5 – Configuring the PostProcess Action
Now we can start configuring the post process action. At first, please click on “Insert” to create the first property we want to configure for parsing. Change the property to “Filler” and the type to “UpTo” from the dropdownlists above. Also insert “date=” as value for this rule. In short this says: Take all the characters up to the begin of “date=” and drop them away, the cursor now stands at the first character of “date=” which is the “d”:

Figure5: first parsing rule
Again, click on “Insert”. Set the property to “Filler”, the type to “Character Match” and the value to “date=”. This will tell the parser to set the cursor to the first character after the string “date=” (Note: Character Match begins “searching to the end of string” from the begin of the current cursor position ONLY, so we need to jump to “date=” first via a UpTo rule (already done one step above)):
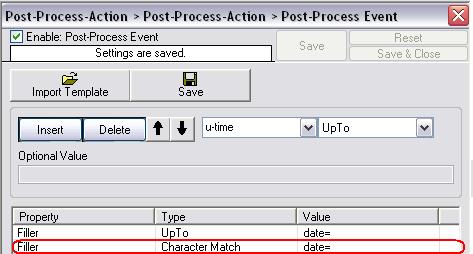
Figure6: second parsing rule
As I told above, the cursor of the parser now stands at the first character after “date=” which means we are now able to parse the first value from the logfile to a custom property: The date. To tell the parser to do so, please again click on “Insert”, name the property “u-date” or anything you want and set the type to “Word”. This will parse all characters from where the curser currently is up to the next space he will find. The date from the firewall syslog data is now stored into the property “u-date”.
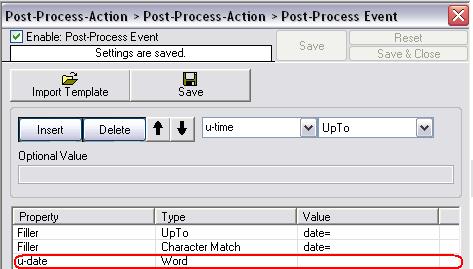
Figure7: third parsing rule
Insert the next rule, set the property to “Filler”, the type to “UpTo” and the value to “time=”. Again click “Insert”, set the property to “Filler”, the type to “Character Match” and the value to “time=”. These two new rules will take all characters from the current cursor position to the last one of the string “time=” and drop them away. The cursor now stands on the first character after “time=”.
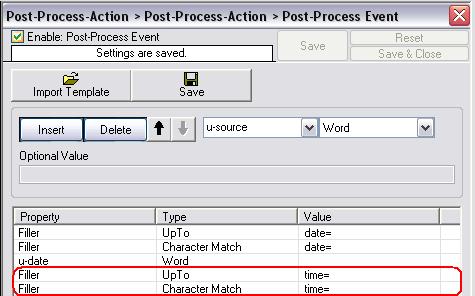
Figure8: fourth parsing rule
Again we have to insert a new rule, name it “u-time”, set the property to “UpTo” and the value to ” device_id=” (Note the space before device_id). This will write all the characters after “time=” until ” device_id=” into the property u-time. We now have the time too.
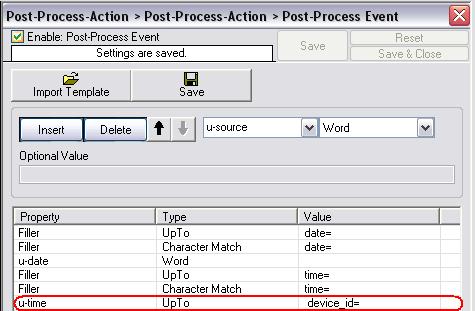
Figure9: fifth parsing rule
Insert the next two rules, for the first please set the property to “Filler”, the type to “UpTo” and the value to “SN=”. For the second please set the property to “Filler”, the type to “Character Match” and the value to “SN=” too. The cursor now stands on the first character after “SN=”.
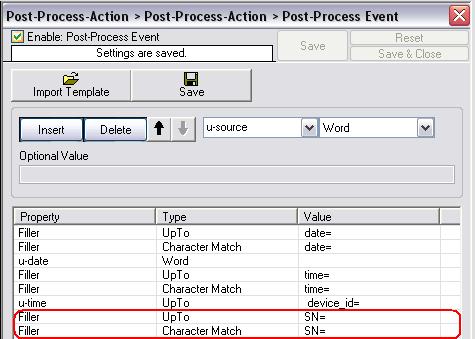
Figure10: sixth parsing rule
Now create the new rule named “u-SN” which indicades the SerialNumber property of the syslog message from the firewall, set the type to “Integer” and click on Save. This will parse all Integer characters from the current cursor position, until no more Integer character is found, into “u-SN”.

Figure11: seventh parsing rule
We got 3 out of 4 properties now from the syslog data, so one is still remaining. Here we go. Again create two rules, both as “Filler” and with value “src=”, the first of them of type “UpTo” and the other “Character Match”. The cursor now stands on the first character after “src=”.
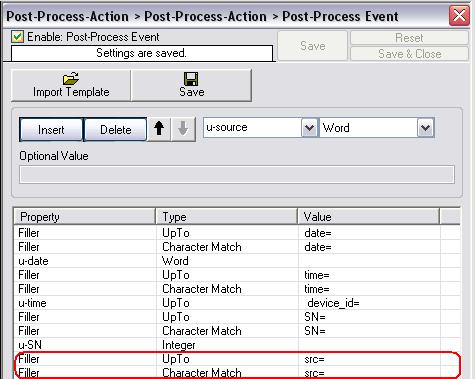
Figure12: eighth parsing rule
Now we only have to parse out the Source-IP which we will do via a Word type rule. Name the next Rule “u-source” and set the type to “Word”. This will parse all from the current cursor position until the next space into “u-source”. Now we got all four properties we wanted.
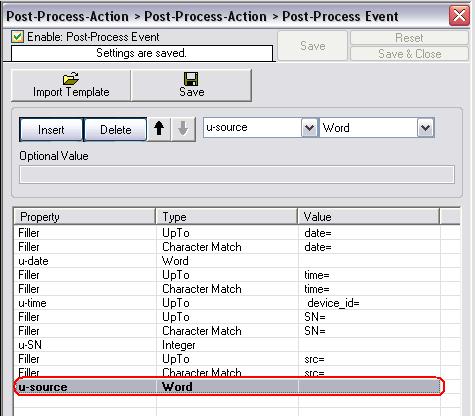
Figure13: last parsing rule
Step 6 – Creating the Database
Create a new Database via i.e. MySQL or MSSQL. In our sample we create it within MySQL and use PHPMyAdmin as DatabaseTool. First create the Database, we named it “step-by-step-dbsample” and then create a new table (“sample_properties”) with the following fieldnames:
- Date
- Time
- SN
- SourceMachine
The SQL Statements for this two steps should look like these:
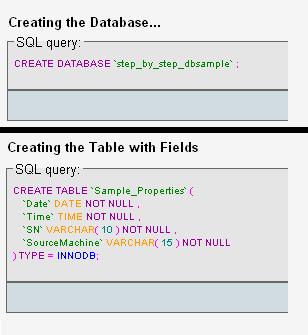
Figure14: creating the database
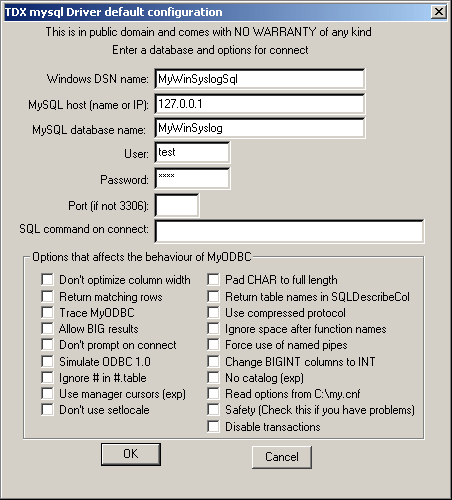
Step 7 – Creating the System DSN
Now we must create a system dsn for our newly created table, so that we can access it via our database logging action later. To do so, please go to “Start” -> “Control Panel” -> “Administrative Tools” -> “Data Sources (ODBC)”. Go to the tab “System DSN” and click “Add”. Select the Driver you need from the shown list, in our sample this is “MySQL ODBC 3.51 Driver”, and click “Finish”. Please then fill in the shown configuration form in that way, that it suits your database and click on “Test”. If the test succeeds you are done, click OK then. If it failed, please re-check your configuration data. Remember the configured “Source Name”.
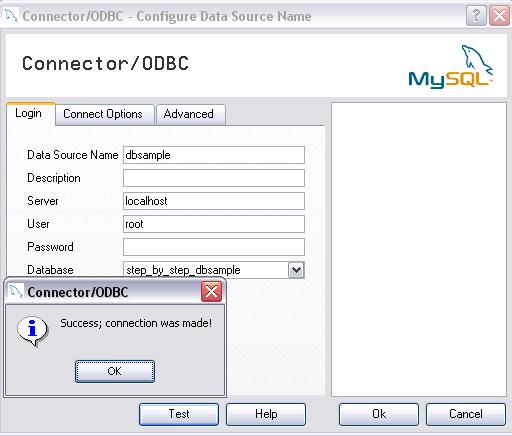
Figure15: testing system dsn
Step 8 – Configuring the Database Logging Action #1
Now please add a “Write to Database” action to your rule created at the beginning. To do so, expand the treeview of your “Post-Process-Action” rule in our ruleset, right click on “Actions” -> “Add Action” -> “Write to Database”. You will see the newly created Action like shown below:
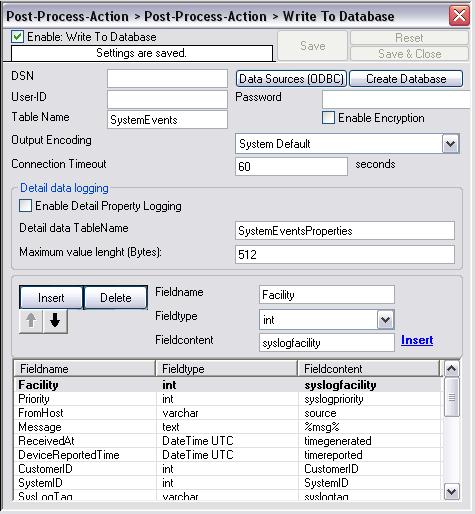
Figure16: database logging action #1
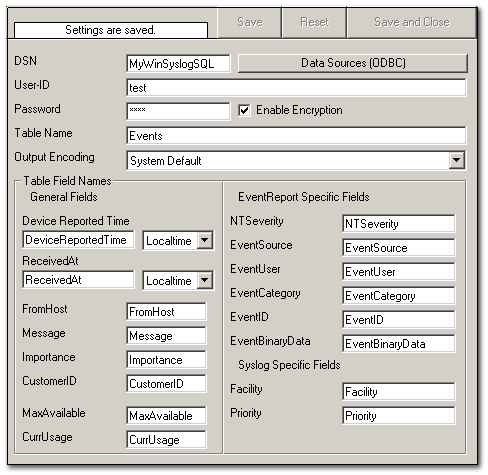
Step 9 – Configuring the Database Logging Action #2
First, type in your new system dsn name in the “DSN” field, then the suiting username and password. Change the “Table Name” to the name of the table we created in step 6. After this, delete all the configured fields in the data-grid-view. Select them and then click on the “Delete” Button. After these steps are done, it should look like the following screenshot:
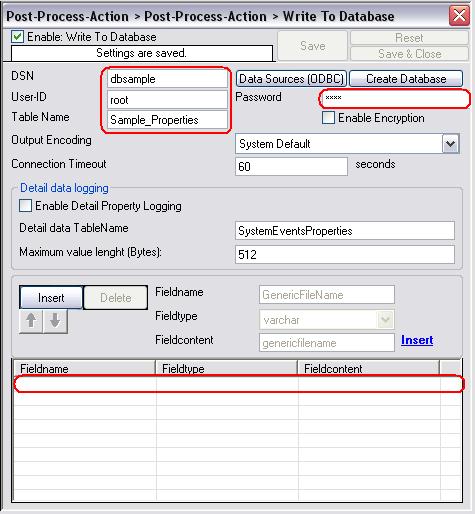
Figure17: database logging action #2
Step 10 – Configuring the Database Logging Action #3
Now we have to configure the database logging action in that way, that it writes our custom parsed properties into the fields of the new database/table. Please click on “Insert” first to create a new “row”. Type in the fieldname of our first field in the database/table. In our sample this is “Date”. Set the fieldname to “Date”, the fieldtype to “varchar” and the fieldcontent to “u-date” (where we parsed in the userdefined date before). Do the same now for the “Time” Field. Again click on “Insert”, set the fieldname to “Time”, the fieldtype to “varchar” and the fieldcontent to “u-time”. Repeat these steps for the two remaining fields with fieldtype “varchar” too. Click on “Save”:
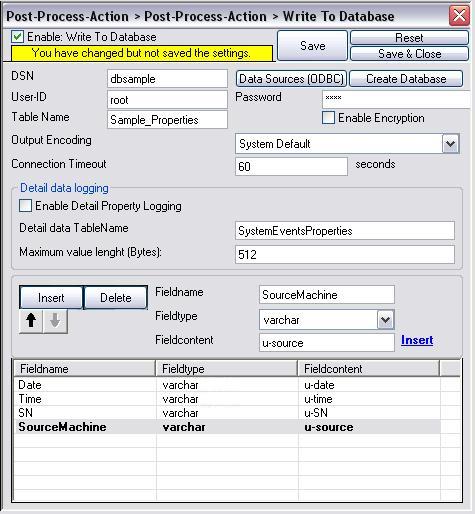
Figure18: database logging action #3
Step 11 – You are done
If you now take a look into your Database (in our sample MySQL via PHPMyAdmin) you will see that it worked fine and the message properties were correctly parsed and stored (in our sample i sent 3 of those messages).
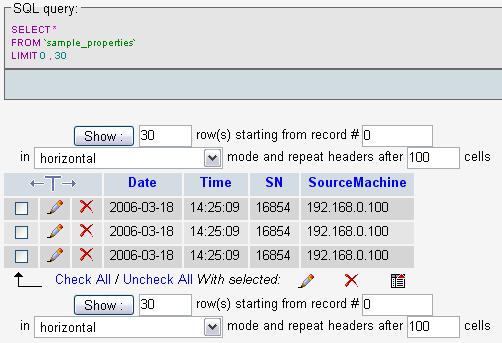
Figure19: The Result Please Note: There’s also an Article available which describes how the parsing of logfiles works, you can find it here.
Attachments: