Creating a simple Syslog Server

Step-By-Step Guides

Article created 2005-05-17 by Hamid Ali Raja.

Creating a simple Syslog Server

In this scenario, a simple Syslog server will be created. No other services are configured. The Syslog server will operate as a standard Syslog server on the default port of 514/UDP. All incoming data will be written to a single text file.

Step 1 – Defining a Rule Set for File Logging

The rule set specifies what action to carry out. You might be tempted to define the service first, but starting with the rule set makes things easier as it will be already present when the service is defined later and needs to be bound to a rule set.

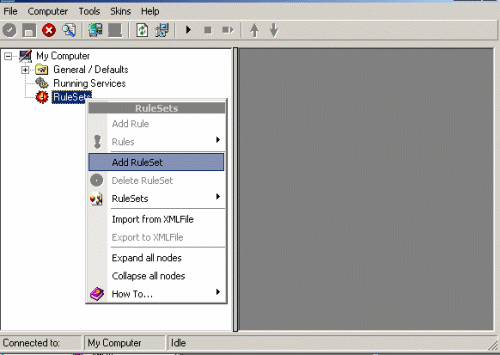
To define a new rule set, right click “Rules”. A pop up menu will appear. Select “Add Rule Set” from this menu. On screen, it looks as follows:

Then,a wizard starts. Change the name of the rule set to whatever name you like. We will use “Write Syslog Log File” in this example. The screen looks as follows:

Click”Next”. A new wizard page appears:

There,select file logging. Do not select any other options for this example. Also, leave the “Create a Rule for each of the following actions” setting selected. Click “Next”.
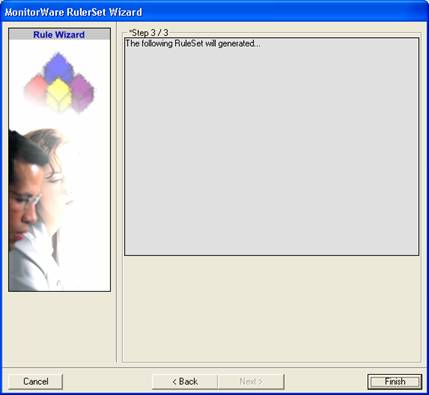
This is just a confirmation page. Click “Finish” to create the rule set.

The wizard closes and the client shows a newly created rule set.

As you can see, the “Write Syslog Log File” rule set is now present. Please expand it in the tree view until you have the following screen contents:

As you can see, we have a “File Logging” action configured. We will review the settings just for your information. Click on “Filter Conditions”:

As you can see, none of the filter conditions are enabled. This means that the all information units (incoming messages) will be matched by these filter conditions. As such, the rules for the “File Logging” action will always be carried out.

Please note that this also means that all Syslog priorities and facilities will be written to the same file.

Now let us check the “File Logging” action itself. Please select it in the tree view:

As you can see, it has been created with the default parameters. Each day, a file will be created in the C:\temp directory and its base name will be MonitorWare. It will include all information items in the file.

If you would like to store it into a separate directory or change the file name, here is the place to do it. Important: please make sure the directory you specify exists! If it does not yet exist, please create it before you start the service. If the directory does not exist, the service is not able to store any files.

In our example, we would like to save it to “c:\logfiles” with a base name of “Syslog”. Therefore, we change these properties:

After doing so, you will notice the yellow text on top of the window. It tells you that the configuration changes have not yet been applied. To do so, press “save”.
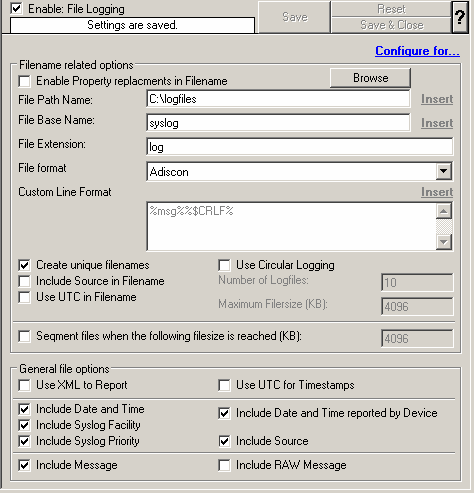
Now you have a workable rule set for logging incoming messages to a text file.

Step 2 – Create a Syslog Server Service

Now we need to define a Syslog server service. A Syslog server is also sometimes called a “Syslog daemon”, “Syslogd” or “Syslog listener”. It is the process that receives incoming messages.

To define it, right click on “Services”, then select “Add Service” and the “Syslog Server”:

Once you have done so, a new wizard starts:

Again, you can use either the default name or any one you like. We will use “My Syslog Server” in this example. Leave the “Use default settings” selected and press “Next”:
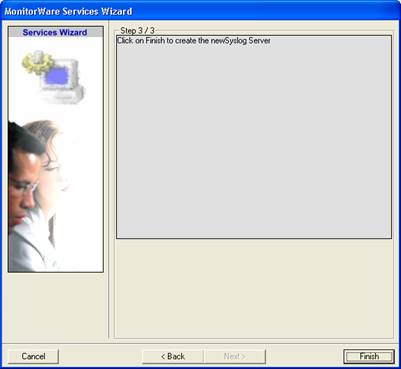
As we have used the default, the wizard will immediately proceed with step 3, the confirmation page. Press “Finish” to create the service. The wizard completes and returns to the configuration client. There, you will see the newly created service beneath the “Services” part of the tree view:
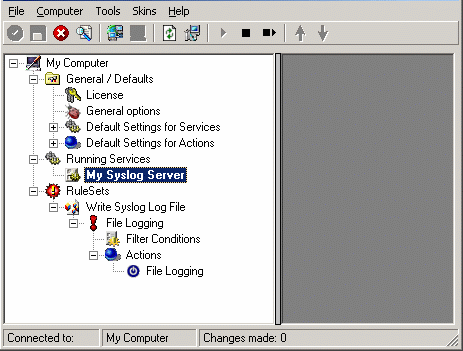
To check its parameters, select it:
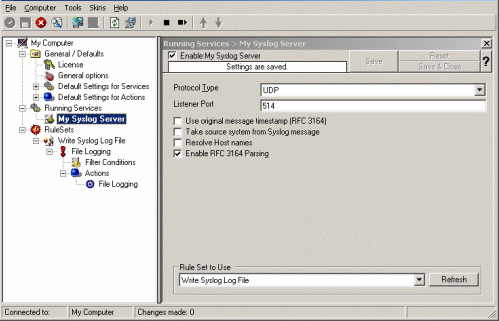
As you can see, the service has been created with the default parameters. As such, it operates as a RFC compliant standard Syslog server.

Please note that the “Write Syslog Log File” has been automatically assigned as the rule set to use. This is the case because we already created it and it is the only rule set. By default, the wizard will always assign the first rule set visible in the tree view to new services. If another one is to be used, you need to change it to the correct one here in the service definition.

Also, note that the wizard uses the default properties from the “Service Defaults”. Obviously, if these are changed, the default properties for new services will differ.

This procedure completes the configuration of the Syslog server.

Step 3 – (Re-) Start the Service

Application cannot dynamically read changed configurations. As such, it needs to be restarted after such changes. In our example, the service was not yet started, so we simply need to start it. If it’s already running, you need to restart it.

Service control can be done with both the respective operating system capabilities (like service manager MMC) or with the configuration client. These are shown in the red surrounded area in the following screen shot:

The buttons resemble Windows service manager – start, stop and restart. In this example, stop and restart are grayed out because the service is not running.

After service restart, the new definitions are active and application is ready to accept and store incoming messages.

Step 4 – Configure your Syslog-Enabled Devices

Even though application is now ready, it can only receive messages if some devices send them. Remember, Syslog is a protocol where the server is passively waiting for incoming messages. As long as no device sends message, the Syslog server will not log anything.

Since there are a large variety of devices, we unfortunately cannot provide device specific instructions. However, almost all devices need to be configured with their specific configuration tool. Typically, only two settings need to be made: one to activate Syslog messages at all and one with the Syslog server IP address or name.

For some devices, we have step-by-step guides. Please read “Sample Syslog Device Configurations” for further details.

Remember: the computer running application now acts as a Syslog server. As such, you need to find out its IP address or name and supply it to the device as the Syslog server. Please note that not all devices can operate with computer names. Use the IP address, if in doubt.
A complete step by step guide on setting up SETP action

How To setup an SETP Action

Article created 2005-05-05 by Hamid Ali raja.

1.
Start the Application.

2.
Select your language – in this example, I use English, so it might be a good idea to
choose English even if that is not your preference. You can change it any time
later, but using English makes it much easier to follow this guide here.

3.
Then define a new rule set, right click
"Rules". A pop up menu will appear. Select "Add Rule Set" from this
menu. On screen, it looks as follows:

4.
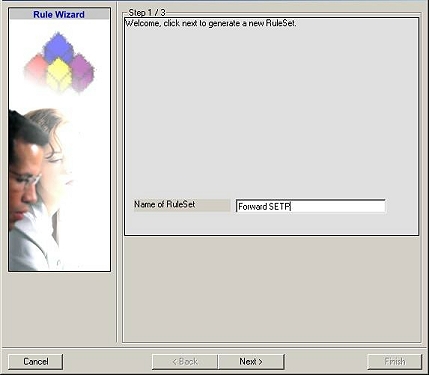
Then, a wizard starts. Change the name of the
rule to whatever name you like. We will use "Forward SETP" in this example.
The screen looks as follow:


Click "Next". A new wizard page appears.

5.
Select only Forward by SETP. Do not select any
other options for this sample. Also, leave the "Create a Rule for each of the
following actions" setting selected. Click "Next". You will see a
confirmation page. Click "Finish" to create the rule set.

6.
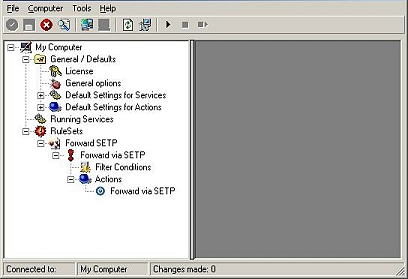
As you can see, the new Rule Set "Forward
SETP" is present. Please expand it in the tree view until the action level of
the "Forward SETP" Rule and select the "Forward by SETP" action to
configure.

7.
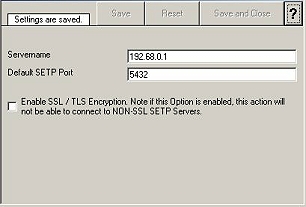
Now, type the IP address or host name of our
central hub server in the "Servername" field:

8.
Make sure you
press the “Save” button – otherwise your changes will not be applied.

Support for Mass Rollouts

Support for Mass Rollouts

A major update to this article was done on 2005-05-04 by Rainer Gerhards.

A mass rollout in the scope of this topic is any case where the product is rolled out to more than 5 to 10 machines and this rollout is to be automatted. This is described first in this article. A special case may also be where remote offices shall receive exact same copies of the product (and configuration settings) but where some minimal operator intervention is acceptable. This is described in the second half of this article.

The common thing among mass rollouts is that the effort required to set up the files for unattended distribution of the configuration file and poduct executable is less than doing the tasks manually. For less than 5 systems, it is often more economical to repeat the configuration on each machine – but this depends on the number of rules and their complexity. Please note that you can also export and re-import configuration settings, so a hybrid solution may be the best when a lower number of machines is to be installed (normal interactive setup plus import of pre-created configuration settings).

Before considering a mass rollout, be sure to read “The MonitorWare Agent Service“. This covers necessary background information and most importantly the command line switches.

Automatted Rollout

The basic idea behind a mass rollout is to create the intended configuration on a master (or baseline) system. This system holds the complete configuration that is later to be applied to all other systems. Once that is system is fully configured, the configuration will be transferred to all others.

The actual transfer is done with simple operating system tools. The complete configuration is stored in the the registry. Thus, it can be exported to a file. This can be done with the client. In the menu, select “Computer”, then select “Export Settings to Registry File”. A new dialog comes up where the file name can be specified. Once this is done, the specified file contains an exact snapshot of that machine’s configuration.

This snapshot can then be copied to all other machines and put into their registries with the help of regedit.exe.

An example batch file to install the product and configuration on the “other” servers might be:

 copy \\server\share\mwagent.exe c:\some-local-dir
 copy \\server\share\libeay32.dll c:\some-local-dir
 copy \\server\share\ssleay32.dll c:\some-local-dir
 copy \\server\share\mwagent.pem c:\some-local-dir
 cd \some-local-dir
 mwagent –i
 regedit \\server\share\configParms.reg

The file “configParams.reg” would be the registry file that had been exported with the configuration client.

Of course, the batch file could also operate off a CD – a good example for DMZ systems which might not have Windows networking connectivity to a home server.

Please note that the above batch file fully installs the product – there is no need to run the setup program at all. All that is needed to distribute the service is the mwagent.exe and its two helper dlls, which are the core service. For a locked-down environment, this also means there is no need to allow incoming connections over Windows RPC or NETBIOS for an engine only install.

Please also note that, in the example above, “c:\some-local-dir” actually is the directory where the product is being installed. The “mwagent -i” does not copy any files – it assumes they are already at their final location. All “mwagent -i” does is to create the necessary entries in the system registry so the MonitorWare Agent is a registered system service.

Subsidary Rollout with consistent Configuration

You can use engine-only install also if you would like to distribute a standadized installation to subsidary administrators. Here, the goal is not have everything done fully automatic, but to ensure that each local administrator can set up a consistent environment with minimal effort.

You can use the following procedure to do this:

  1. Do a complete install on one machine.
  2. Configure that installation the way you want it.
  3. Create a .reg file of this configuration (via the client program)
  4. Copy mwagent.exe, mwagent.pem, libeay32.dll, ssleay32.dll and the .reg file that you created to a CD (for example). Take the thre executable files from the install directory of the complete install done in step 1 (there is no specific engine-only download available).
  5. Distribute the CD.
  6. Have the users create a directory where they copy all four files. This directory is where the product is installed in – it may be advisable to require a consistent name (form an admin point of view – the product does not require this).
  7. Have the users run “mwagent -i” from that directory. It will create the necessary registry entries so that the product becomes a registered service.
  8. Have the users double-click on the .reg file to install the pre-configured parameters (step 3).
  9. Either reboot the machine (neither required nor recommend) or start the service (via the Windows “Servcies” manager or the “net start” command)

Important: The directory created in step 6 actually is the program directory. Do not delete this directory or the files contained in it once you are finished. If you would do, this would disable the product (no program files would be left on the system).

If you need to update an engine-only installation, you will probably only upgrade the master installation and then distribute the new exe files and configuration in the same way you distributed the original version. Please note that it is not necessary to uninstall the application first for an upgrade – at least not as long as the local install directory remains the same. It is, however, vital to stop the service, as otherwise the files can not be overwritten.

How to setup MonitorWare Agent, WinSyslog and EventReporter?

How to setup MonitorWare Agent, WinSyslog and EventReporter?

Article created 2004-02-27 by Tamsila-Q-Siddique.
Article updated 2004-04-28 by Tamsila-Q-Siddique.
Article updated 2005-05-04 by Hamid Ali Raja.

WinSyslog and EventReporter are subset of MonitorWare Agent. This means that there would be no difference in the set up creation.You need administrative privileges on each of the machines. This is required both for installation and configuration. Make sure you log on with a sufficiently privileged user account.

  1. Download your desired software from: WinSyslog, EventReporter or MonitorWare Agent
  2. After downloading the software start the client application.
  3. Select your language from English, Deutsch or Japanese.
  4. Switch to the “License” tab.
  5. Enter the License Name and License Key into the respective fields.
  6. Click “OK”.

This process will switch the product from the trial version to the licensed one. Be sure to enter the license name and license key exactly as provided by us. Remember that the license key information is case-sensitive. Documentation on how to enter the license key is in the manual. If you still encounter problems, please go throught this License Information FAQ.

Note: If you aren’t licensed user, a free, full-featured 30-days trial period is available for evaluation purposes.

Related Material – MonitorWare Agent, WinSyslog and EventReporter are installed as a “System Service” during setup. So the service operates in the background while your computer is running.

You can also opt for “Engine Only” installation of MonitorWare Agent, WinSyslog and EventReporter. The following URL’s will guide you through the “Engine Only” installation.

For MonitorWare Agent:
http://www.monitorware.com/common/en/References/mwagent-service30.php

For WinSyslog:
http://www.monitorware.com/common/en/References/ws-service60.php

For EventReporter:
http://www.monitorware.com/common/en/References/er-service-70.php