Monitor a SNMP Device using MonitorWare Agent
Article created 2008-02-26 by Andre Lorbach.
This article will help you to monitor SNMP capable devices using the new SNMP Monitor Service of MonitorWare Agent. There are many devices out there which support SNMP, and can also be queried for information’s using SNMP GET. We will use SNMP GET to monitor a device, if we get a respond, the device is most likely running. If we do not get a response, the device may be offline or is powered off. We will use the Send Email Action to generate Alert Emails in case of that a monitored device is not responding anymore.
- You can download a preconfigured configuration from here, which you can import on your target system. The configuration sample will have comments for better understanding. The MonitorWare Agent Client can import the XML/REG configuration file by using the “Computer Menu”.
As I said earlier there are many devices out there which do support SNMP like printers, routers, managed switches, linux / windows server and so on. In this article I will show you how to setup the SNMP Monitor Service to monitor a HP LaserJet 4000 laser printer.
Table of Contents
1. SNMP Device (Printer) Setup
1.1 Configuring the Printer
2. Configuring MonitorWare Agent
2.1 Download and Install MonitorWare Agent
2.2 Setup Basics in MonitorWare Agent
2.3 Create a Forwarding Rule for the InterActive SyslogViewer (Optional!)
2.4 Create an Email alert
2.5 Configure Filters for the Email Alert
Final Thoughts
1. SNMP Device (Printer) Setup
1.1 Configuring the Printer
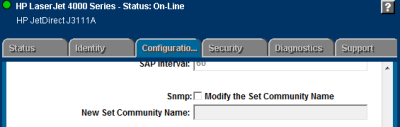 As far as I know this printer does not need any special setting to have SNMP support enabled. So by default SNMP is enabled, and it is possible to overwrite the used snmp community name. However for this article I will not modify this setting. The only thing we will need for this device is it’s IP Address which is 172.16.0.15. |
| Back to Top |
2. Configuring MonitorWare Agent
2.1 Download and Install MonitorWare Agent
| So if you haven’t done so already, go to www.mwagent.com and download the latest MonitorWare Agent Version. It is always recommended to use the latest Version of MonitorWare Agent. Once the Download is done, go ahead and install it. You may have to restart after installation, this depends on your System. (This article will only work with MonitorWare Agent 5.2 or higher). |
2.2 Setup Basics in MonitorWare Agent
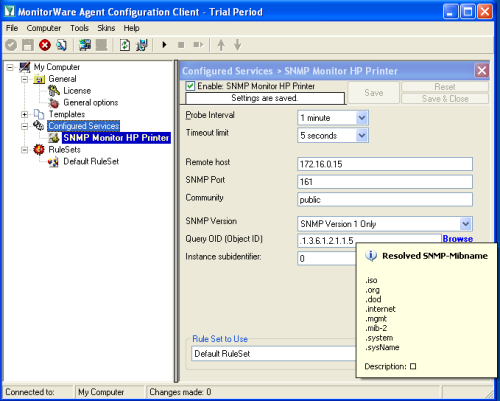 Start the MonitorWare Agent Client and skip the wizard on startup. First we create new “SNMP Monitor” Service by right clicking the Configured Services node and going to the Add Service menu. Insert the IP of the device you want to monitor in the remote host field. You can leave the default values for the other configuration options, they will work fine for most devices. The Query OID I use in this sample will query the system name of the device. However there are several other variables you pick for monitoring such as:
Other OID’s might also be available, it depends on device you are monitoring. There is also a Instance subidentifier option available. I recommend to leave this value to 0, it is only useful if you want to query a OID which contains multiple data. |
| Back to Top |
2.3 Create a Forwarding Rule for the InterActive SyslogViewer (Optional!)
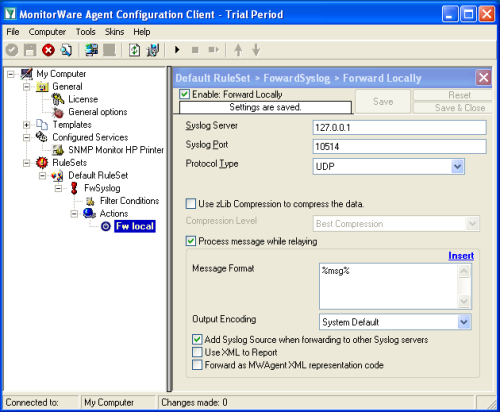 This is an optional step, only useful for testing and debugging the SNMP Monitor. You can disable the Action of this rule later if you want. As we are using the UDP protocol to forward syslog messages locally, it doesn’t really matter. So first of all create a new Rule called “FwSyslog” and add a new Forward Syslog Action. The Syslog Server is 127.0.0.1 and the syslog port is 10514. See the screenshot for more details. |
2.4 Create an Email alert
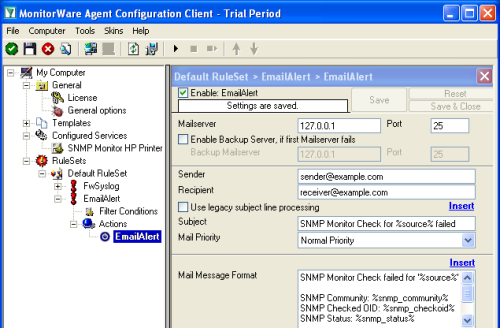 The best option to get alerted is by email. So we create another rule called EmailAlert and add a Forward Email Action. Please fill Sender, Recipient and Mailserver configuration yourself. Use the following text as mail subject: Use the following text as message format: |
2.5 Configure Filters for the Email Alert
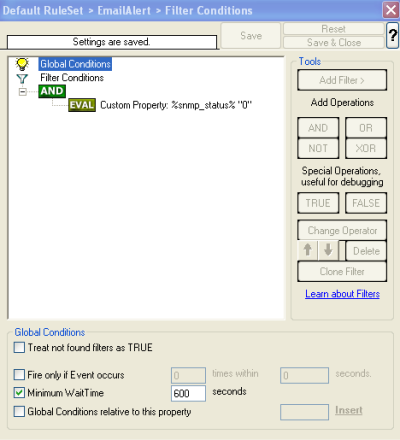 We were not finished yet ;). We need to configure some filters, otherwise you would get one Email for each SNMP Monitor check, even if successfully. So add a new Custom Property filter, with the property name “%snmp_status%”. Use the compare operation “not equal” and Property Valur of “0”. So this means the Actions in this rule will be fired whenever the status is not 0, and every status which is not 0 means there was an error. To avoid email flooding, set the Minimum WaitTime to 600 seconds. This means it doesn’t matter how failures are generated, in 10 minutes there will only be one email alert. |
Final Thoughts
I hope this article will help you solving your tasks or shows you the potential of MonitorWare Agent, and what you can archive with it. Feel free to email me for recommendations or questions. Of course, the outlined actions are only samples and you may do other things with them, for example store log records to a database table instead of storing them to file.