2011-02-28 MonitorWare Agent 7.2b released

Adiscon is proud to announce the 7.2b release of MonitorWare Agent. This is a bugfixing release.

This release only consists of bugfixes:

  • Fixed an issue with percent characters in EventLog Monitor V1 and V2.
  • Fixed an RFC 2822 compatibility issue with hours which could cause problems displaying the correct time in some mailclients.
  • Corrected support for the OutputEncoding Option in ODBC and OLEDB Action related to character fields.
  • Fixed encoding detection for UTF8 encoded Syslog messages, where the BOM starts after the RFC 5424 Syslogheader.

For more details read the version history

Version 7.2b is a free download. Customers with existing 6.x keys can contact our Sales department for upgrade prices. If you have a valid Upgrade Insurance ID, you can request a free new key by sending your Upgrade Insurance ID to sales@adiscon.com. Please note that the download enables the free 30-day trial version if used without a key – so you can right now go ahead and evaluate it.

How can I get rid of control characters and linefeeds?

How can I get rid of control characters and linefeeds?

Created 2011-02-17 by Florian Riedl

Some syslog sources create strange message formats. In many cases, this is of no concern. In other cases, this can disturb reviewing logs. For example, if you are using the InterActive SyslogViewer, control characters in the message create strange placeholder characters (usually this looks like a box, because Windows cannot display those control characters. This is disturbing the view of course and makes it hard to read the log message correctly. This can happen with devices like firewalls or something similar, but with Windows Events as well. Here is an example of the InterActive SyslogViewer struggling with tab characters in the log message:

Control Characters in InterActive SyslogViewer
Click to enlarge.

In this case, we want to remove the control characters from the messages. Therefore we have to use the property replacer on the message property. With the property replacer, we can easily do that. Basically, we want to replace a control character with a space. In the best case, we now have a space where the control character was, but usually a control character has already a space before and/or behind it. But we do not want to have multiple spaces in the middle of a line, so we need to compress them as well.

Now that we have made the decission about what we have to do, we can create the property replacer command. We take the property for the message:

%msg%

This is just the property, but not the property replacer yet. The property replacer looks basically like this:

%msg:::%

Usually, this is used to substract a substring from a string with FromPos and ToPos. Not in this case, but here is a short description anyway. After the first colon comes the FromPos parameter and after the second colon comes ToPos. Now after the third colon, this is important for us now, come the options. Since we need to replace the control characters we need the option spacecc and for compressing space we use compressspace. The property replacer string should look like this now:

%msg:::spacecc,compressspace%

As you can see, multiple options are comma separated.

But where do we use this property replacer now? You can use it in nearly every action that is available. Here is an example of a “Forward via Syslog” Action.

Control Characters 01

In the field Message Format you can see the property %msg%. This needs to be replaced by our property replacer. In the end, it should look like this:

Control Characters 02

Now, all the control characters like tabs or linefeeds will be replaced by a space and multiple spaces will be compressed to a single space.

For more information about properties and the property replacer, please refer to the manual at the chapter for Event Properties in the Reference section.

MonitorWare Agent sending to the Microsoft Message Queue

Created 2011-02-03 by Florian Riedl

With version 8.0 of MonitorWare Agent we introduced a new action called “Send MSQueue”. This action allows MonitorWare Agent Professional and Enterprise to forward the received messages to the Microsoft Message Queue. This action is also available in EventReporter Professional (v12.0) and WinSyslog Professional and Enterprise (v11.0).

To get this new functionality working, you need to do some work in advance. Basically, you need to have the Microsoft Message Queue functionality installed on both the system you want to use MonitorWare Agent on, as well as the system where you want to have the messages being forwarded to. If both systems are the same, the process is can be shortened a bit. But our assumption is, that this is not the case.

Step 1

The server which should receive the messages from the message queue needs the most attention here. We will show how to configure it with the example of a Windows 2008 server. These steps should be similar for a Windows 2003 Server as well.

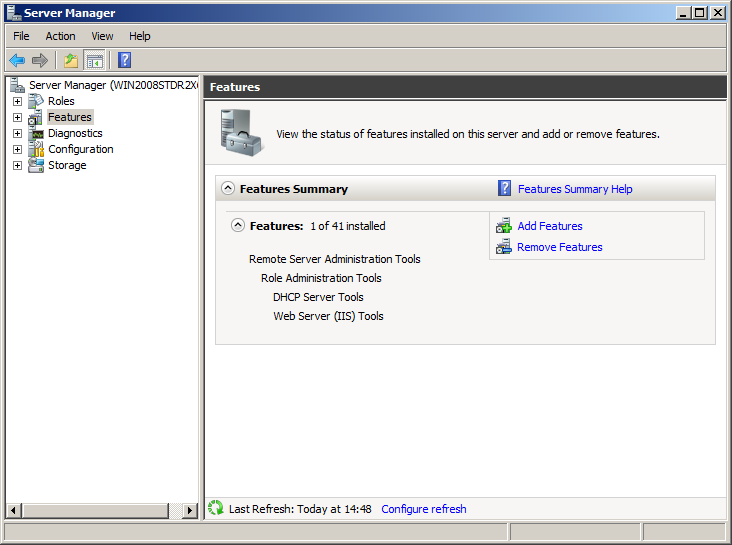
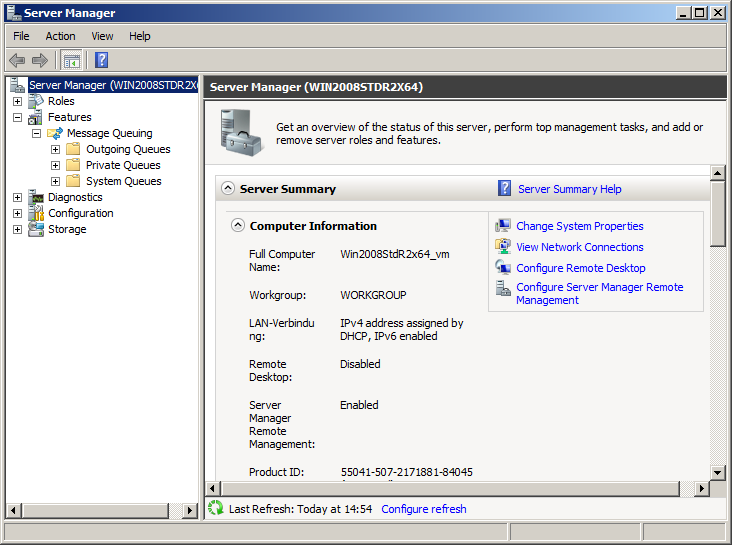
Go to the Server Manager. On the left hand side, you find everything, that is necessary for the server. Go to “Features”. Then click in the right pane on “Add Features”.

Message Queue 01

You will get a list of features you can install. Right now, we are only interested in the Message Queueing feature. Mark it to be installed. You could expand the view, but for now the default options are sufficient (depending on your needs you might want to install some of the other options). When you have marked Message Queuing, click on “Next”.

Message Queue 03

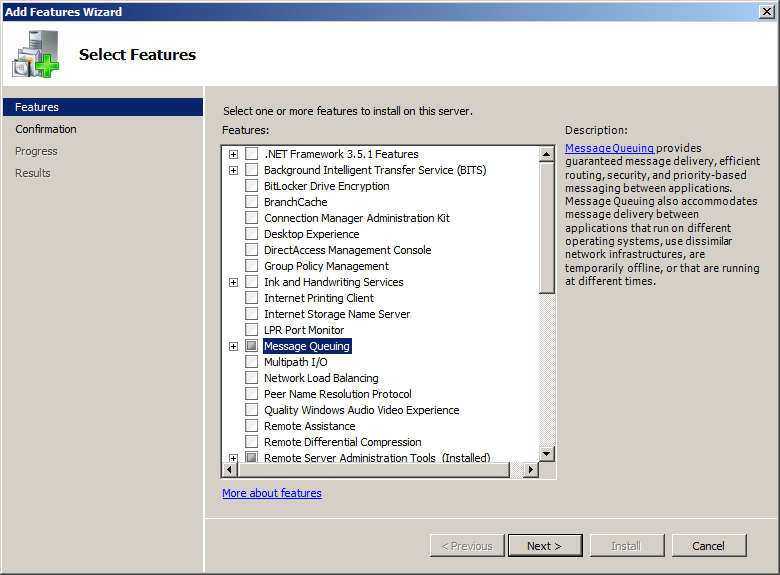
You will be shown the Features to be installed. The screenshot shows only the Message-Queuing Service, since this is the only feature we want to install right now. Click on “Install”.

Message Queue 04

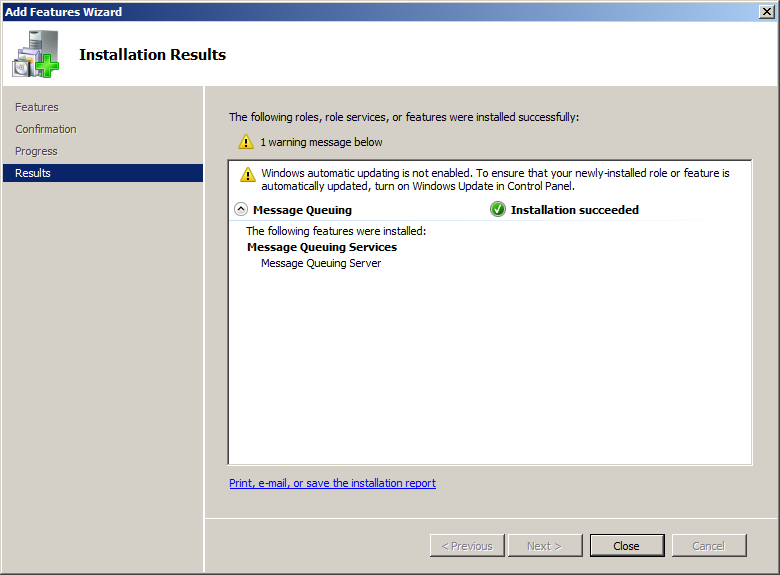
The feature will be installed now. When the results are shown, it should say that the installation was successful. Click on “Close” now.

Message Queue 05

In your Server-Manager you should now find Message Queuing und Features. Expand the view completely. You will see the different queues now.

Message Queue 06

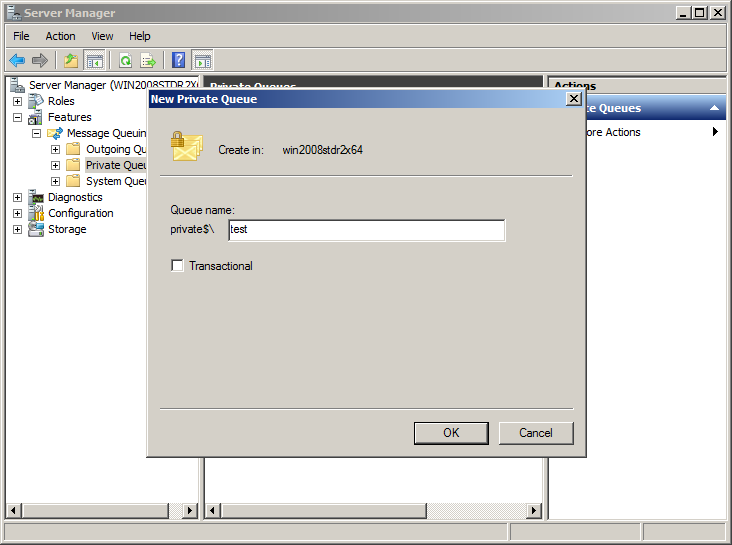
Most interesting to us are the privat queues. It will hold the received messages later. But for that, we need to create a queue first. Right-click on the private queues. In the context menu go to “New” and then on “privat queue”. A window pops up, where we can define a name for it. Choose a name and click on “Ok”.

Message Queue 08

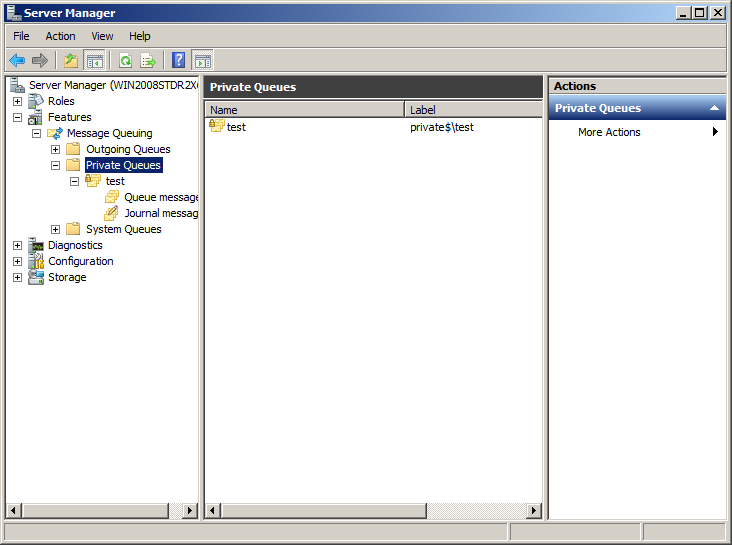
You can see the newly created queue named test on the screenshot. By expanding the view further, you will find more sub-folders like queued messages and journal messages. We will later find the messages in queued messages.

Message Queue 09

That’s it for now. The server is now ready to receive messages for the message queue.

Step 2

Now we take care of the client setup. We need to setup the message queue feature here as well. In this example we show how to do that on a Windows XP machine. The process should be similar on a Windows Vista or Windows 7 machine.

Go into the Control Panel and open “Add or Remove Programs”. Click on the “Add/Remove Windows Components” on the left side. The Windows Components Wizard will open and it will show you a list of additional programs and services. Scroll down until you find the entry “Message Queuing”.

Message Queue 10

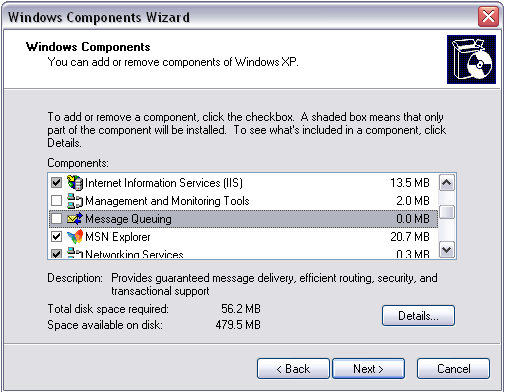
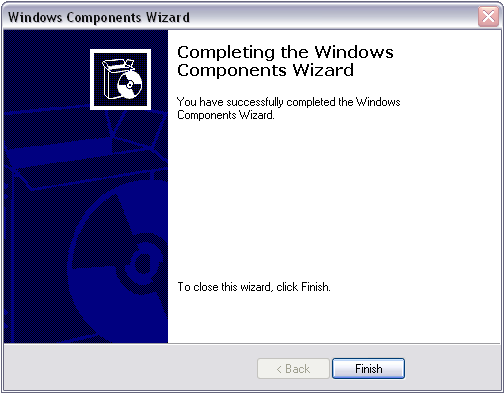
Mark it for installation and click “Next”. The components for Message Queuing will now be installed. When it is finished, the installation wizard will tell you, that you have successfully completed the installation. Click on “Finish”. You can close the “Add or Remove Programs” window as well.

Message Queue 11

That was pretty quick. We do not have to do any extra configuration here. We just needed to install these components for the API to be available, so MonitorWare Agent can use it.

Step 3

We can now configure MonitorWare Agent to send to the Message Queue. We assume, that a basic configuration for MonitorWare Agent is already available and it is configured as a syslog receiver with a ready ruleset.

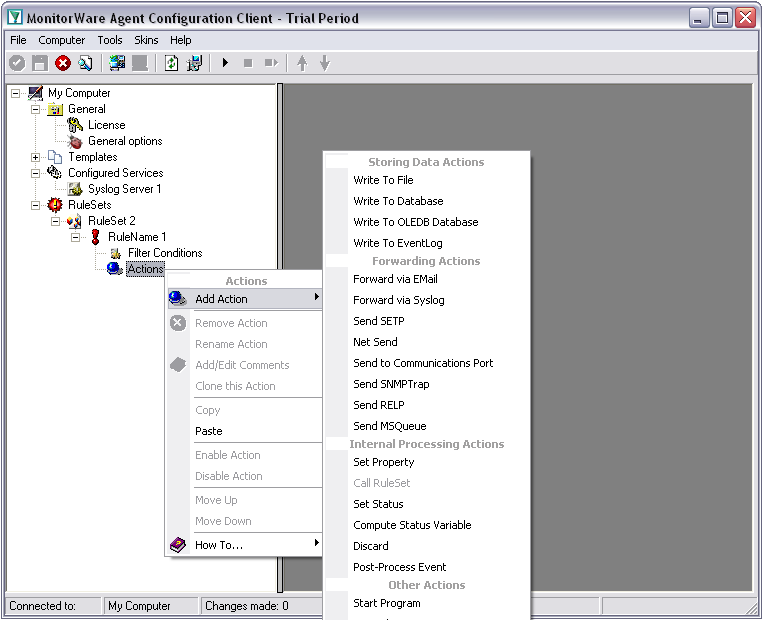
Therefore we just need to create the action. It is called “Send MSQueue”. Right click on “Actions”. A menu will open. Move the mouse to “Add Action” and the list of available actions will appear. Click on “Send MSQueue”, you will find it in the middle of the list.

Message Queue 12

The setup wizard will occur. Simply click on “Next” and then on “Finish”. You can now see the “Send MSQueue” action with its default values.

Message Queue 13

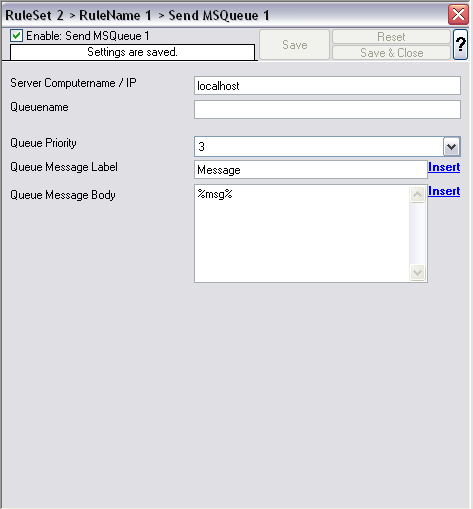
We need to change at least the “Server Computername / IP” field and the “Queuename” field. These need to be changed for the scenario to work. The rest can stay as is. Though you might want to change at least the “Queue Message Label” as this will always be the same then. You can change it, by using the properties available in MonitorWare Agent. The same goes for the field “Queue Message Body”, which can be completely customized with properties and you own content. By default it holds the message of the Syslog Message or Windows Event.

We need to change the adress field, which is on the top, to the IP of the machine we want to send to. Hostnames currently do not work yet. The “Queuename” must be set as well. This is needed for the queue that should be filled with messages. You can see on the image below, how this should look like.

Message Queue 15

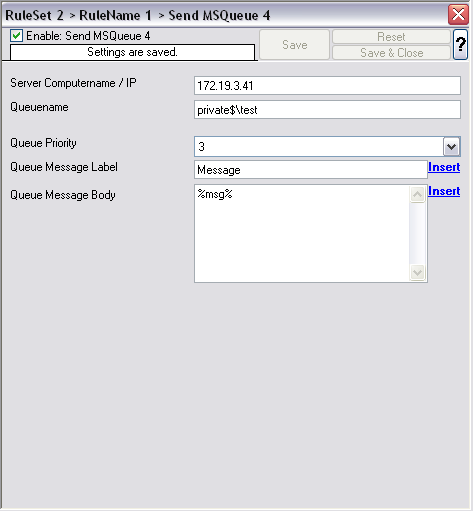
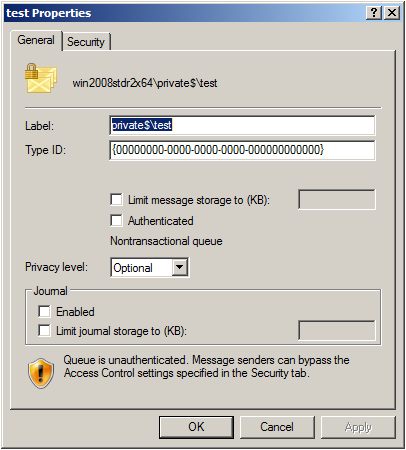
You can get the path yourself by going to your queues on the server. Right click on the queue you want the path of and click on “Properties”. A window with the properties will open. In the field “Label” is the path to the queue. This should be copied and pasted into MonitorWare Agent.

Message Queue 16

Final Thoughts

This is the easiest way to set up MonitorWare Agent to work with the Microsoft Message Queue. More information on the Message Queue is available at the Microsoft website.

Please note: the MonitorWare Agent Service must be started with some account credentials that have administrative privileges on the local machine as well as on the remote server, that shall receive the messages. You might need to set this manually in the control panel for “Services”.

Massive use of memory when using TCP

Massive use of memory when using TCP

Article created 2011-02-01 by Florian Riedl.

Due to some testing we found, that in some cases MonitorWare Agent uses a lot of memory. This will happen, when MonitorWare Agent is configured as a syslog receiver and is listening to TCP. Additionally, this only occurs, when there are large message bursts, that are continously sent.

We realized it, when MonitorWare Agent used up all free memory and even the page file and didn’t stop to allocate memory blocks. First we thought this was a real bug – the memory would be allocated, but not be purged after it was used. But that was not the problem. Further testing proved, that the memory would be free again after a while.

It turned out, that the real reason was a configuration issue in MonitorWare Agent. With the default values for receiving syslog over TCP, the service would not recognize the line separators of the syslog messages, thus “thinking” it would get a single message only and thus allocating more and more memory for this “huge” message. This would happen when receiving large bursts of message and the buffer for receiving syslog messages would be full.

The solution is pretty simple, yet effective. In the configuration client you need to activate a setting for the syslog server. Just activate “Messages are separated by the following sequence” in the TCP Options. With this activated, MonitorWare Agent can properly recognize line breaks. Thus, it will only allocate memory for the real messages in the queue.

This option will be activated by default in the next release of MonitorWare Agent (8.0).