Which Event Log Monitor to use for Vista?

Which Event Log Monitor to use for Vista?

Created 2007-04-10 by Rainer Gerhards.

Starting with EventReporter 8.3 and MonitorWare Agent 4.3 two different event log monitor services are provided. They are called “Event Log Monitor” (V1) and “Event Log Monitor V2”. In short, the V2 version is recommended for Windows Vista (and above, e.g. Longhorn Server) while the other version is for previous releases of Windows (NT, 2000, 2003, XP).

But why does Adiscon provide two different event log monitors and not combine them into a single one? The root cause is a change in Windows. Windows Vista comes with a totally new event logging system. While to the casual user it looks quite similar to the previous system, it actually was re-designed from scratch (at least to the best of my knowledge). Microsoft realized that the old system was too limited to catch up with today’s administrative and auditing needs. Instead of trying to add more and more bells and whistles to the old  system, Microsoft did the right thing and engineered a new, well designed one. That new system provides a compatibility layer which will make it look familiar to the user. The layer also emulates the previous API calls. For that reason, even our V1 event log monitor works quite well. It, too, could be used to poll Vista logs. However, there are a number of good reasons to use the V2 version:

  • support the variety of new Vista event logs
  • support for new and improved message formats
  • great performance thanks to using native APIs and event subscriptions
  • there are some subtle compatibility problems with the legacy APIs. We assume that Microsoft fixes that in some point in the future. But why wrangle with problems when you can avoid them?
  • the V2 monitor is a Vista native and thus performs well and very robust

The V2 event log monitor is not available on Windows 2000, 2003 and XP because the required APIs are not available on those platforms.

Customers interested in monitoring Windows Vista as well as Windows 2000, 2003 and XP systems can do that form a single machine. To do so, V1 and V2 event log monitors can be combined. Multiple of them can be configured and running at the same time. The only restriction is that this EventReporter/MonitorWare Agent must run on a Vista machine because only Vista provides the necessary APIs for the V2 monitor. Customers with further questions should kindly contact Adiscon support at support@adiscon.com.


Database Formats

Database Formats

These sample here implement the MonitorWare Common Database Format in widely used database systems. Attention Sybase users: the “Message” name is reserved in your database system and cannot be used as a field name. It needs to be changed, otherwise the table create will fail. Be sure to also change it in to client database field name configuration.

  • JET (MS Access) Sample
  • Microsoft SQL Server Sample
  • MySQL

JET (MS Access) Sample -A sample JET (Microsoft Access) database file is included in the MonitorWare Agent, EventReporter and WinSyslog install set. It conforms to the MonitorWare Common Database format. It is in Microsoft Access 97 format to enhance compatibility. It can be converted to any more current format without any problems. In fact, we recommend using the most current format supported by your system because it offers the best performance. To convert it, please use Microsoft Access.

Microsoft SQL Server Sample – If you would like to create the default database on Microsoft SQL server, please use the following script:

CREATE TABLE.SystemEvents
(
ID int IDENTITY (1, 1) NOT NULL,
CustomerID bigint,
ReceivedAt datetime NULL,
DeviceReportedTime datetime NULL,
Facility smallint NULL,
Priority smallint NULL,
FromHost nvarchar (60) NULL,
Message text,
NTSeverity int NULL,
Importance int NULL,
EventSource nvarchar (60),
EventUser nvarchar (60) NULL,
EventCategory int NULL,
EventID int NULL,
EventBinaryData text NULL,
MaxAvailable int NULL,
CurrUsage int NULL,
MinUsage int NULL,
MaxUsage int NULL,
InfoUnitID int NULL ,
SysLogTag varchar(60),
EventLogType varchar(60),
GenericFileName VarChar(60),
SystemID int NULL,
Checksum int NULL
)

CREATE TABLE.SystemEventsProperties
(
ID int IDENTITY (1, 1) NOT NULL ,
SystemEventID int NULL ,
ParamName varchar (255) NULL ,
ParamValue varchar(255) NULL
)

MySQL Sample – If you would like to create the default database on MySQL, please use the following script:

CREATE TABLE SystemEvents
(
ID int unsigned not null auto_increment primary key,
CustomerID bigint,
ReceivedAt datetime NULL,
DeviceReportedTime datetime NULL,
Facility smallint NULL,
Priority smallint NULL,
FromHost varchar(60) NULL,
Message text,
NTSeverity int NULL,
Importance int NULL,
EventSource varchar(60),
EventUser varchar(60) NULL,
EventCategory int NULL,
EventID int NULL,
EventBinaryData text NULL,
MaxAvailable int NULL,
CurrUsage int NULL,
MinUsage int NULL,
MaxUsage int NULL,
InfoUnitID int NULL ,
SysLogTag varchar(60),
EventLogType varchar(60),
GenericFileName VarChar(60),
SystemID int NULL,
Checksum int NULL
)

CREATE TABLE SystemEventsProperties
(
ID int unsigned not null auto_increment primary key,
SystemEventID int NULL ,
ParamName varchar(255) NULL ,
ParamValue varchar(255) NULL
)

This script should also be easily adaptable to other database systems like Oracle.

When porting the script to other database systems, please note that “nvarchar” is essentially “varchar”. The difference is that data is stored in Unicode which allows storage of non-ANSI characters. Typically, it can be replaced with “varchar” or an equivalent data type without any problems.

To what extent MonitorWare Agent 4.x / WinSyslog 7.x Support SNMP?

To what extent MonitorWare Agent 4.x / WinSyslog 7.x Support SNMP?

Created 2007-01-30 by Florian Riedl.

I am using MonitorWare Agent 4.x / WinSyslog 7.x on my NT Server. To what extent MonitorWare Agent 4.x / WinSyslog 7.x Support SNMP?

MonitorWare Agent and WinSyslog are capable of either sending or receiving SNMP Traps. Usually SNMP Traps are used by network devices to report status messages to the managing system. Our products can play either role. They are fully compatible to SNMP v1 and v2c and provide you full enterprise support.

Managing incoming Traps works the same way as with a Syslog server for example. Incoming Traps will be forwarded to the corresponding Ruleset and pass by rule after rule. There it can be filtered for general information like the “Community”, the “Version” or “Value” for example. Finally it will be processed by an action, which you can select to your needs. The SNMP Agent service will co-exist peacefully next to the Windows SNMP Agent and will not hinder it in it’s functionality. The Windows SNMP Agent listens to port 161, while MonitorWare Agent and WinSyslog listen to port 162.

The “Send SNMP Trap”-Action is capable of sending all kinds of Traps. You can choose the whole variety of the MonitorWare Products’ Properties as a value for the messages. With that, you can send SNMP Traps to the Windows internal SNMP Agent or any other device that is able to receive SNMP Traps. Of course you have full enterprise support, too. This gives you the possibility to involve every machine on your network into your security plan or whatever purpose it should serve.

For internal processing, the variables of incoming SNMP messages will be added to a new property. Those properties will be named %snmp_var_x% with the x being a number starting with 1. You can use these custom properties for filtering and everywhere you can use or print properties. For example, you can create a “send mail”-action. Here you can specify complete freely how the message will look like. You can use a introductory text and then let it show the error message in some context. This could look like this:

The result will be, that the 5th property of the snmp trap will be inserted into the message text.

This gives you an overall solution for receiving and sending SNMP Traps. You can create some kind of relay point, or just do some logging for later analysis. While the first versions of our software with SNMP compatibility had just basic features which were targeted towards SOHO devices. Later, enterprise customers asked for SNMP functionalities, which caused us to create a full-blown SNMP implementation with enterprise-class support.

If you need further information about the SNMP implementation, send a mail to our Support.

How to run MonitorWareLine Products on Windows Cluster Servers?

How to run MonitorWareLine Products on Windows Cluster Servers?

Created 2006-07-17 by Timm Herget

You want to run i.e. WinSyslog on a Windows 2003 Cluster but you are not sure if it will work properly on this platform and if there are any particular issues to be aware of in this configuration?

In our sample, we will use WinSyslog, but it also works with EventReporter or MonitorWare Agent.
From the technical point, WinSyslog can run on a Cluster-Node without any problems.
However there is no failsave or direct Cluster Support within WinSyslog.
This means in detail: if you want to run WinSyslog on other nodes, in case one node fails, you have to do the following:

Step 1

Set the Service Startup on all nodes to manual, expect on the node where you want to run WinSyslog mainly.


Figure1: setting service start to manual

To do so, go into the Windows Service Manager (Start -> Control Panel -> Administrative Tools -> Services) and look for the specific service name (in our case AdisconWINSyslog). Right click and select Properties from the upcoming dropdown menu. Set the startup type to manual, click apply and then ok.
Please note: Do not configure the Service to start manually on the main node!

Step 2

Mirror the configuration between the nodes manually by exporting & importing the configurations.


Figure2: mirror configuration

Our Products have the functionality to export an exact snapshot of the current configuration. This is done via standard Windows registry files. You can export your configuration on device a and import it on device b, which then has exactly the same configuration as device a.

To use it, please do the following:

  • Go to “Computer Menu”
  • Choose “Export Settings to Registry-File” (be sure NOT to select a binary format – they are only for special purposes. You can also NOT review binary files for security-relevant data.) Please also note that you can export in Win32 or x64 format so please choose the right one for your system.
  • Save this registry file.

Otherwise just install WinSyslog on your main node, it will run without any problems.

MonitorWare Agent 4.x – Database Structure

MonitorWare Agent 4.x – Database Structure

Created 2003-05-05 by Wajih-ur-Rehman.
Last Updated 2006-06-21 by Timm Herget.

What is the new Database Structure for MonitorWare Agent 4.x?

The Database Structure for MonitorWare Agent 4.x is almost the same as that of the older versions with the exception of SystemEventsProperties Table which is new in this new Database schema. In this new version, what the agent does is that it parses the message field and takes out some known parameters and store them in the form of name value pairs in the SystemEventsProperties Table as a Foreign Key. This means that one row in the SystemEvents Table can have multiples entries (in the form of name value pairs) in the SystemEventsProperties Table.

What is the log file format for generating reports with Monilog for MonitorWare Agent, WinSyslog and EventReporter?

What is the log file format for generating reports with Monilog for MonitorWare Agent, WinSyslog and EventReporter?

Created 2006-06-20 by Timm Herget

I am using MonitorWare Agent 4.x / EventReporter 8.x / WinSyslog 7.x
What are the settings that I would have to make such that the log file is generated in a format that is acceptable to Monilog?

There are a few things that have to be set in order to generate a log file that would be read by Monilog for Reporting purposes. Your settings would vary over:

  • 1. SETP Protocol
  • 2. Syslog Protocol

1. Report Settings for SETP

At Sender’s Side:

1.1. Event Log Monitor Setting

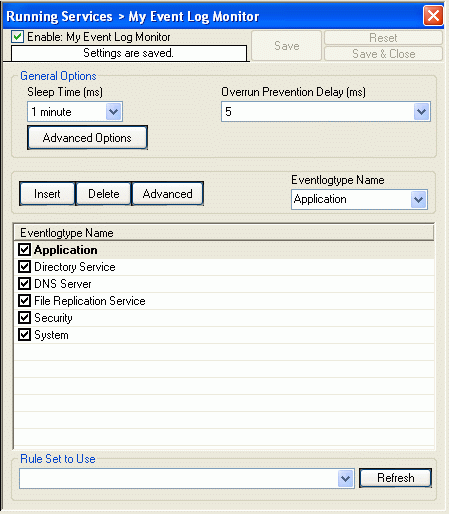
Use the default format of the EventLog Monitor’s. Your settings should be like this:


Figure 1: Event Log Monitor Service Settings

1.2. Forward Via SETP Settings

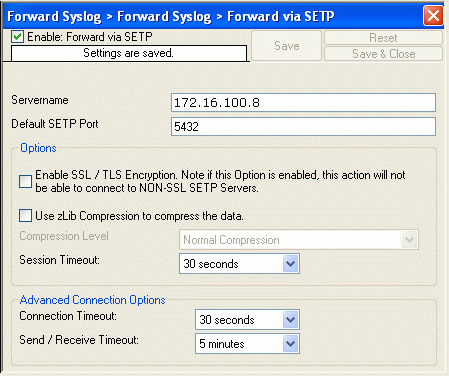
Use the default formtat of the “Forward via SETP” actions. In this example we assume that all messages should be forward via SETP to the central SETP Server at 172.16.100.8. Please replace this value per your environment.


Figure 2: Forward Via SETP Action Settings

At Reciever’s Side:

1.3. SETP Listener Settings

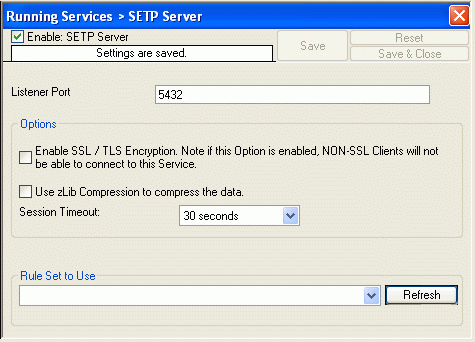
Use the default format of the SETP Server. Your settings should be like this:


Figure 3: SETP Listener Service Settings

1.4. Write to File Action Settings

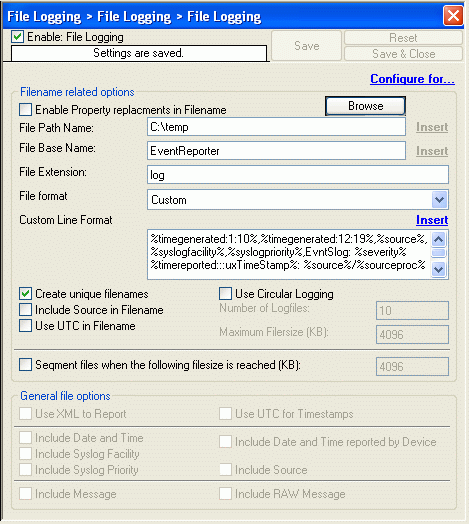
In Write to File Action, Choose “Custom” from the “File Format” combo box. You would see that the “Custom Line Format” has been enabled. From the “Insert” menu entry select “Replace with Monilog Format“. Your settings should be like this:


Figure 4: Write to File Action Settings

With the above mentioned settings, Monilog will successfully generate the report on the log file that has been generated.

2. Report Settings for Syslog

At Sender’s Side:

2.1. Forward via Syslog Settings

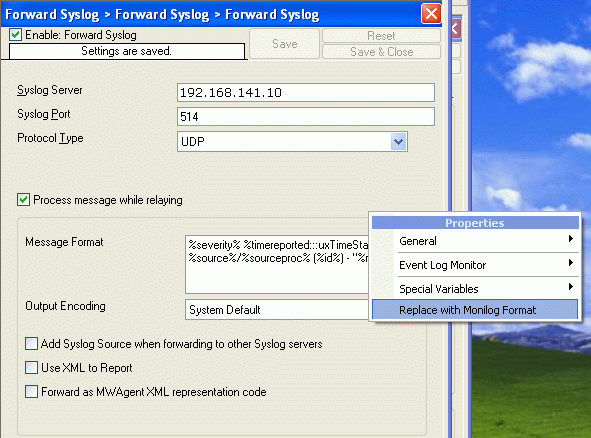
In Forward via Syslog Action, you would see a “Message Format” option. From the “Insert” menu entry select “Replace with Monilog Format“. In this example we assume that all messages should be forward via Syslog to the central Syslog Server at 192.168.141.10. Please replace this value per your environment. Please Note: It is very important that you uncheck the “Add Syslog Source when forwarding to other Syslog servers” Option. Your settings should be like this:


Figure 5: Forward via Syslog Action Settings

At Reciever’s Side:

2.2. Syslog Listener Settings

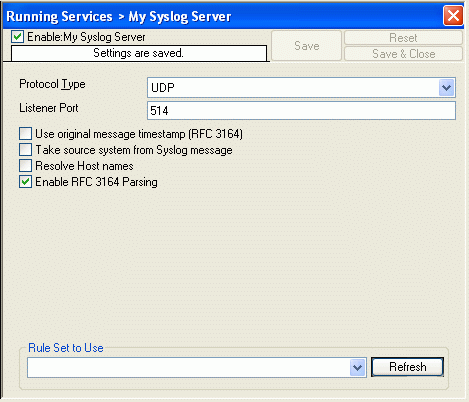
Please note that the “Enable RFC 3164 Parsing” should be checked. Your settings should be like this:


Figure 6: Syslog Listener Settings
2.3. Write to File Action

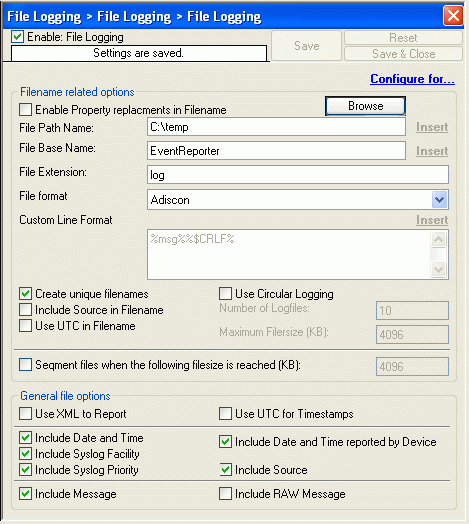
Simply add a write to the file action and bind this RuleSet to the service. Do not chnage the default settings of this action!


Figure 7: Write to File Action Settings

With the above mentioned settings, Monilog will successfully generate the report on the log file that has been generated.

How to store custom properties of a log message in a database

How to store custom properties of a log message in a database

Created 2006-03-27 by Timm Herget

This step-by-step guide describes a scenario where WinSyslog receives syslog data from a Fortigate firewall, parses the messages via post processing action and writes the custom parsed properties into a database.

Step 1 – Creating the Syslog Server

First, please create the syslog server service by right clicking on “Running Services” and selecting “Add Service” and “Syslog Server” from the upcoming dropdpwn menu. After creating it, leave the settings default at this time:
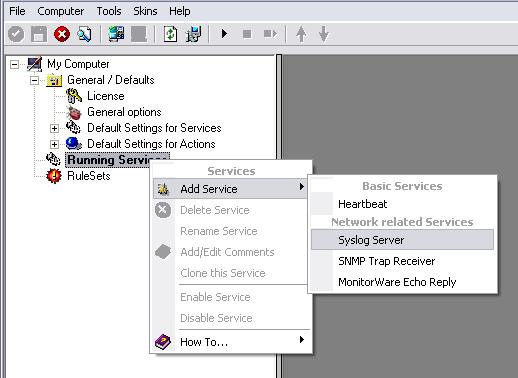

Figure1: creating the syslog server service

Step 2 – Creating the RuleSet

Now, right click on “RuleSets” and select “Add RuleSet”, type in a name for the ruleset and click on “Finish”:


Figure2: creating the ruleset

Step 3 – Creating the Rule and its Action

Right click on the newly created RuleSet and select “Add Rule”, again type in a name and click on “Add Rule”. Now right click on “Actions”, select “Add Action” and then “Post-Process Event”:


Figure3: creating the rule and action

Step 4 – The Syslog Data from the Fortigate Firewall

Below you can see a sample logfile of a Fortigate firewall. All properties are seperated by a space. The highlited properties we want to parse and log them to a databse in our step-by-step guide:


Figure4: the sample logfile

Step 5 – Configuring the PostProcess Action

Now we can start configuring the post process action. At first, please click on “Insert” to create the first property we want to configure for parsing. Change the property to “Filler” and the type to “UpTo” from the dropdownlists above. Also insert “date=” as value for this rule. In short this says: Take all the characters up to the begin of “date=” and drop them away, the cursor now stands at the first character of “date=” which is the “d”:
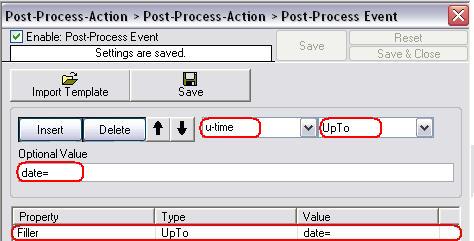

Figure5: first parsing rule

Again, click on “Insert”. Set the property to “Filler”, the type to “Character Match” and the value to “date=”. This will tell the parser to set the cursor to the first character after the string “date=” (Note: Character Match begins “searching to the end of string” from the begin of the current cursor position ONLY, so we need to jump to “date=” first via a UpTo rule (already done one step above)):
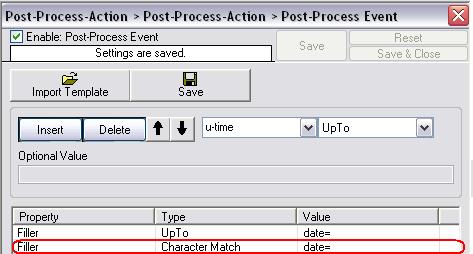

Figure6: second parsing rule

As I told above, the cursor of the parser now stands at the first character after “date=” which means we are now able to parse the first value from the logfile to a custom property: The date. To tell the parser to do so, please again click on “Insert”, name the property “u-date” or anything you want and set the type to “Word”. This will parse all characters from where the curser currently is up to the next space he will find. The date from the firewall syslog data is now stored into the property “u-date”.
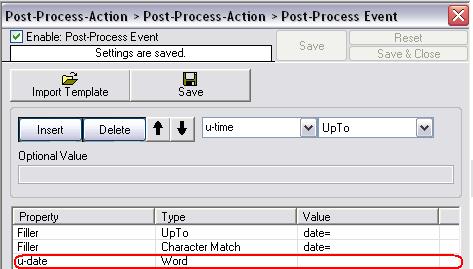

Figure7: third parsing rule

Insert the next rule, set the property to “Filler”, the type to “UpTo” and the value to “time=”. Again click “Insert”, set the property to “Filler”, the type to “Character Match” and the value to “time=”. These two new rules will take all characters from the current cursor position to the last one of the string “time=” and drop them away. The cursor now stands on the first character after “time=”.
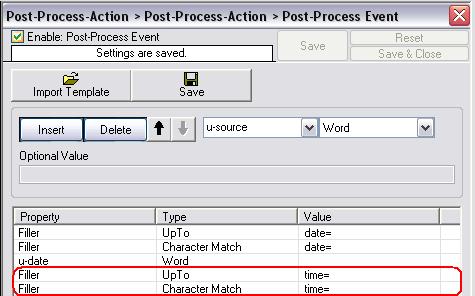

Figure8: fourth parsing rule

Again we have to insert a new rule, name it “u-time”, set the property to “UpTo” and the value to ” device_id=” (Note the space before device_id). This will write all the characters after “time=” until ” device_id=” into the property u-time. We now have the time too.
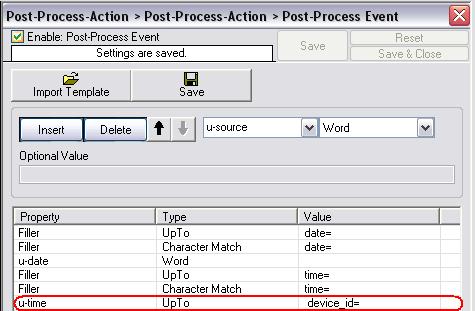

Figure9: fifth parsing rule

Insert the next two rules, for the first please set the property to “Filler”, the type to “UpTo” and the value to “SN=”. For the second please set the property to “Filler”, the type to “Character Match” and the value to “SN=” too. The cursor now stands on the first character after “SN=”.


Figure10: sixth parsing rule

Now create the new rule named “u-SN” which indicades the SerialNumber property of the syslog message from the firewall, set the type to “Integer” and click on Save. This will parse all Integer characters from the current cursor position, until no more Integer character is found, into “u-SN”.


Figure11: seventh parsing rule

We got 3 out of 4 properties now from the syslog data, so one is still remaining. Here we go. Again create two rules, both as “Filler” and with value “src=”, the first of them of type “UpTo” and the other “Character Match”. The cursor now stands on the first character after “src=”.


Figure12: eighth parsing rule

Now we only have to parse out the Source-IP which we will do via a Word type rule. Name the next Rule “u-source” and set the type to “Word”. This will parse all from the current cursor position until the next space into “u-source”. Now we got all four properties we wanted.


Figure13: last parsing rule

Step 6 – Creating the Database

Create a new Database via i.e. MySQL or MSSQL. In our sample we create it within MySQL and use PHPMyAdmin as DatabaseTool. First create the Database, we named it “step-by-step-dbsample” and then create a new table (“sample_properties”) with the following fieldnames:

  • Date
  • Time
  • SN
  • SourceMachine

The SQL Statements for this two steps should look like these:


Figure14: creating the database

Step 7 – Creating the System DSN

Now we must create a system dsn for our newly created table, so that we can access it via our database logging action later. To do so, please go to “Start” -> “Control Panel” -> “Administrative Tools” -> “Data Sources (ODBC)”. Go to the tab “System DSN” and click “Add”. Select the Driver you need from the shown list, in our sample this is “MySQL ODBC 3.51 Driver”, and click “Finish”. Please then fill in the shown configuration form in that way, that it suits your database and click on “Test”. If the test succeeds you are done, click OK then. If it failed, please re-check your configuration data. Remember the configured “Source Name”.
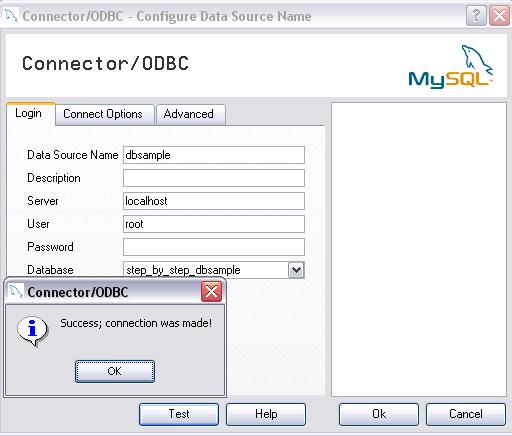

Figure15: testing system dsn

Step 8 – Configuring the Database Logging Action #1

Now please add a “Write to Database” action to your rule created at the beginning. To do so, expand the treeview of your “Post-Process-Action” rule in our ruleset, right click on “Actions” -> “Add Action” -> “Write to Database”. You will see the newly created Action like shown below:
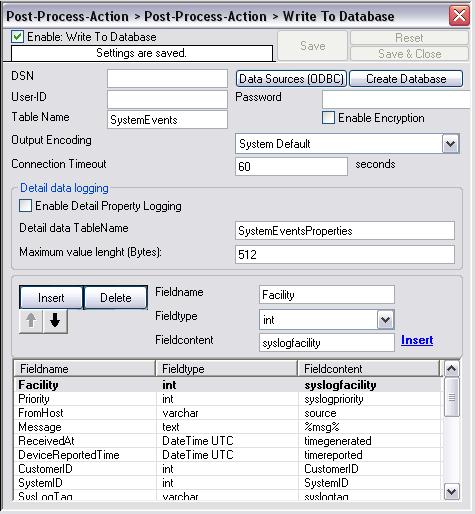

Figure16: database logging action #1

Step 9 – Configuring the Database Logging Action #2

First, type in your new system dsn name in the “DSN” field, then the suiting username and password. Change the “Table Name” to the name of the table we created in step 6. After this, delete all the configured fields in the data-grid-view. Select them and then click on the “Delete” Button. After these steps are done, it should look like the following screenshot:
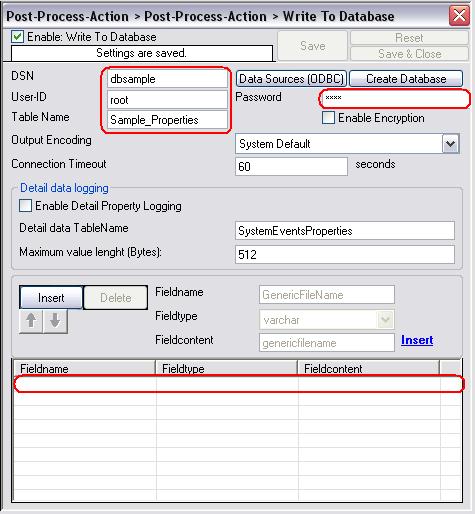

Figure17: database logging action #2

Step 10 – Configuring the Database Logging Action #3

Now we have to configure the database logging action in that way, that it writes our custom parsed properties into the fields of the new database/table. Please click on “Insert” first to create a new “row”. Type in the fieldname of our first field in the database/table. In our sample this is “Date”. Set the fieldname to “Date”, the fieldtype to “varchar” and the fieldcontent to “u-date” (where we parsed in the userdefined date before). Do the same now for the “Time” Field. Again click on “Insert”, set the fieldname to “Time”, the fieldtype to “varchar” and the fieldcontent to “u-time”. Repeat these steps for the two remaining fields with fieldtype “varchar” too. Click on “Save”:
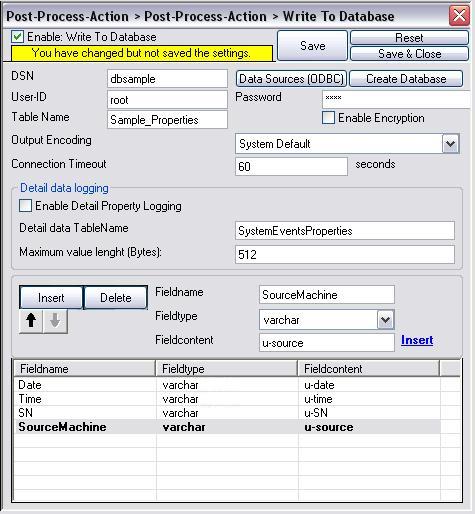

Figure18: database logging action #3

Step 11 – You are done

If you now take a look into your Database (in our sample MySQL via PHPMyAdmin) you will see that it worked fine and the message properties were correctly parsed and stored (in our sample i sent 3 of those messages).
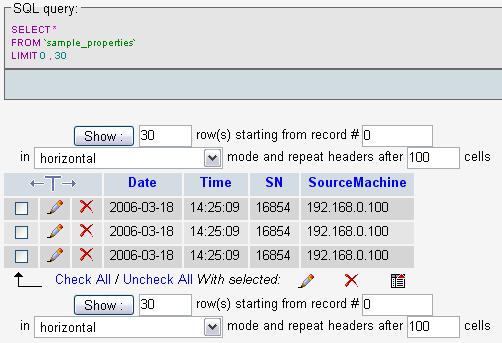

Figure19: The Result Please Note: There’s also an Article available which describes how the parsing of logfiles works, you can find it here.

Attachments:

How to process Syslog messages from Solaris 8/9 systems?

How to process Syslog messages from Solaris 8/9 systems?

Created 2006-03-15 by Andre Lorbach.

This article describes how to workaround problems which occur when you are receiving and processing Syslog messages from Solaris 8/9 systems.

  • The Problem: The problem exists in the way, the Syslog messages are formatted from Solaris 8/9. As an example, we take the following sample Syslog message:
<38>Aug  2 11:49:23 su: [ID 366847 auth.info] ‘su root’ succeeded for root on /dev/console

This message is missing the source, which has to be before the Syslogtag, as it is defined in RFC3164. So correctly, the Syslog would have to look like this:

<38>Aug  2 11:49:23 mymaschine su: [ID 366847 auth.info] ‘su root’ succeeded for root on /dev/console

In the first message, our Syslog Server treats the SyslogTag value as Source, and doesn’t continue to parse the SyslogTag Value. This will result in an empty SyslogTag, and wrong parsed source. The problem is that our Syslog Server does not expect such a message, and so it can’t be handled directly.

  • The Workaround: The best way to workaround this problem is to disable RFC3164 Parsing in the Syslog Server, and implement your own preprocessing of the Syslog message with the help of the Postprocess Action. The following steps explain and show how this can be done.

1. Reconfigure your Syslog Server configuration and disable the following options:
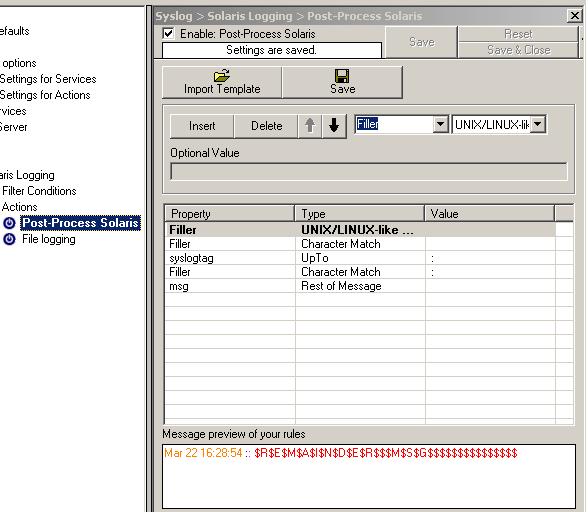
  • Use original message timestamp (RFC 3164)
  • Take source system from Syslog message
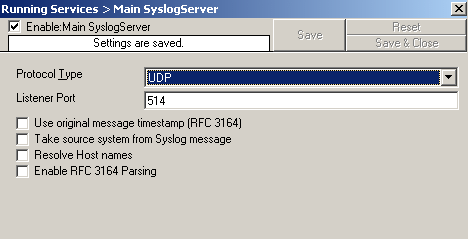
  • Enable RFC 3164 Parsing

2. Create a PostProcess Action for preprocessing the Solaris Syslog messages:

First create a new Rule in your Main RuleSet and move it on top of all Rules. This is important as these actions will do the job of the “Enable RFC 3164 parsing” option of the Syslog Server. In this Rule, create a new PostProcess Action with the following template definition like in screenshot below. You can download the predefined PostProcess template from here. Use the Import Template button to load the predefined PostProcess template into your configuration.

The SyslogTag will now be correctly set by the PostProcess Actions, and the source is taken from the network connection from where the Syslog message is received. Please note that only “wrong” formatted messages will now be correctly parsed. So if you have other Syslog devices, you should let them send their logs to another Syslog Server where normal processing is used.

Can Event Reporter work with custom event logs / evt-files?

Can Event Reporter work with custom event logs / evt-files?

Created 2006-02-15 by Timm Herget

There are 2 FAQ Articles available regarding this question because it is different if you want to monitor custom event logs or custom *.evt files. Please see the links below for further information about this:

Why does the Client remain at the older version after “successfully” upgrading to newer version?

Why does the Client remain at the older version after “successfully” upgrading to newer version?

Created 2005-11-09 by Timm Herget

Do you experience a problem similar to the following?
– After the upgrade, the client reported to have updated the service to 7.x but the client was still version 6.x.
Then you are right here.

This is cause the old setups where made with an installshield version, which was bugged at this time. To solve this problem try the following:

  • Try a repair-installation, and if this still not works:
  • Delete the whole Client and *.xml files from the installation folder and use the REPAIR function of the setup again.