Centralized logging in a hybrid environment (Windows/Linux) – Step 2

Step 2 – Setting up the Windows Clients

Setting up the Windows Clients is rather easy. To do this, we only need to have EventReporter installed. EventReporter will be configured to pull the Windows Event Logs and forward them to our central syslog server via TCP syslog. Our example system will be Windows XP.

When you open the Configuration Client, you will see the configuration tree on the left. Most important are the part “Configured Services” and “Rulesets”. Right now, both have no content. But we will change that now.

Step 2.1

As a first step, we will set up the ruleset again.

centralized_monitoring_2001

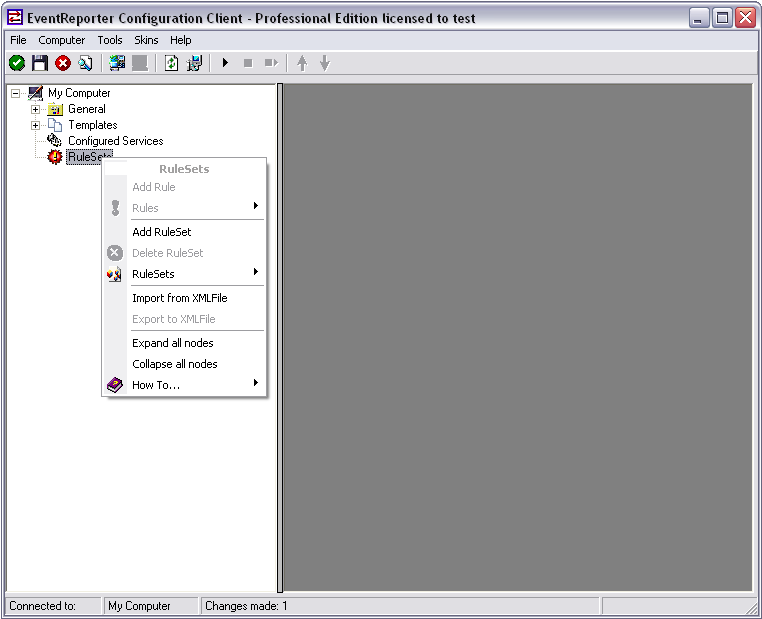
Right-click on RuleSets in the left hand list. A context menu will appear. Click on Add RuleSet

centralized_monitoring_2002

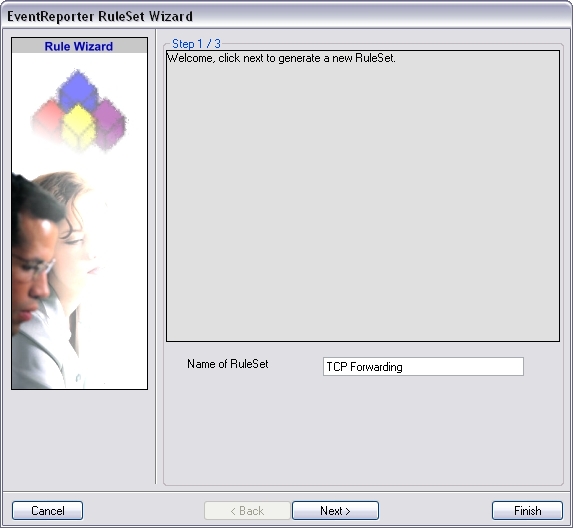
The RuleSet Wizard will appear now. You can give your ruleset a name of course. We will use TCP Forwarding for this example. After that, click on “Next”.

centralized_monitoring_2003

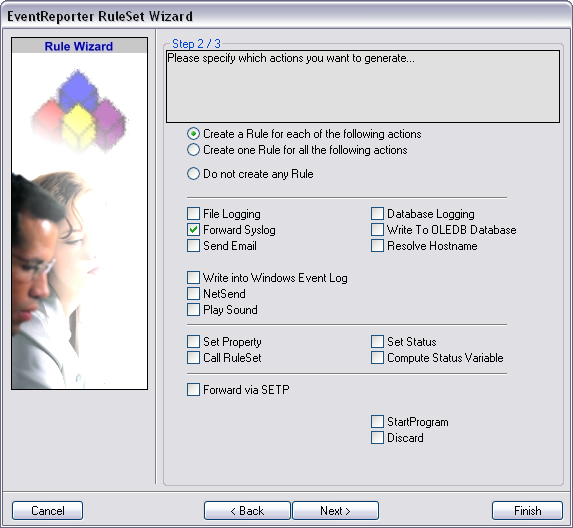
On the second page of the wizard we can specify what actions we want. Since we only want the log messages to be forwarded via syslog, check the box next to “Forward Syslog”. After that, click “Finish” to create the ruleset and action.

Step 2.2

centralized_monitoring_2004

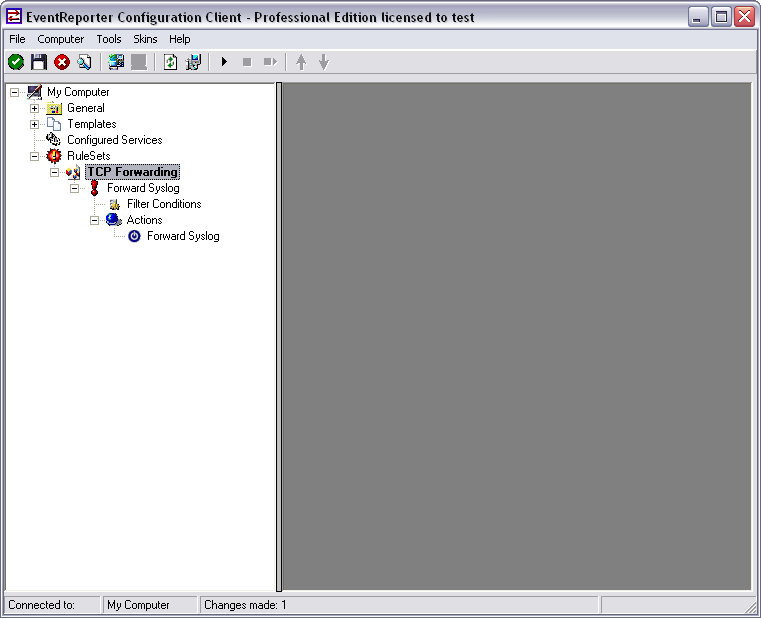
When you expand the treeview now, you will find a rule named “Forward Syslog” with an attached action of the same name.

centralized_monitoring_2005

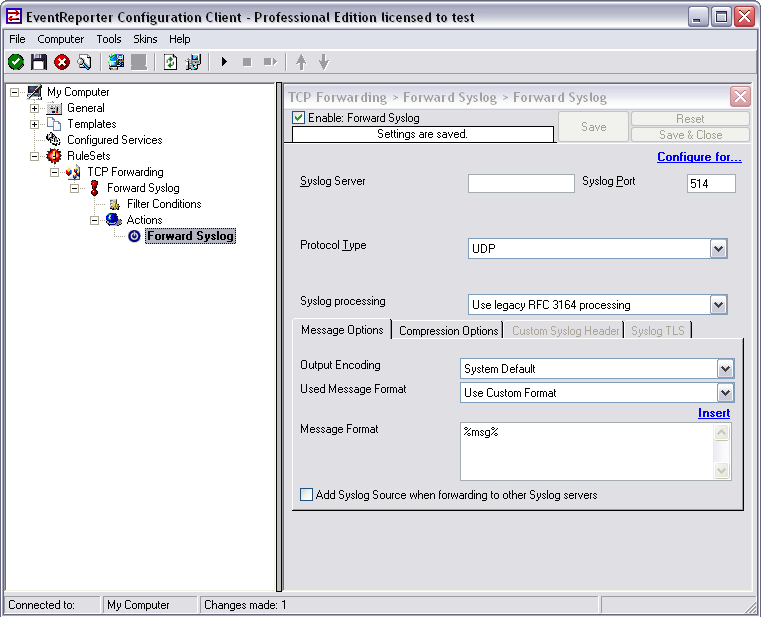
Now click on the action “Forward Syslog. You can see the default values now.

centralized_monitoring_2006

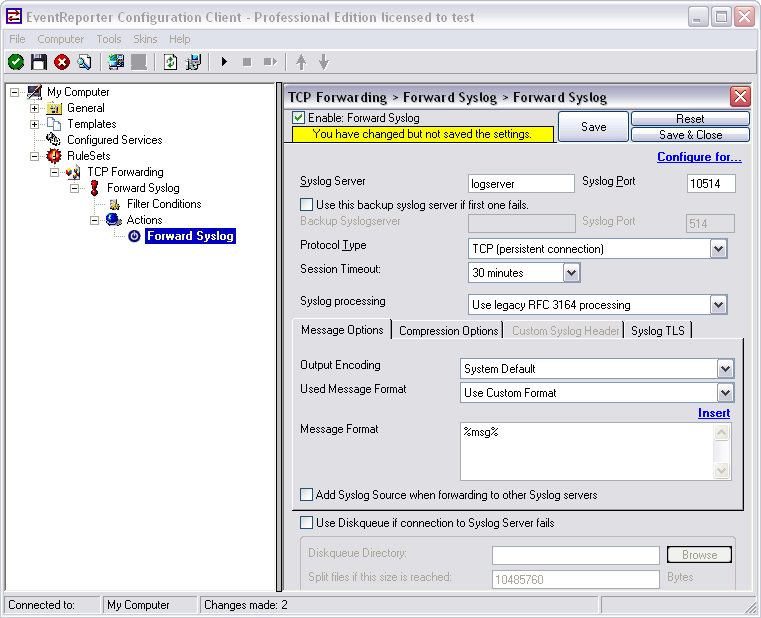
We need to change some of those settings now. First of all we need to enter the IP or hostname of our central server into the field “Syslog Server”. After that, change the port to 10514, since our central server will listen to syslog on this port. And we need to change the protocol type. Change is to TCP (persistent connection). That is all for now. Click on the Save button on the top so we can go on configuring the Service itself.

Step 2.3

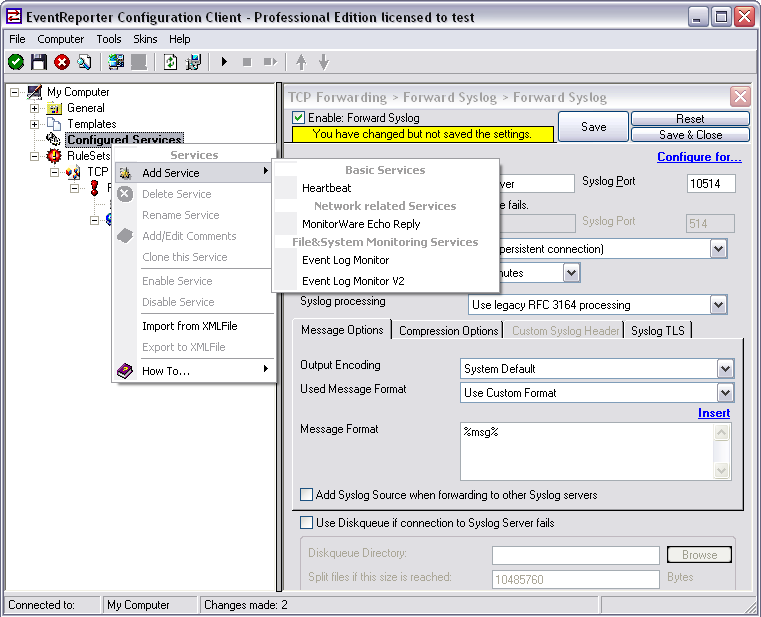
We need to configure our service now. Right-click on “Configured Services” in the configuration tree on the left to pop up a context menu.

centralized_monitoring_2007

When you go to “Add Service” you will see the list of available Services. The list is a lot smaller than in MonitorWare Agent. We need the regular Event Log Monitor in this case.

Note: If you are using Windows Vista, 7 or Server 2008 you might consider using the Event Log Monitor V2, since it is optimized for the new EventLog that has been introduced with Windows Vista.

centralized_monitoring_2008

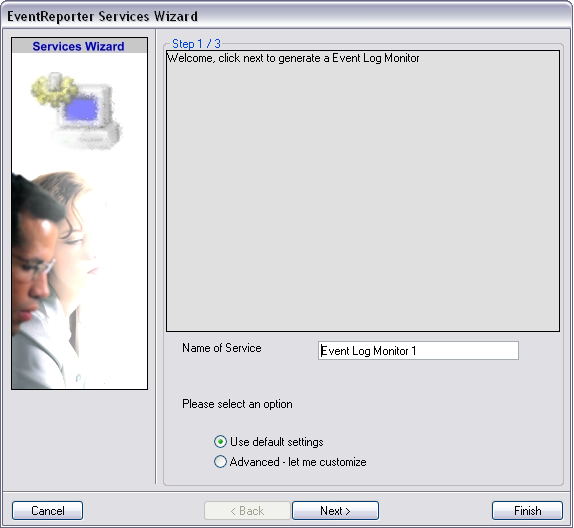
When you have clicked on Event Log Monitor in the list, a wizard will open. Since we will not do any configuration now, just click on “Finish”.

centralized_monitoring_2009

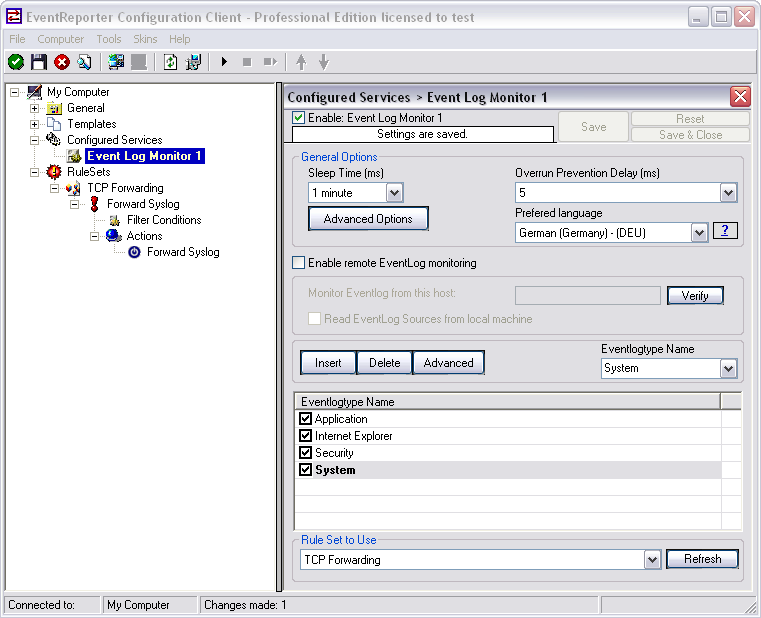
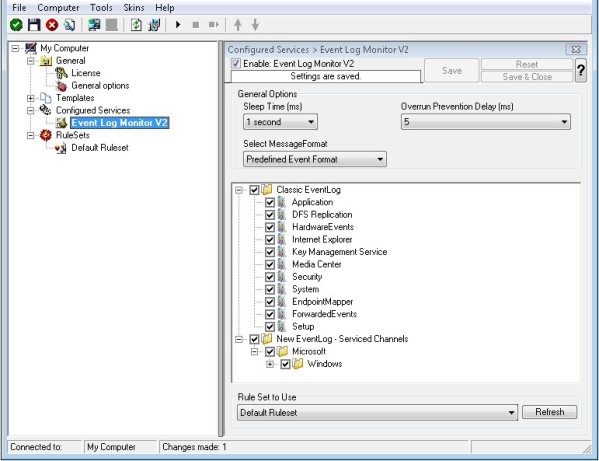
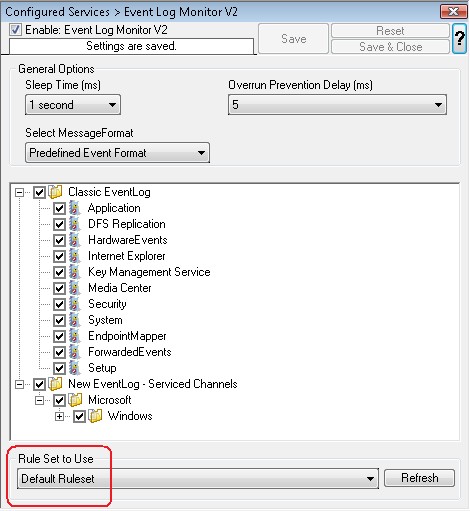
When clicking on Event Log Monitor in the configuration tree you will see the default options. We can leave these settings as they are. Probably you might want to change the preferred language or the sleep time. As you can see at the bottom, the service is already assigned to our ruleset we created earlier. Newly created services will automatically be assigned to the first ruleset in the list.

Step 2 is finished

Basically, that is it. Save the configuration and then start the service with the button that looks like the “Play” symbol. EventReporter will then start to pull Events from the Windows Event Log and forward them via TCP syslog to your central server.

<< Go back to the main page

Centralized logging in a hybrid environment (Windows/Linux) – Step 1

Step 1 – Setting up the central log server:

The central log server is the most important part of our central log storage and thus will be configured as the first part. And due to all the things it needs to do, it has the most work of course. When selecting your machine to install the central log server on, please keep in mind, that you need quite a good machine for larger networks. If you have a very large environment, it might be a good idea to use multiple servers for this scenario with a load balancer and a separate database server. But in this guide, we will have it all on one machine.

Prerequisites:

The following should be installed and working:

  • Windows Server operating system (Windows Server 2008)
  • Database Server (MSSQL)
  • IIS Webservice
  • MonitorWare Agent Professional Server (V7.2)

The list holds the things necessarily needed. In the brackets is schon which we will use in this example. Please note, that this will work with other versions as well, especially with MonitorWare Agent.

As mentioned before, MonitorWare Agent will have multiple purposes. It should receive syslog via TCP and UDP, monitor the local EventLog and textbased logfiles as well as writing everything into a database and sending email messages in case of error and critical messages occuring.

Step 1.1

First of all, we will set up the processing rules and actions. We will start this way due to the design of MonitorWare Agent. Since the Services need to be bound to a ruleset upon creation, we will start this way, so the ruleset is there already when creating the service.
centralized_monitoring_1001

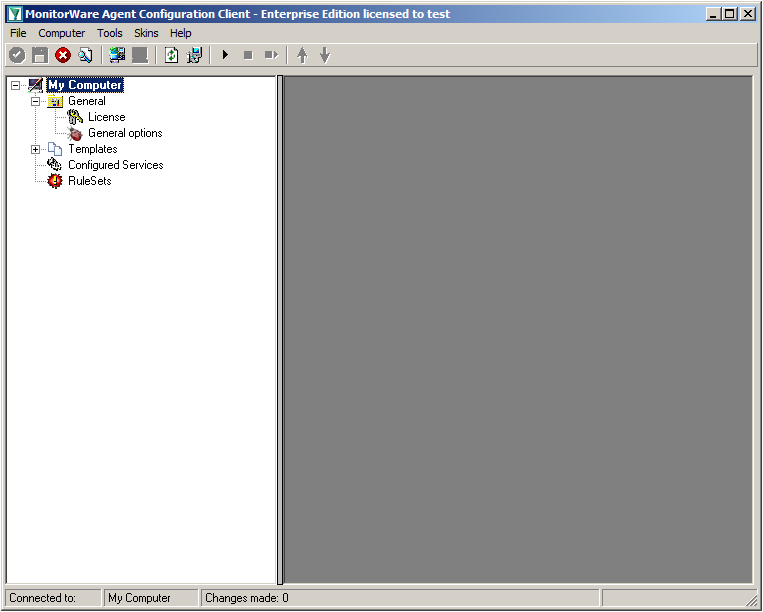
When starting MonitorWare Agent the first time, you will see on the lefthand side our overview of “Configured Services” and “Rulesets”. Right now, there shouldn’t be any entries here.
centralized_monitoring_1002

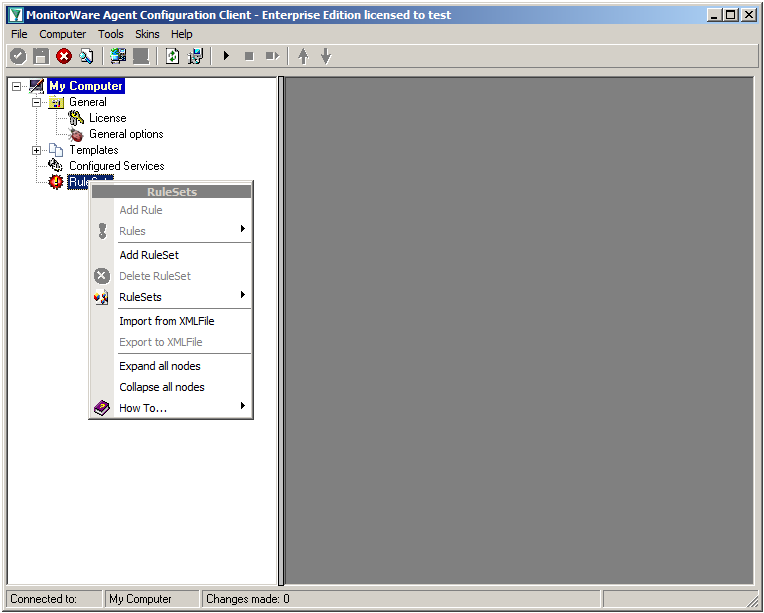
Right click on “Rulesets”. A context-menu will open.
centralized_monitoring_1003

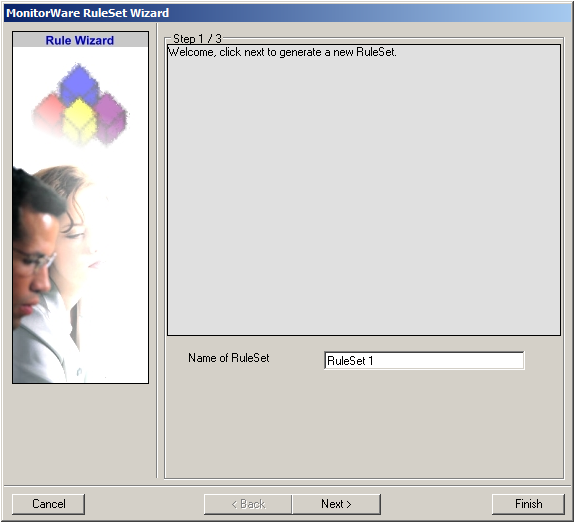
Choose “Add Ruleset”. The ruleset wizard will open. On this first screen, we can choose the name of the ruleset.
centralized_monitoring_1004

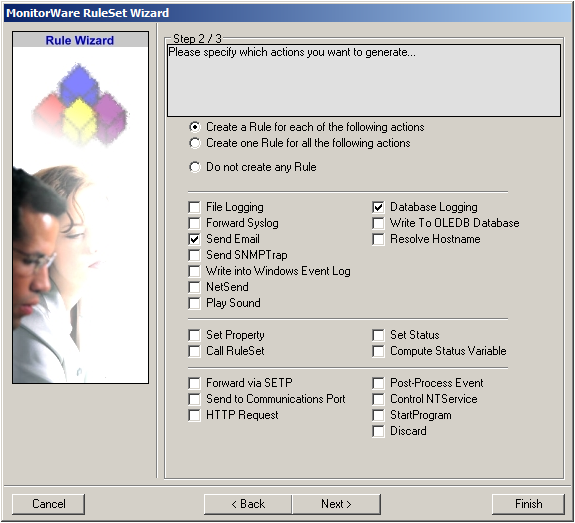
After choosing a name (in this example “Storage & Alert”), click on “Next”. Here we can set, what we will need. Leave the marker for “Create a Rule for each of the following actions” and choose “Send Email” and “Database Logging”.
centralized_monitoring_1005

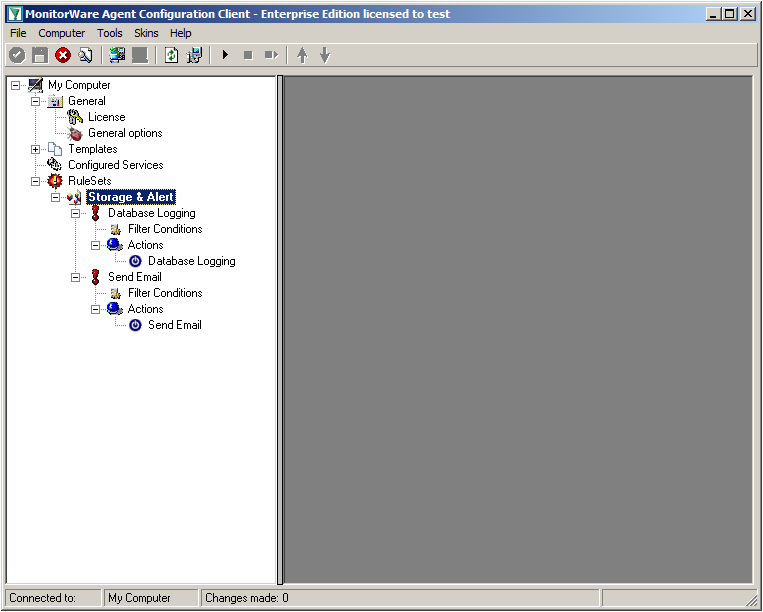
You can now click on Finish. You will now see a new ruleset in the treeview on the left hand side. If you expand this view completely, you can see the two rules that have been created and the actions that are in there. You should have a rule “Database Logging” and a rule “Send Email”.

Step 1.2

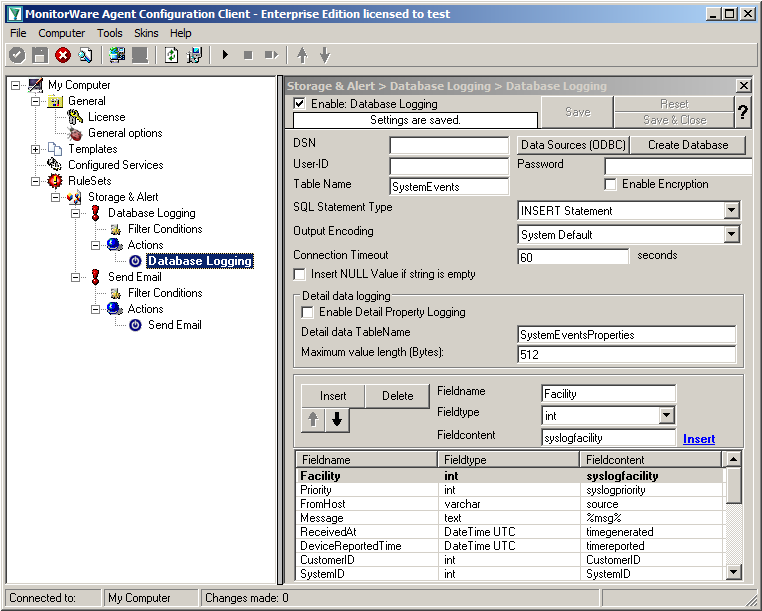
We will now start with configuring the action for “Database Logging”. Expand the branch called “Database Logging” completely. Under actions you will find the “Database Logging” action. When you click it, you will see the configuration window.
centralized_monitoring_1006

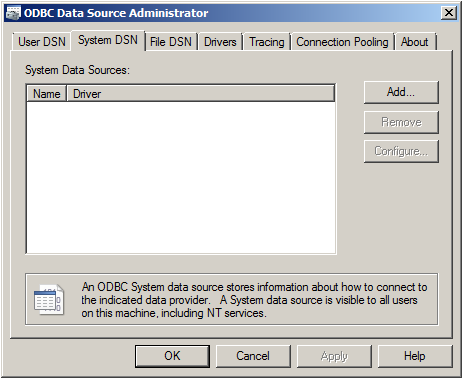
Click on the button “Data Source (ODBC)”. This will open the ODBC Data Source Administrator.
centralized_monitoring_1007

Go to System DSN and click “Add…”.

centralized_monitoring_1008

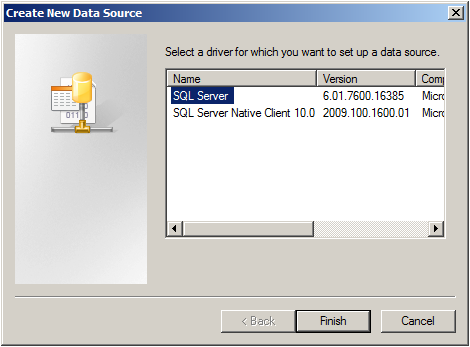
Select SQL Server from the list and click “Finish”.
centralized_monitoring_1009

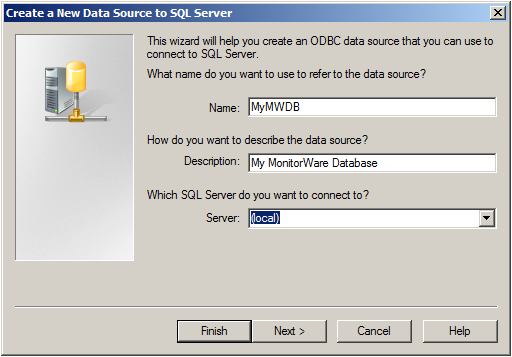
Choose a name for the datasource and a description. In this case we choose MyMWDB as name. As server choose the name of the server where the database is. In our example we use localhost. Now click on “Next”.
centralized_monitoring_1031

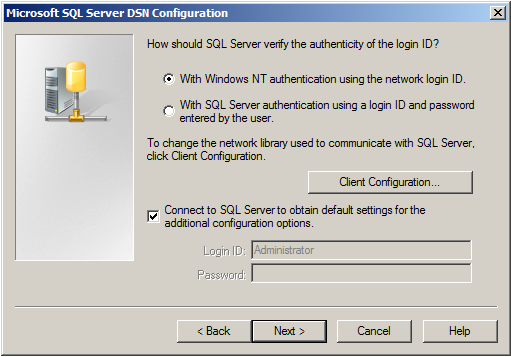
Select “SQL Server Authentication” and type in your MSSQL Login ID and Password. If you have Windows NT authentication like in our case, leave it as is. Click on “Next”.
centralized_monitoring_1010

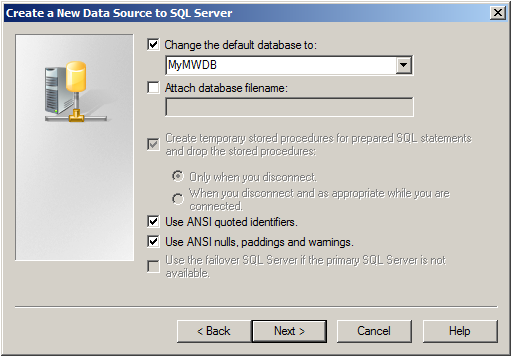
Select “Change the default Database to:” and choose your new created Database, in our example we use “MyMWDB” which we created beforehand. Click on “Next”.
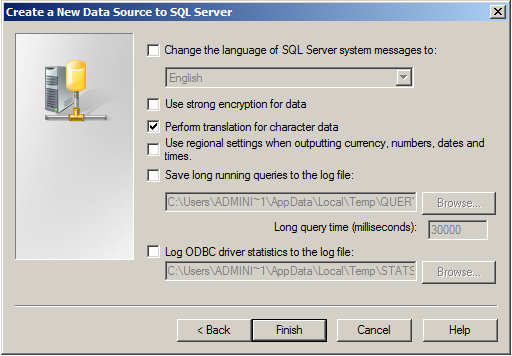
centralized_monitoring_1011

Leave all at default settings and click “Finish”, a test Window will appear:
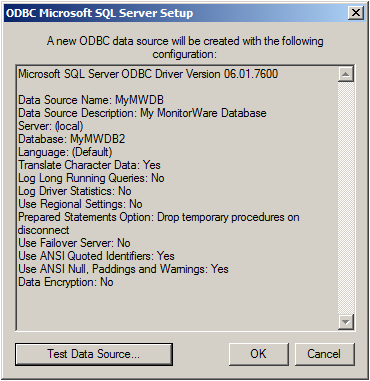
centralized_monitoring_1012

Click on “Test Data Source”, normally the following Window should be displayed:
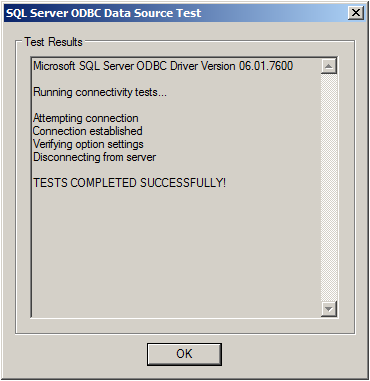
centralized_monitoring_1013

If not, go back and check your Settings, if yes, Click “OK” and exit the System-DSN Wizard.
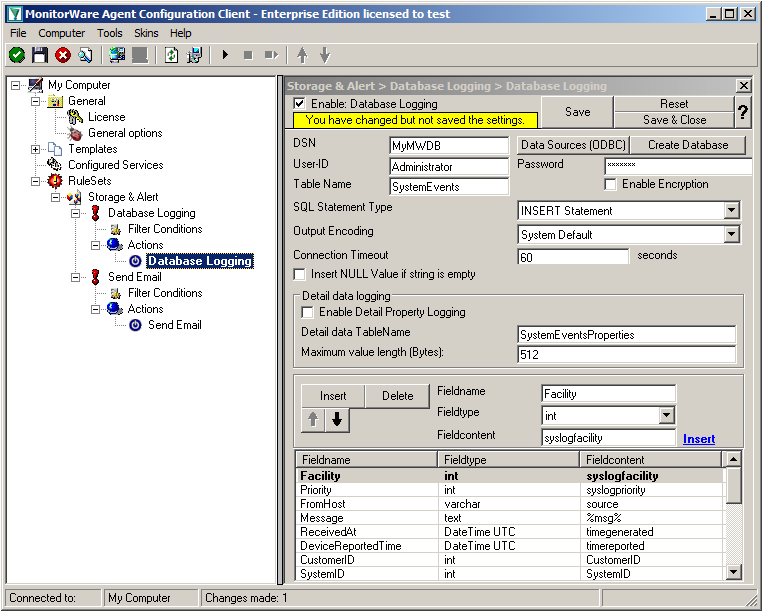
centralized_monitoring_1014

Now we are back in MonitorWare Agent. Insert the DSN for your database, User-ID and Password.
centralized_monitoring_1015

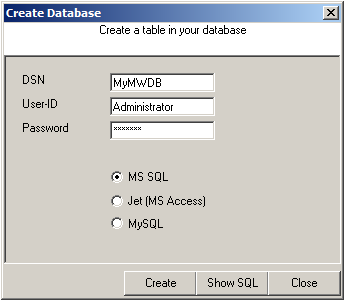
After that, click the “Create Database” button. We still need the tables that the log messages will be stored in. After clicking the button, a small window will open. Insert the DSN, User-ID, Password and choose the type of database you are using, in our case MS SQL. By clicking on the “Create” Button, the tables needed for the default database format of the MonitorWare Products will be created. After that, close the window.

Since we want to log all messages into the database, there is no need to set up any filters.

Step 1.3

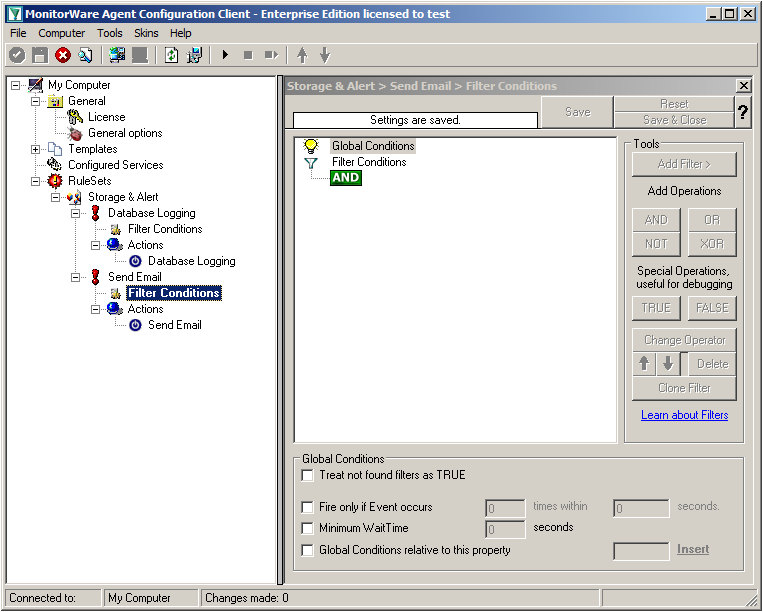
In the next step, we want to set up the Send Email rule. But since we only want error log messages, we need to set some filters. Click on the Filter Conditions. You will see the overview over the filters for this rule.
centralized_monitoring_1016

Right now, the view is empty except for a AND operator. Double-click it to change it into a OR operator.
centralized_monitoring_1017

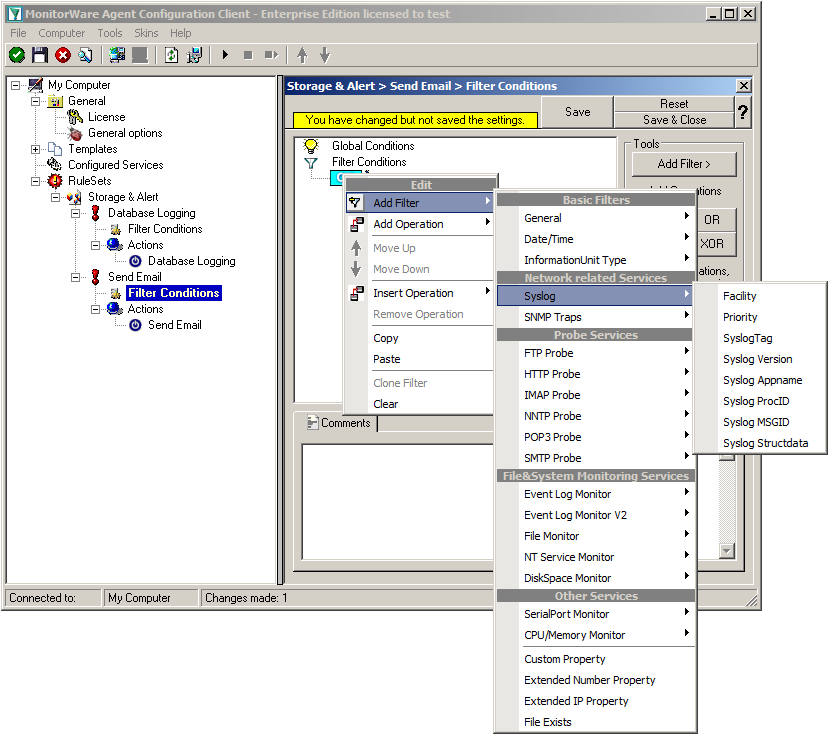
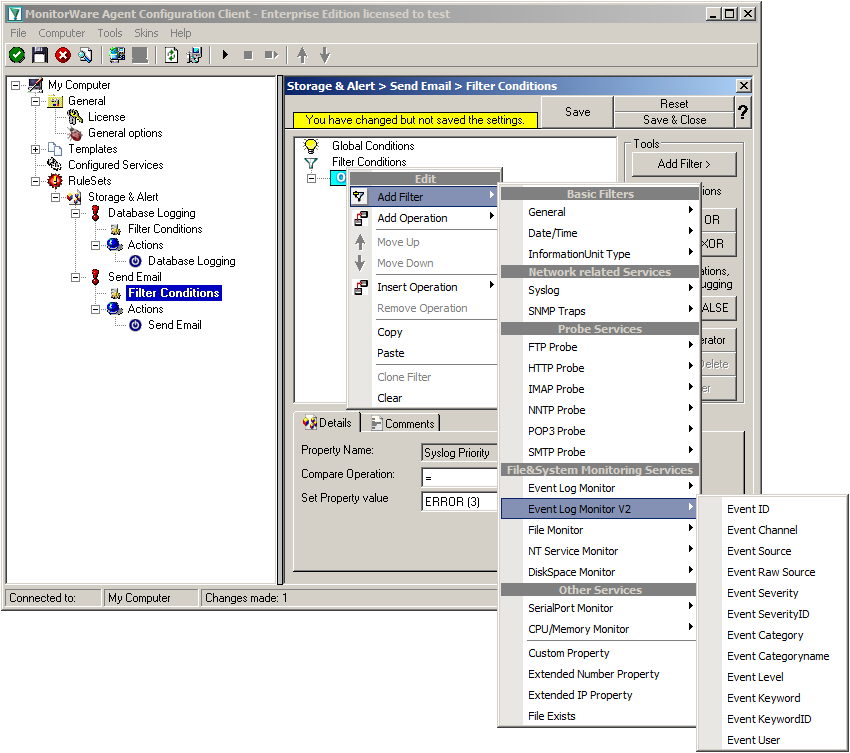
Right-click on the OR operator. A context menu will open. Go to Add Filter -> Syslog -> Priority.
centralized_monitoring_1018

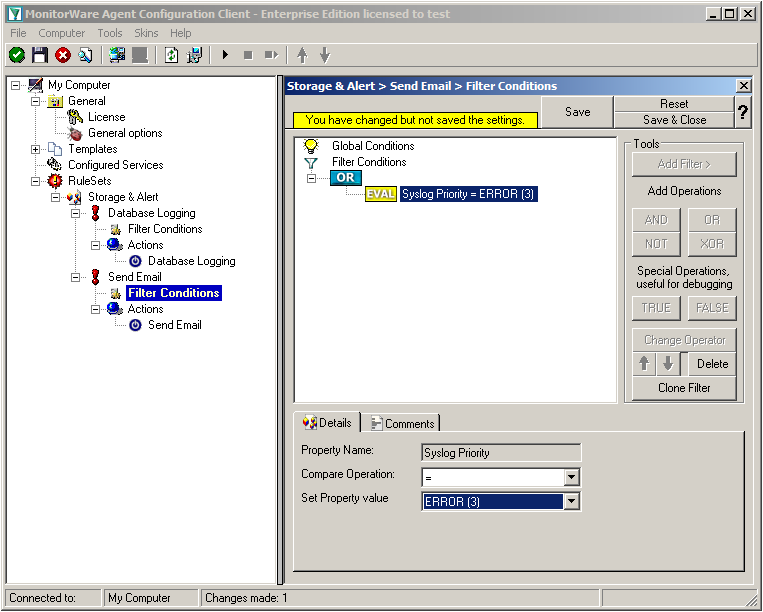
Click on the filter setting and change the property value to “Error (3)”.
centralized_monitoring_1019

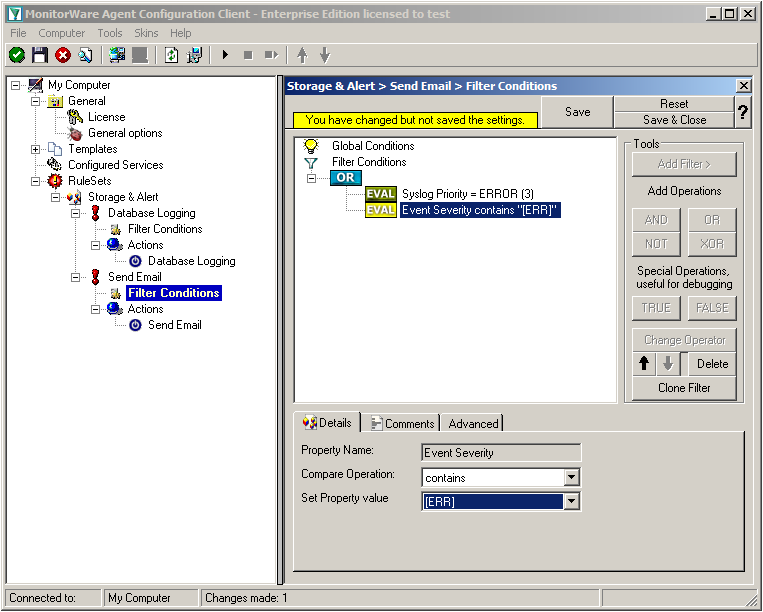
Again click on Add Filter -> EventLog Monitor V2 -> Event Severity.
centralized_monitoring_1020

Click on the second filter setting and change the property value to “[ERR]”.

We are now finished with the filter settings. The filter will accept all log messages that are either of syslog proiority error or critical or Windows Event severity error. The OR operator ensures, that every of these cases will be accepted. When the messages are approved of fitting into the filter, the action will process them.
centralized_monitoring_1021

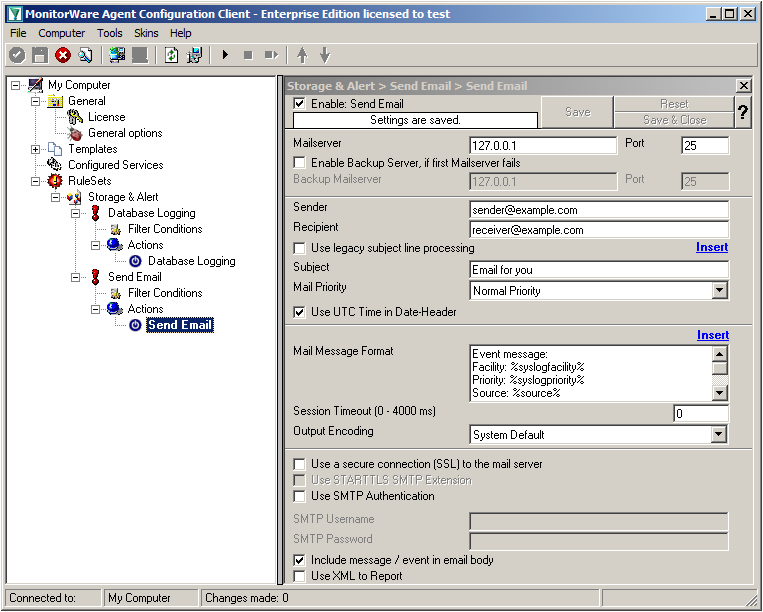
Click on the “Send Email” action now. You will see the configuration window on the right pane. Currently, there are only the default values in there.
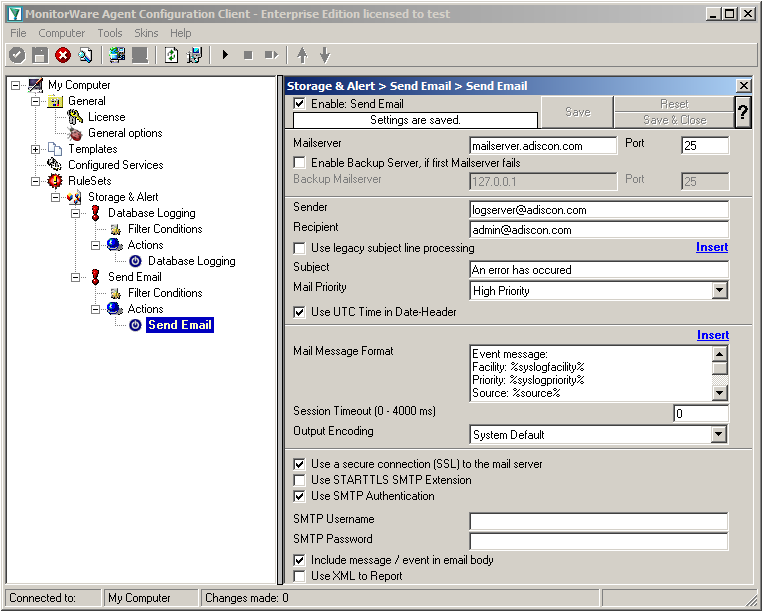
centralized_monitoring_1022

We need to change some settings here, like the Mailserver, Sender and Recipient, the subject and the Mail Priority. If necessary for your mail server, you need to change the authentification settings at the bottom as well. in our example we need SMTP Authentication for that. If you want, you could even enable the backup mail server.

Now we have all actions fully configured. It is now time to setup the configured services.

Step 1.4

Currently, when clicking on Configured Services you will not see a thing. But we will configure the services now. Without them, MonitorWare Agent is not able to get any log messages. We will setup 2 Syslog Receiver, 1 EventLog Monitor and 1 File Monitor.
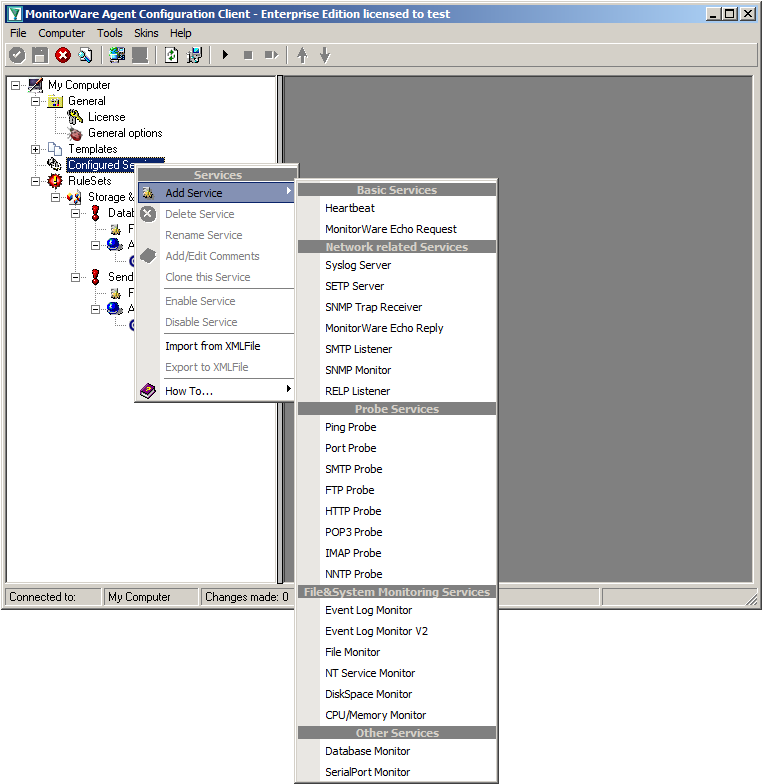
centralized_monitoring_1030

When right clicking on Configured Services a context-menu will open. By moving your cursor to “Add Service” you can see a list of Services, that may be configured. The list seems pretty long, but we basically need 3 services of them.
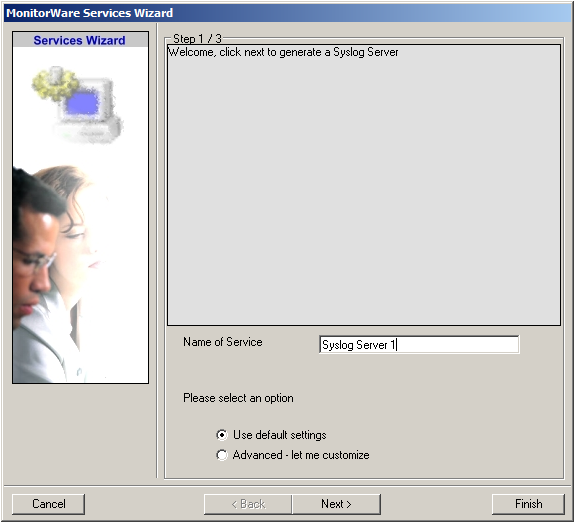
centralized_monitoring_1024

Click on “Syslog Server” first. The Services Wizard will open. Simply click on Finish for now. Repeat this again for Syslog Server, EventLogMonitor V2 and File Monitor.
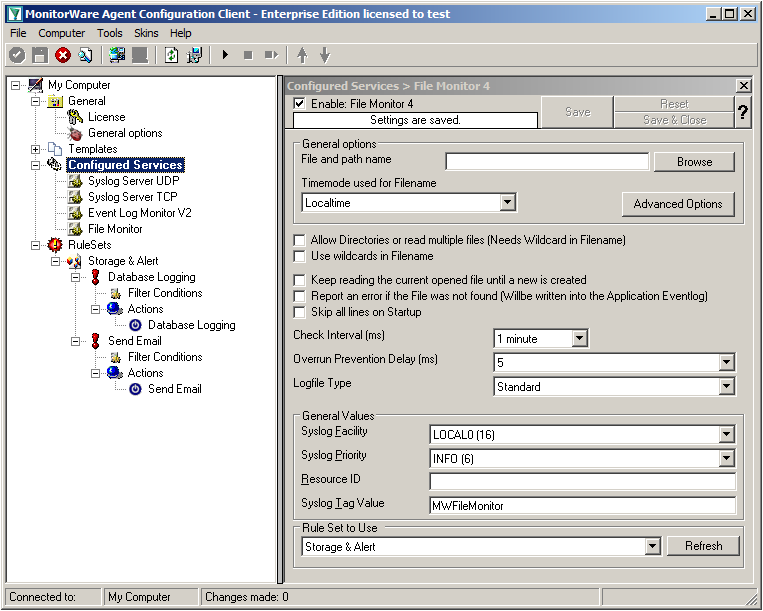
centralized_monitoring_1025

In the end, you should have a list with 4 Services. For our example I renamed the services by doing a right-click on the Service name I wanted to change and the choosing “Rename Service”. This was mostly to distinct the two Syslog Servers.

Step 1.5

Settings for Syslog Server UDP
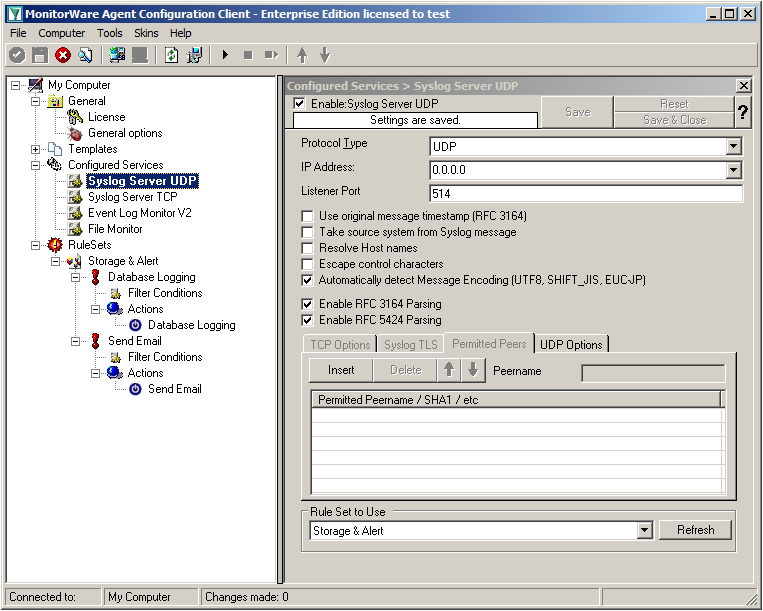
centralized_monitoring_1026

We can leave the “Syslog Server UDP” on default settings. It is already listening to UDP on port 514. The rest of the default settings is just fine.

Step 1.6

Settings for Syslog Server TCP
centralized_monitoring_1027

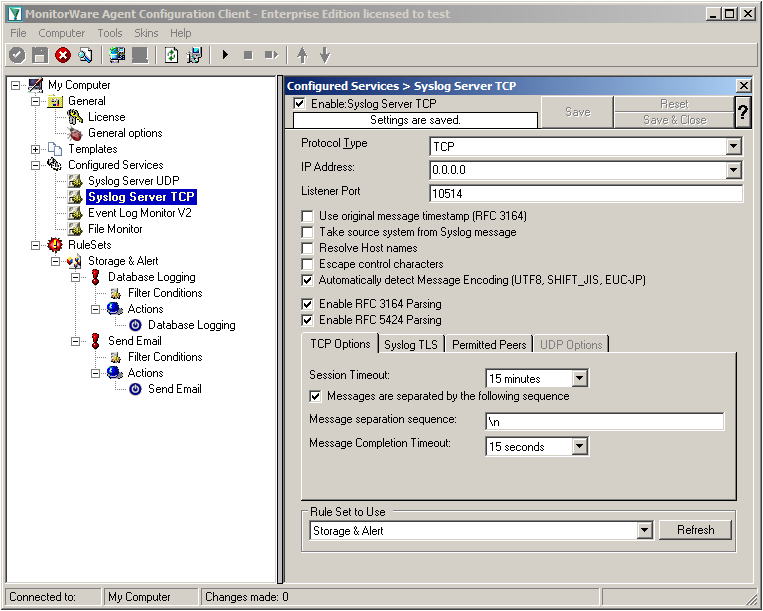
We will now go to the “Syslog Server TCP” now. Here we need to change several settings. Change the protocol type to TCP and the Listener Port to 10514. Further, we need to enable the option “Messages are separated by the following sequence” in the TCP options. It should look like this now:

Step 1.7

Settings for Event Log Monitor V2
centralized_monitoring_1028

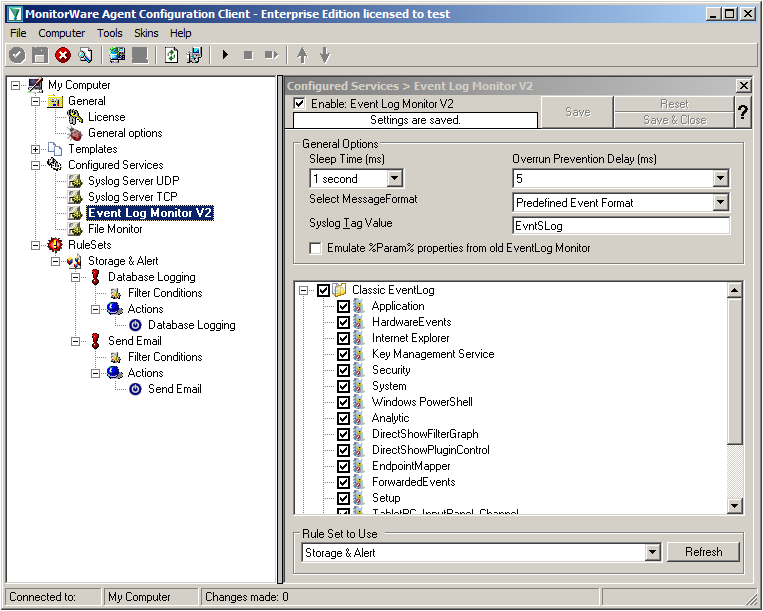
The Event Log Monitor V2 needs no additional setup. Again the default values are ok. If you want specific Event categories not to be stored, you can disable the options. But the basic format is sufficient.

Step 1.8

Settings for File Monitor
centralized_monitoring_1029

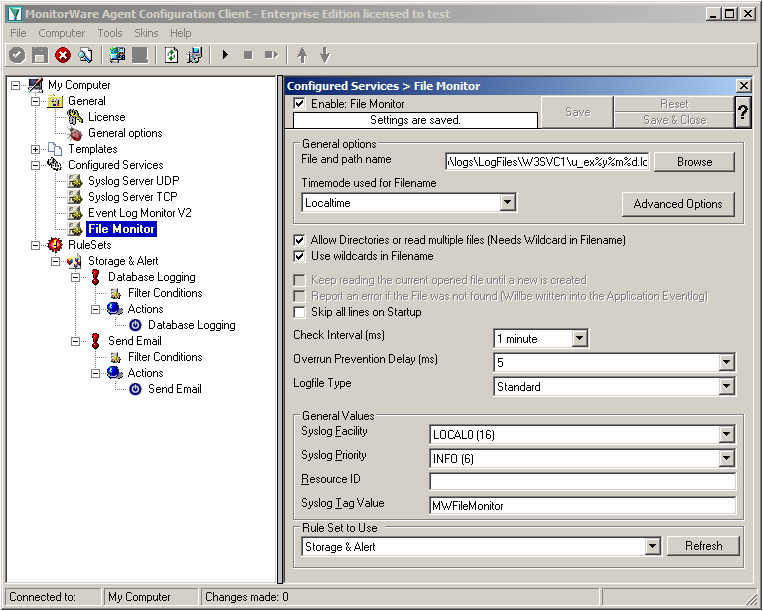
The File Monitor needs some additional settings. First, enable the option “Allow Directories or read multiple files”. You will see, that the use of wildcards will be automatically enabled and some other options completely being disabled.

Then we need to set the source files. For our example, we want to monitor the IIS logfiles. At the top of the File Monitor configuration you can see the option “File and path name”. There is a Browse button right next to it. Click it.

A windows explorer window will open, where you can choose the file you want to monitor. Navigate to the path C:\inetpub\logs\LogFiles\W3SVC1\. This is the location where the log files are stored. Please note, that the file location could be different when using another version of IIS. Choose the first file in the list. (Note: Daily Internet Information Server log files are named “u_exyymmdd.log”, with yy being the 2 digit year, mm the month and dd the day of month. To generate the same name with file monitor, use the following name “u_ex%y%m%d.log”.)
Set the Logfile Type to “W3C WebServer Logfile”.

Please note, that this step can be easily adapted for other log files (e.g. DHCP log files) as well.

Step 1 Finished

We have now finished the configuration for our central server. It will now be able to receive syslog either via TCP (port 10514) or UDP (port 514), monitor the local Event Log as well as the IIS logfiles. Once more click the “Save” button to save the configuration (if not done already) and start the service. All log messages will now be stored into the database as they arrive/occur. Further, administrators will be alerted via email once an error occurs.

<< Go back to the main page
2011-02-28 MonitorWare Agent 7.2b released

Adiscon is proud to announce the 7.2b release of MonitorWare Agent. This is a bugfixing release.

This release only consists of bugfixes:

  • Fixed an issue with percent characters in EventLog Monitor V1 and V2.
  • Fixed an RFC 2822 compatibility issue with hours which could cause problems displaying the correct time in some mailclients.
  • Corrected support for the OutputEncoding Option in ODBC and OLEDB Action related to character fields.
  • Fixed encoding detection for UTF8 encoded Syslog messages, where the BOM starts after the RFC 5424 Syslogheader.

For more details read the version history

Version 7.2b is a free download. Customers with existing 6.x keys can contact our Sales department for upgrade prices. If you have a valid Upgrade Insurance ID, you can request a free new key by sending your Upgrade Insurance ID to sales@adiscon.com. Please note that the download enables the free 30-day trial version if used without a key – so you can right now go ahead and evaluate it.

How to monitor a Software-Raid on Windows 2003 by using the EventLog Monitor of MonitorWare Agent

How to monitor a Software-Raid on Windows 2003 by using the EventLog Monitor of MonitorWare Agent.

Article created 2008-01-17 by Andre Lorbach.

This article will guide you in how to monitor a software raid on Windows 2003 by filtering specific events by using the EventLog Monitor in MonitorWare Agent. This is also possible with EventReporter, however this article will target the more powerful MonitorWare Agent.

  • You can download a preconfigured configuration from here, which you can import on your target system. The configuration sample will have comments for better understanding. The MonitorWare Agent Client can import the XML/REG configuration file by using the “Computer Menu”.

Raid Systems have a big advantage for failover support and prevent data loss. But what when a hard disk is failing, you don’t know it? Windows Server Systems often run for months without being monitored, and what if two hard disk fail in this time period? A nightmare for every system administrator. So we will setup a EventLog Monitor in MonitorWare Agent which alert you by email in case of a raid brakes, a hard disk fails or anything else bad happens.

Table of Contents

1. Creating a Windows Software Raid (Skip if Raid exists!)
1.1 Convert Hard disks into dynamic disks
1.2 Adding a Mirror to the existing system partition
2. Installing and Configuring MonitorWare Agent
2.1 Download and Install MonitorWare Agent
2.2 Setup up basic MonitorWare Agent configuration
2.3 How to verify that the alert is working?
Final Thoughts

1. Creating a Windows Software Raid (Skip if Raid exists!)

1.1 Convert Hard disks into dynamic disks

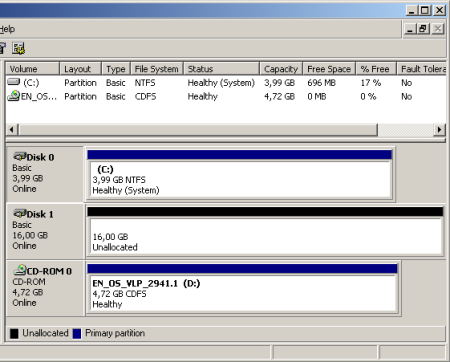
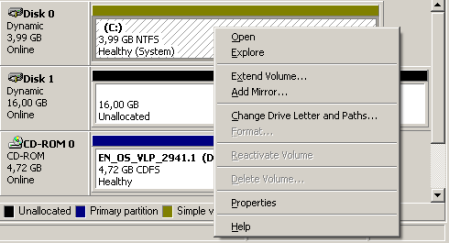
So in case you have no Software Raid configured yet, open the Computer Management und go to the Disk Management. You will see your System drive and you should have a second hard disk with enough free space available. For a sample see the screenshot.

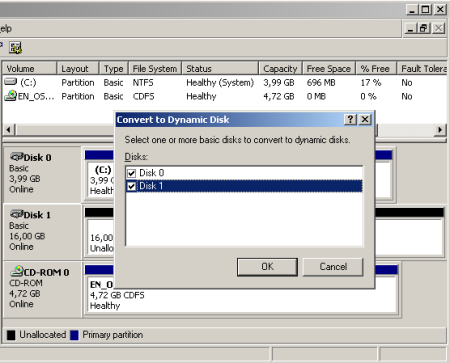
Right-Click one of the disks and click on “Convert to Dynamic Disk”. A wizard will appear, select both hard disks, the system one and the one you are going to use as raid mirror. Once you have accepted this, a couple of questions will follow which you need to accept and finally a reboot is required. This is because Windows can not convert a hard disk if the system is running on it.

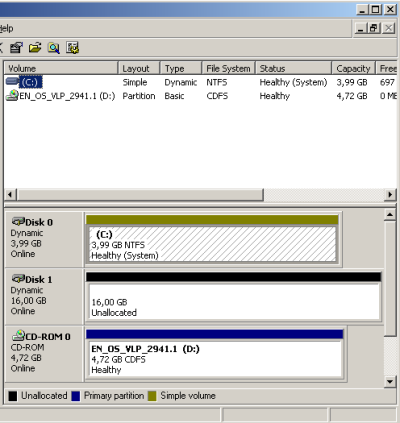
Once you have rebooted, logged in and open the Disk Management. You will notice the different partition color. This means your system partition runs on a dynamic disk now, the conversion went fine. If not review the System EventLog for possible errors.

Back to Top

1.2 Adding a Mirror to the existing system partition

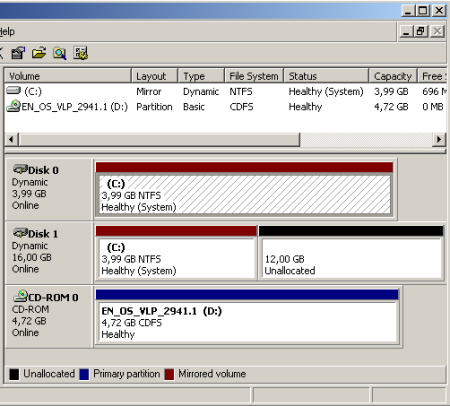
All requirements for a software raid (mirror) are now given, so kindly right click your system partition and click on “Add Mirror“. A requester will open which will ask you on which disk you want to add the mirror. In our sample, this would be disk 1. After the mirror has been added, Windows will start regenerating the mirror which means it will sync both hard disks. This may take some time depending on the size of your hard disk, maybe even hours.

As you can see the partitions are now marked red which represents the color for mirrored partitions. After the synchronization has finished, the red partitions will be marked as healthy in the Disk Management view.

Back to Top

2. Installing and Configuring MonitorWare Agent

2.1 Download and Install MonitorWare Agent

So if you haven’t done so already, go to www.mwagent.com and download the latest MonitorWare Agent Version. It is always recommended to use the latest Version of MonitorWare Agent. Once the Download is done, go ahead and install it. You may have to restart after installation, this depends on your System.

Back to Top

2.2 Setup up basic MonitorWare Agent configuration

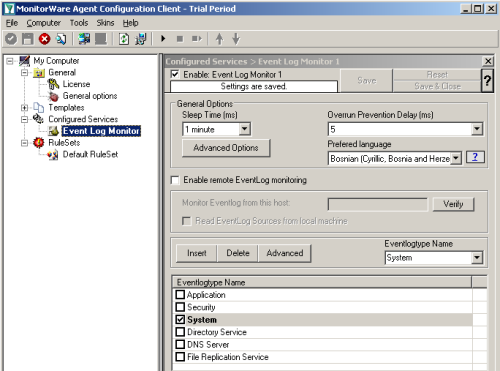
Start the MonitorWare Agent Client and skip the wizard on startup. First we create new “Event Log Monitor” Service. Uncheck all event log types except System, as this is the only event log needed to achieve our goal. If you like to monitor other Event Log Types too, you may select them. It will have no impact on our following configuration.

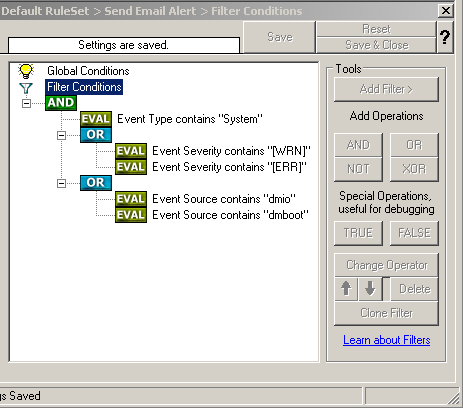
Now we can add another Rule called “Send Email Alert”. This rule will have a few filters to only allow events with warning or error severity. The Eventlogtype is System and the event sources which matter to us are dmio and dmboot. The filters should look like in this screenshot.

For additional reference, here is a list of possible dmboot und dmio events:
Event ID 1: “dmboot: Volume %2 (no mountpoint) started in failed redundancy mode.”
Event ID 2: “dmboot: Volume %2 (%3) started in failed redundancy mode.”
Event ID 3: “dmboot: Failed to start volume %2 (%3)”
Event ID 4: “dmboot: Failed to encapsulate selected disks”
Event ID 5: “dmboot: Disk group %2 failed. All volumes in the disk group are not available.”
Event ID 6: “dmboot: Failed to auto-import disk group %2. All volumes in the disk group are not available.”
Event ID 7: “dmboot: Failed to restore all volume mount points. All volume mount points may not be available. %2”

Event ID: 1, “dmio: Device %2,%3: Received spurious close”
Event ID: 2, “dmio: Failed to log the detach of the DRL volume %2”
Event ID: 3, “dmio: DRL volume %2 is detached”
Event ID: 4, “dmio: %2 error on %3 %4 of volume %5 offset %6 length %7”
Event ID: 5, “dmio: %2 %3 detached from volume %4”
Event ID: 6, “dmio: Overlapping mirror %2 %3 detached from volume %4”
Event ID: 7, “dmio: Kernel log full: %2 %3 detached”
Event ID: 8, “dmio: Kernel log update failed: %2 %3 detached”
Event ID: 9, “dmio: detaching RAID-5 %2”
Event ID: 10, “dmio: object %2 detached from RAID-5 %3 at column %4 offset %5”
Event ID: 11, “dmio: RAID-5 %2 entering degraded mode operation”
Event ID: 12, “dmio: Double failure condition detected on RAID-5 %2”
Event ID: 13, “dmio: Failure in RAID-5 logging operation”
Event ID: 14, “dmio: log object %2 detached from RAID-5 %3”
Event ID: 15, “dmio: check_ilocks: stranded ilock on %2 start %3 len %4”
Event ID: 16, “dmio: check_ilocks: overlapping ilocks: %2 for %3, %4 for %5”
Event ID: 17, “dmio: Illegal vminor encountered”
Event ID: 18, “dmio: %2 %3 block %4: Uncorrectable %5 error”
Event ID: 19, “dmio: %2 %3 block %4:\r\n Uncorrectable %5 error on %6 %7 block %8”
Event ID: 20, “dmio: Cannot open disk %2: kernel error %3”
Event ID: 21, “dmio: Disk %2: Unexpected status on close: %3”
Event ID: 22, “dmio: read error on object %2 of mirror %3 in volume %4 (start %5, length %6) corrected”
Event ID: 23, “dmio: Reassigning bad block number %2 on disk %3”
Event ID: 24, “dmio: Reassign bad block(s) on disk %2 succeeded”
Event ID: 25, “dmio: Fail to reassign bad block(s) on disk %2: error 0x%3”
Event ID: 26, “dmio: Found a bad block on disk %2 at block number %3”
Event ID: 27, “dmio: Corrected a read error during RAID5 initialization on %2”
Event ID: 28, “dmio: Failed to recover a read error during RAID5 initialization on %2: error %3”
Event ID: 29, “dmio: %2 read error at block %3: status 0x%4”
Event ID: 30, “dmio: %2 write error at block %3: status 0x%4”
Event ID: 31, “dmio: %2 write error at block %3 due to disk removal”
Event ID: 32, “dmio: %2 read error at block %3 due to disk removal”
Event ID: 33, “dmio: %2 is disabled by PnP”
Event ID: 34, “dmio: %2 is re-online by PnP”
Event ID: 35, “dmio: Disk %2 block %3 (mountpoint %4): Uncorrectable read error”
Event ID: 36, “dmio: %2 %3 block %4 (mountpoint %5): Uncorrectable read error”
Event ID: 37, “dmio: Disk %2 block %3 (mountpoint %4): Uncorrectable write error”
Event ID: 38, “dmio: %2 %3 block %4 (mountpoint %5): Uncorrectable write error”

The next step is to create a SendEmail Action and configure it like in the screenshot.

Here is the Event message we suggest to use, but feel free to create and modify your own:

You need to replace the mail server, sender and recipient with yourself.

Back to Top

2.3 How to verify that the alert is working?

There is a simple way to test if our alerting is working, however it isn’t without risks. I only recommend you to do this step if your really want to test the alerting! I do NOT recommend to perform this test on a productive system!

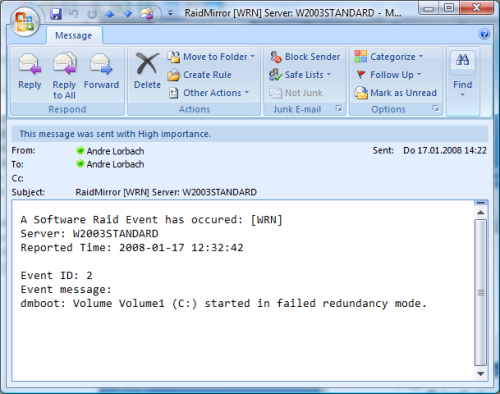
First of all shutdown the server and open the case. Then disconnect the second hard disk by removing the power or the data connector. Then boot the server, once windows is starting the services you should get an alert by email. It should look like the sample email in the screenshot.

If the test was successful, you can shutdown your server again. Connect the power / data connector and boot your server. You may receive the same email message again, as the raid is now OUT OF SYNC. So you need to open the Disk Management and right click the disk with the exclamation mark. Then select “Reactivate Disk”, the raid will begin resynchronization immediately after this.

Back to Top

Final Thoughts

I hope this article will help you solving your tasks and shows you the potential of MonitorWare Agent, and what you can archive with it. Feel free to email me for recommendations or questions.

Can I use the old EventLog Monitor with Vista?

Can I use the old EventLog Monitor with Vista?

Created 2007-04-18 by Florian Riedl.

Windows Vista available since early 2007. Due to the changes Microsoft introduced with Vista, the procedure for monitoring event logs with the non-Vista event log monitor has changed.  Adiscon introduced the native Vista EventLog Monitor V2 which requires no specific prerequisites. Some customers still prefer to use the previous EventLog Monitor. We recommend against this. However, there may be some reasons for doing so. If so, you have to go to “Control Panel -> Administrative Tools -> Services”. In the list of Windows internal services you have to find the service named “Remote Registry” and start it.

Remote Registry Service

Once the Service is started, you are able to fully use the old EventLog Monitor again, just like if you use Windows XP. Please keep in mind that only the XP-like subset of event logging is available via that monitor. To fully process Vista event logs, you need to switch to the V2 event log monitor.

Customers with further questions should kindly contact Adiscon support at support@adiscon.com.

How To setup EventLogMonitor V2 Service

How To setup EventLogMonitor V2 Service

Article created 2007-04-10 by Florian Riedl
Article updated 2011-05-25 by Tom Bergfeld.

Please note:

Starting with EventReporter 8.3 and MonitorWare Agent 4.3 two different event log monitor services are provided. They are called “Event Log Monitor” (V1) and “Event Log Monitor V2”. In short, the V2 version is recommended for Windows Vista (and above, e.g. Longhorn Server) while the other version is for previous releases of Windows (NT, 2000, 2003, XP). Please find more information about the different EventLogMonitors at Which Event Log Monitor to use.
There is also a guide How To setup EventLogMonitor V1 Service.

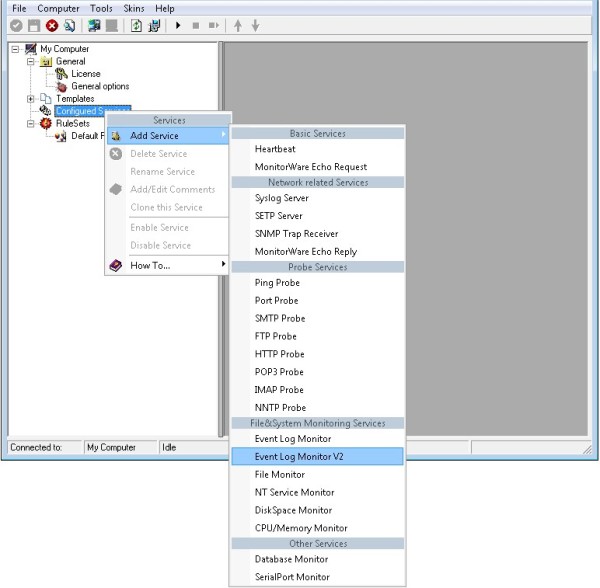
1. First, right click on “Services”, then select “Add Service” and then “Event Log Monitor V2”:

create service

2. Once you have done so, a new wizard starts.
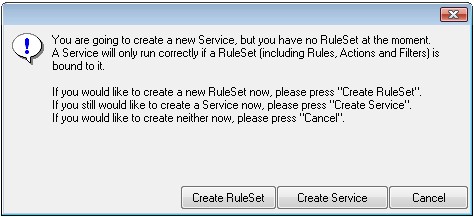
If the following Popup appears, please select “Create Service”:

create the service

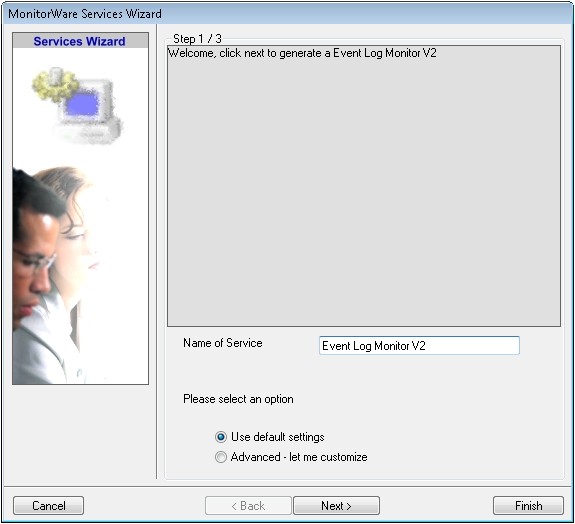
Again, you can use either the default name or any one you like. We will use the default name in this sample. Leave the “Use default settings” selected and press “Next”.
service name

3. As we have used the default, the wizard will immediately proceed with step 3, the confirmation page. Press “Finish” to create the service. The wizard completes and returns to the configuration client.

4. Now, you will see the newly created service beneath the “Services” as part of the tree view. To check its parameters, select it:

view service
As you can see, the service has been created with the default parameters.

Note: The “Default RuleSet” has been automatically assigned as the rule set to use. By default, the wizard will always assign the first rule set visible in the tree view to new services.

5. Finally we, bind a ruleset to this service. If you already have a ruleset, simply choose one. If not, then you will have to create one, or insert the actions you want to take in the default ruleset.
Remember, this is only an example. You can do it in any way you want.

6. The last step is to save the changes and start the service. This procedure completes the configuration of the syslog server.

The NT Service cannot dynamically read changed configurations. As such, it needs to be restarted after such changes. In our sample, the service was not yet started, so we simply need to start it. If it already runs, you need to restart it.

That’s it. This is how you create a simple EventLog Monitor V2 for Vista.

How To setup EventLogMonitor Service

How To setup EventLogMonitor Service

Article created 2003-02-24 by Rainer Gerhards.
Last Updated 2011-05-25 by Tom Bergfeld.

Please note:

Starting with EventReporter 8.3 and MonitorWare Agent 4.3 two different event log monitor services are provided. They are called “Event Log Monitor” (V1) and “Event Log Monitor V2”. In short, the V2 version is recommended for Windows Vista (and above, e.g. Longhorn Server) while the other version is for previous releases of Windows (NT, 2000, 2003, XP). Please find more information about the different EventLogMonitors at Which Event Log Monitor to use.
There is also a guide How To setup EventLogMonitor V2 Service.

1. First, right click on “Services”, then select “Add Service” and then “Event Log Monitor”:

2. Once you have done so, a new wizard starts.
If the following Popup appears, please select “Create Service”:

Again, you can use either the default name or any one you like. We will use “My Event Log Monitor” in this sample. Leave the “Use default settings” selected and press “Next”.

3. As we have used the default, the wizard will immediately proceed with step 3, the confirmation page. Press “Finish” to create the service. The wizard completes and returns to the configuration client.

4. Now, you will see the newly created service beneath the “Services” part of the tree view. To check its parameters, select it:


As you can see, the service has been created with the default parameters.

Note 1: The “Default RuleSet” has been automatically assigned as the rule set to use. By default, the wizard will always assign the first rule set visible in the tree view to new services. In our case, this is not correct and will be corrected soon.

Note 2: If you want to generate reports (using Monilog) on the data via this service i.e. EventLogMonitor, then you have to press the “Configure for Monilog” button and make the settings as shown in the screen-shot.

Note 3: If you want to generate reports (using MonitorWare Console) on the data via this service i.e. EventLogMonitor, then you have to uncheck the “Use Legacy Format” option. This is recommended. If you don’t uncheck this option then meaningful reports aren’t generated (i.e. reports are not properly consolidated by MonitorWare Console).

5. Now you must differentiate between clients and central hub server. In clients use the “Forward ” RuleSet we have created in Step 2, select it as rule set to use. In central hub server select the “Database Logging” RuleSet we have created in Step 3. Leave all other settings in their default.

Clients:

Central hub server:

6. Finally, save the change and start MonitorWareAgent. This procedure completes the configuration of the syslog server.

MonitorWare Agent cannot dynamically read changed configurations. As such, it needs to be restarted after such changes. In our sample, the service was not yet started, so we simply need to start it. If it already runs, you need to restart it.

With step 5 the client machines configuration has finished. All the next steps are only concerned with the central hub server.

Configuring Windows for the Event Log Monitor

Article created 2003-05-12 by Rainer Gerhards.

Configuring Windows for the Event Log Monitor

The event log monitor service pulls events from the Windows event logs. In Windows’ default setup, the information contained in the logs is sparse and far from sufficient for security monitoring. If you are solely interested in checking system health, the default setting can be sufficient. If you are interested in security monitoring, you definitely need to change some settings in order to receive a useful result. This will be described in detail later in this section.

No matter what your logging needs are, you need to change the log file overwrite mode. Windows uses a circular buffer for each event log. Once the log file maximum size is reached, whenever a new event is written, an old one is overwritten. This is no problem if the log file size is large enough – and the default typically is – because the event log monitor retrieves log entries on a regular basis and forwards them to the configured destination. As such, no event is lost when an old one is overwritten. However, in default setup, Windows will stop writing events to the event logs when these logs are full and events younger than 7 days would be overwritten. Windows indicates this by placing a respective event into the system log , which of course will not help us retrieve any of the lost logs.

As such, we highly recommend that the log mode is set to “Overwrite as needed” instead to “Overwrite after 7 Days”. In addition, we recommend extending the size of the event log files to 10 to 20 MB. This is just a security precaution – but with today’s hard disk sizes it does not really matter if 100 MB or so are set aside as an additional buffer for unusual high log activity.

Please note that the CERT advises to increase the log size but also advises not to allow Windows to overwrite the log files. Adiscon’s recommendation is not in contrast to the CERT advisory as the event log monitor takes care of the events before they can be overwritten. And, once to repeat, not allowing to overwrite logs can lead to lost log entries, even is a large amount of log space is set aside. A malicious user might first generate a massive amount of log data before the actual attack is carried out.