2017-07-24 MonitorWare Agent 11.2 released

Adiscon is proud to announce the 11.2 release of MonitorWare Agent.

Besides some bugfixes (See Version History for details) a few new features have been added to this minor release. Most important is the ability to use regular expressions as compare operation when filtering properties. Properties can also be converted into IPv4 or IPv6 Addresses now, and the Syslog Priority/Facility can be overwritten in the Syslog Action.

Detailed information can be found in the version history.

Version 11.2 is a free download. Customers with existing 10.x keys can contact our Sales department for upgrade prices. If you have a valid Upgrade Insurance ID, you can request a free new key by sending your Upgrade Insurance ID to sales@adiscon.com. Please note that the download enables the free 30-day trial version if used without a key – so you can right now go ahead and evaluate it.

MonitorWare Agent 11.2 Released (Build-IDs: Service 11.2.0.502, Client 11.2.0.1580)

MonitorWare Agent 11.2 Released

Build-IDs: Service 11.2.0.502, Client 11.2.0.1580

Features

  • Syslog Action: Added support to overwrite Syslog Priority/Facility
  • SNMP Trap Receiver: Added support to print OCTET STRINGS with format hints. Format hints are now properly used using internal NET-SNMP functions. Support for encoding detection does not work for those SNMP Variables.
  • File Action: Added option to control the Filehandle timeout when using dynamic filenames.
  • Property Engine: Added two new property replacer options “toipv4address” and “toipv6address” to resolve a property into a valid IPv4 or IPv6 Address.
  • Filter Engine: Implemented a new regular expressions compare operation.
    More details on how to use REGEX can be found in the new documentation.
  • Configuration Reload: Added new options to add a random delay between configuration checks. The delay is limited to 60 seconds as it will also delay the service control manager communication.

Bugfixes

  • SNMP Monitor: Fixed internal crash when using multiple SNMP Monitor Services.
  • Syslog Action: Fixed bug in Syslog Cache processing when saved messages were larger than 4096 bytes.
  • File Action: Fixed closing filehandles on very busy systems.
  • Filter Engine: Fixed Extended IP Filtering when using lower or greater compare operation.
  • Normalize Action: Removed incorrect NULL Byte at the end of the INPUT String.
  • File Configuration: Fixed reading Filter values containing backslashes.
    They weren’t removed properly in filter values.

You can download Free Trial Version of MonitorWare Agent.

Centralized logging in a hybrid environment (Windows/Linux) – Step 1

Step 1 – Setting up the central log server:

The central log server is the most important part of our central log storage and thus will be configured as the first part. And due to all the things it needs to do, it has the most work of course. When selecting your machine to install the central log server on, please keep in mind, that you need quite a good machine for larger networks. If you have a very large environment, it might be a good idea to use multiple servers for this scenario with a load balancer and a separate database server. But in this guide, we will have it all on one machine.

Prerequisites:

The following should be installed and working:

  • Windows Server operating system (Windows Server 2008)
  • Database Server (MSSQL)
  • IIS Webservice
  • MonitorWare Agent Professional Server (V7.2)

The list holds the things necessarily needed. In the brackets is schon which we will use in this example. Please note, that this will work with other versions as well, especially with MonitorWare Agent.

As mentioned before, MonitorWare Agent will have multiple purposes. It should receive syslog via TCP and UDP, monitor the local EventLog and textbased logfiles as well as writing everything into a database and sending email messages in case of error and critical messages occuring.

Step 1.1

First of all, we will set up the processing rules and actions. We will start this way due to the design of MonitorWare Agent. Since the Services need to be bound to a ruleset upon creation, we will start this way, so the ruleset is there already when creating the service.

centralized_monitoring_1001

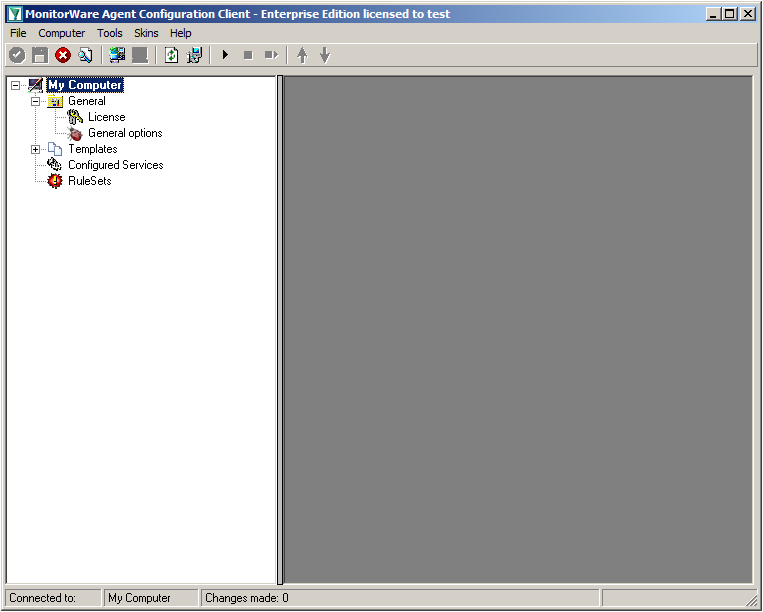
When starting MonitorWare Agent the first time, you will see on the lefthand side our overview of “Configured Services” and “Rulesets”. Right now, there shouldn’t be any entries here.

centralized_monitoring_1002

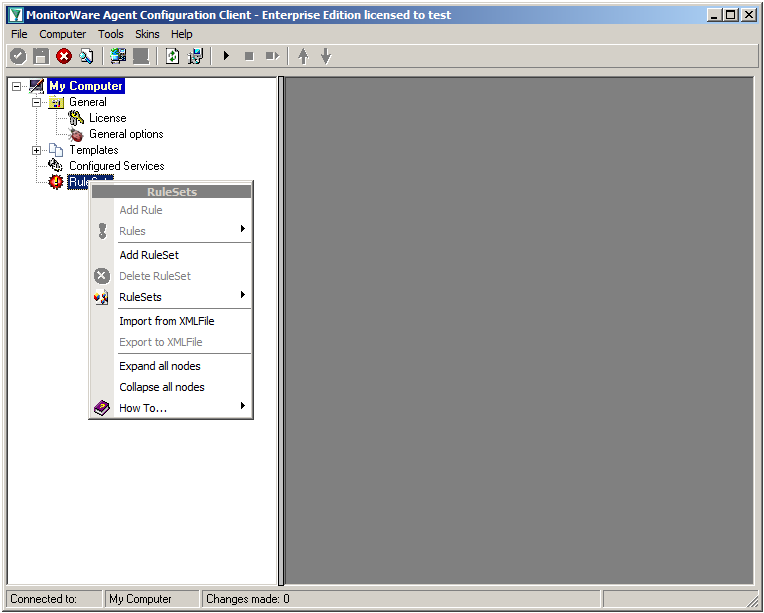
Right click on “Rulesets”. A context-menu will open.

centralized_monitoring_1003

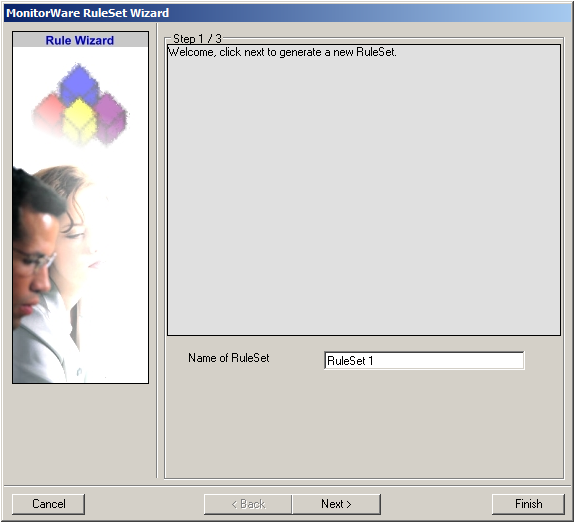
Choose “Add Ruleset”. The ruleset wizard will open. On this first screen, we can choose the name of the ruleset.

centralized_monitoring_1004

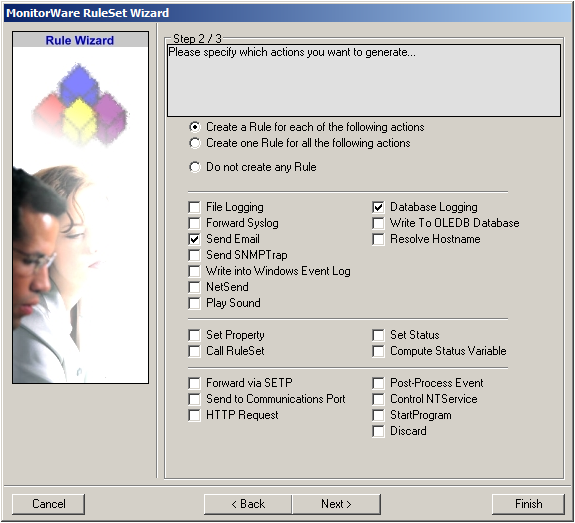
After choosing a name (in this example “Storage & Alert”), click on “Next”. Here we can set, what we will need. Leave the marker for “Create a Rule for each of the following actions” and choose “Send Email” and “Database Logging”.

centralized_monitoring_1005

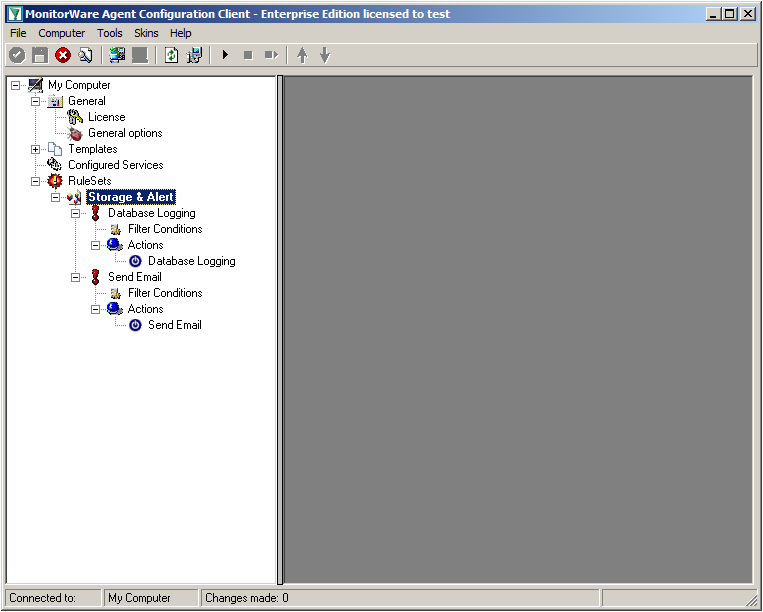
You can now click on Finish. You will now see a new ruleset in the treeview on the left hand side. If you expand this view completely, you can see the two rules that have been created and the actions that are in there. You should have a rule “Database Logging” and a rule “Send Email”.

Step 1.2

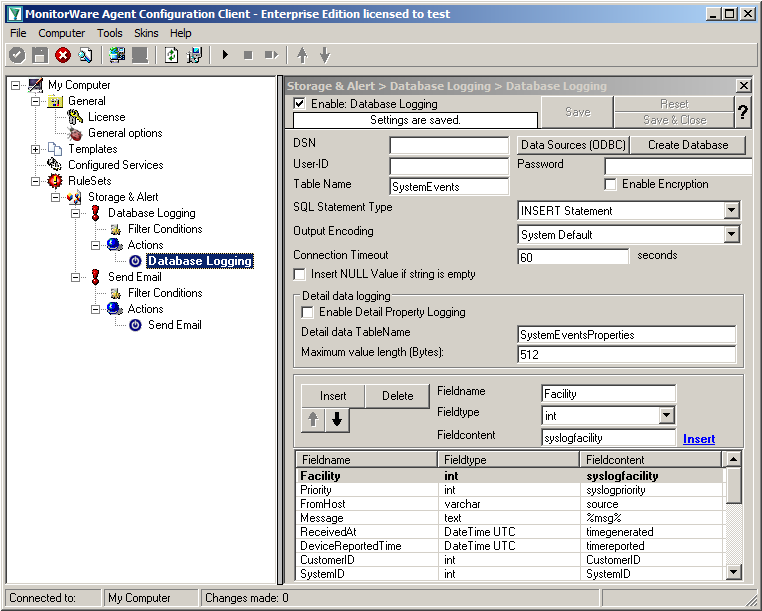
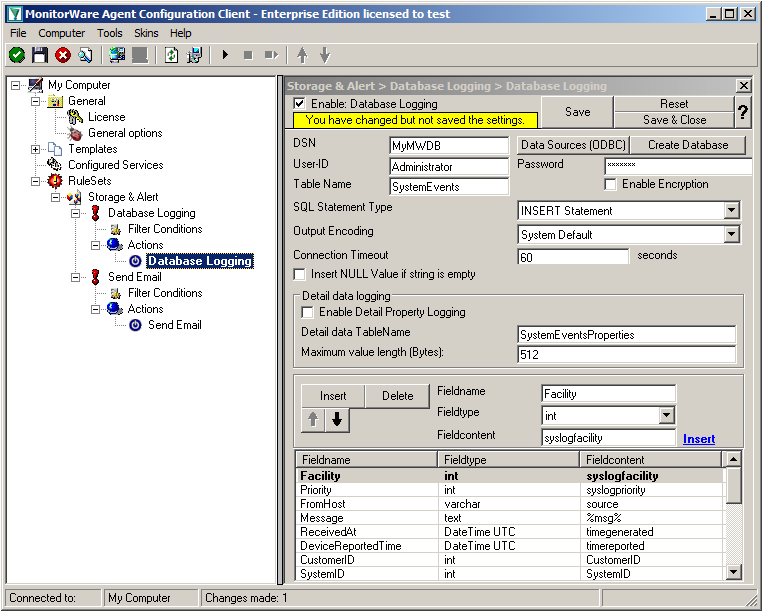
We will now start with configuring the action for “Database Logging”. Expand the branch called “Database Logging” completely. Under actions you will find the “Database Logging” action. When you click it, you will see the configuration window.

centralized_monitoring_1006

Click on the button “Data Source (ODBC)”. This will open the ODBC Data Source Administrator.

centralized_monitoring_1007

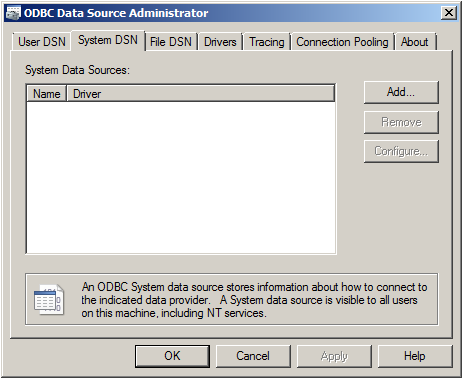
Go to System DSN and click “Add…”.

centralized_monitoring_1008

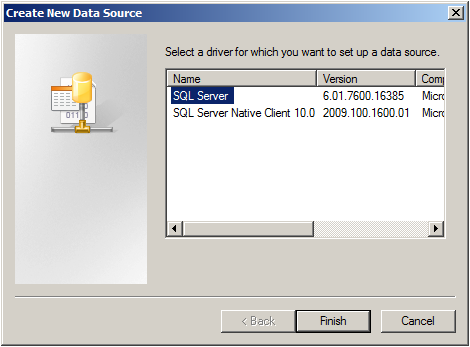
Select SQL Server from the list and click “Finish”.

centralized_monitoring_1009

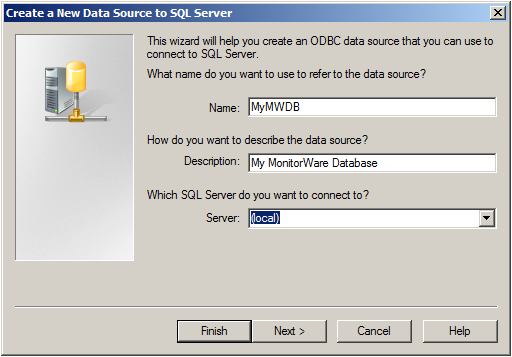
Choose a name for the datasource and a description. In this case we choose MyMWDB as name. As server choose the name of the server where the database is. In our example we use localhost. Now click on “Next”.

centralized_monitoring_1031

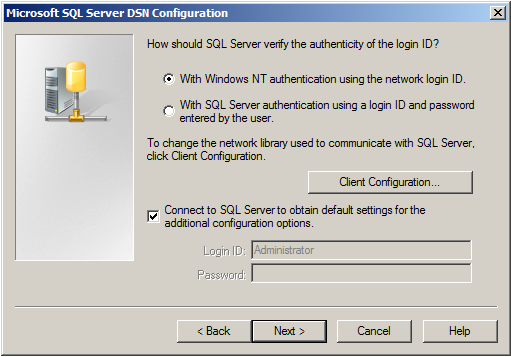
Select “SQL Server Authentication” and type in your MSSQL Login ID and Password. If you have Windows NT authentication like in our case, leave it as is. Click on “Next”.

centralized_monitoring_1010

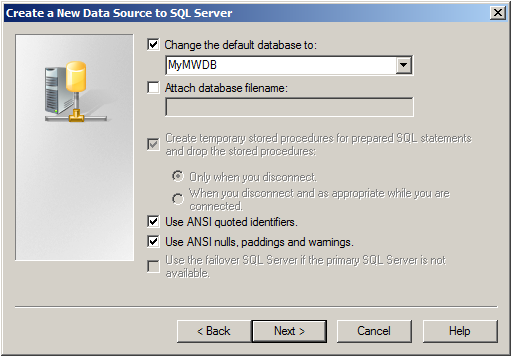
Select “Change the default Database to:” and choose your new created Database, in our example we use “MyMWDB” which we created beforehand. Click on “Next”.

centralized_monitoring_1011

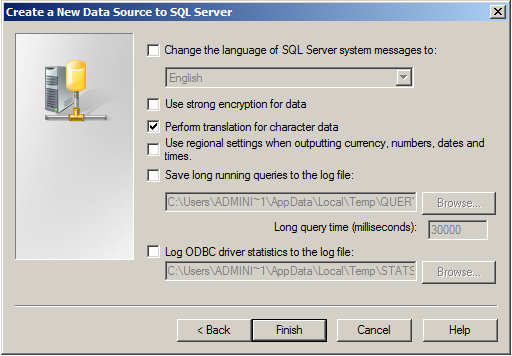
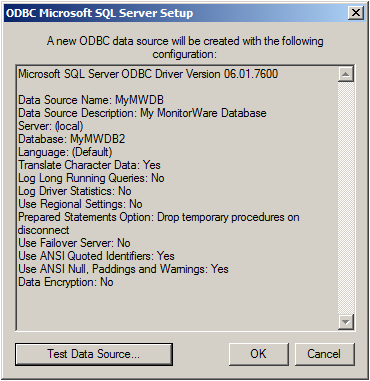
Leave all at default settings and click “Finish”, a test Window will appear:

centralized_monitoring_1012

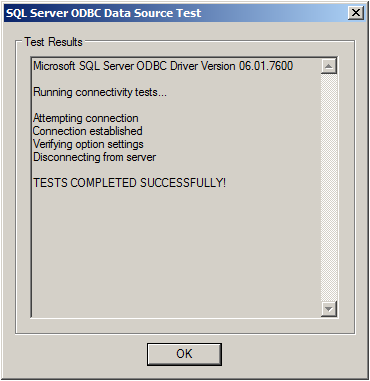
Click on “Test Data Source”, normally the following Window should be displayed:

centralized_monitoring_1013

If not, go back and check your Settings, if yes, Click “OK” and exit the System-DSN Wizard.

centralized_monitoring_1014

Now we are back in MonitorWare Agent. Insert the DSN for your database, User-ID and Password.

centralized_monitoring_1015

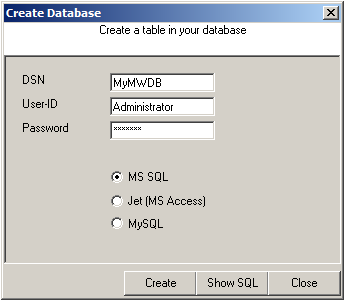
After that, click the “Create Database” button. We still need the tables that the log messages will be stored in. After clicking the button, a small window will open. Insert the DSN, User-ID, Password and choose the type of database you are using, in our case MS SQL. By clicking on the “Create” Button, the tables needed for the default database format of the MonitorWare Products will be created. After that, close the window.

Since we want to log all messages into the database, there is no need to set up any filters.

Step 1.3

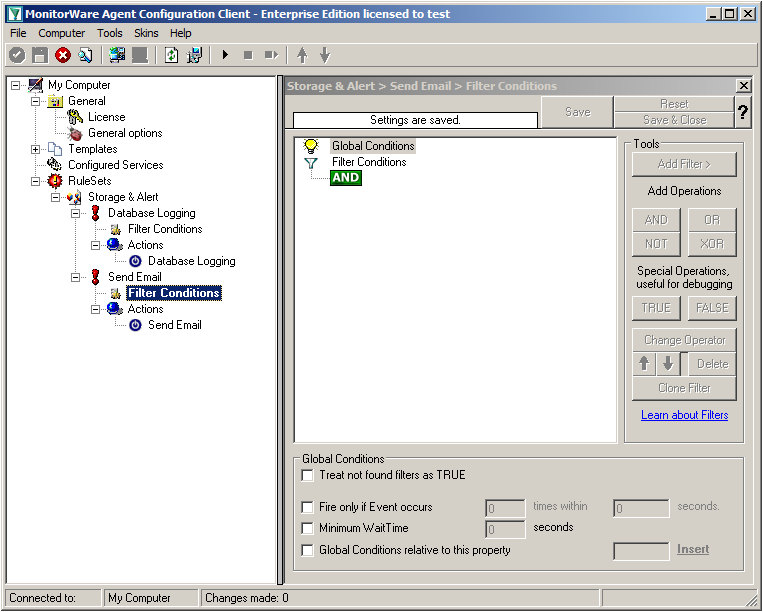
In the next step, we want to set up the Send Email rule. But since we only want error log messages, we need to set some filters. Click on the Filter Conditions. You will see the overview over the filters for this rule.

centralized_monitoring_1016

Right now, the view is empty except for a AND operator. Double-click it to change it into a OR operator.

centralized_monitoring_1017

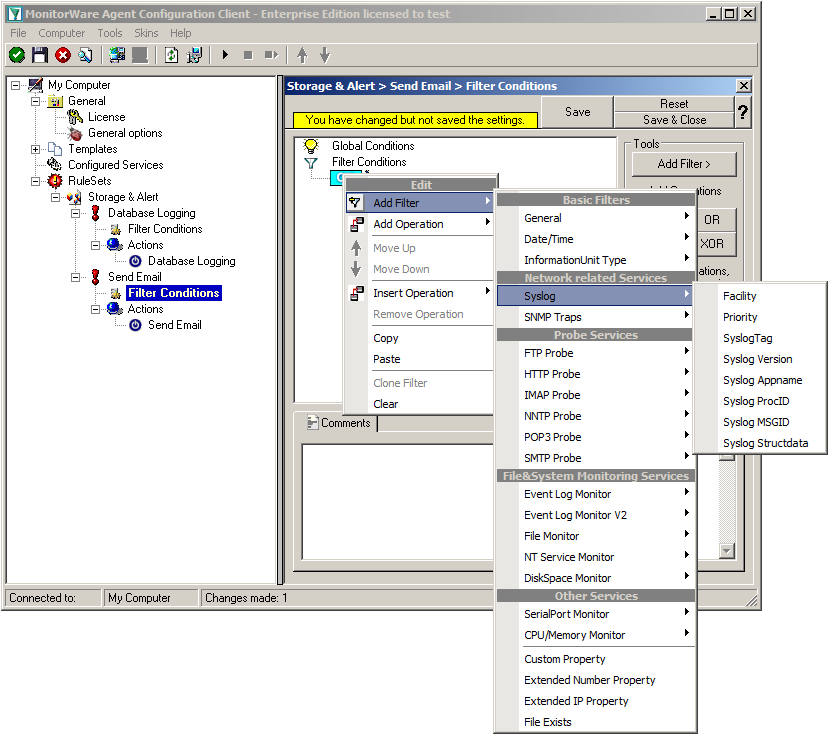
Right-click on the OR operator. A context menu will open. Go to Add Filter -> Syslog -> Priority.

centralized_monitoring_1018

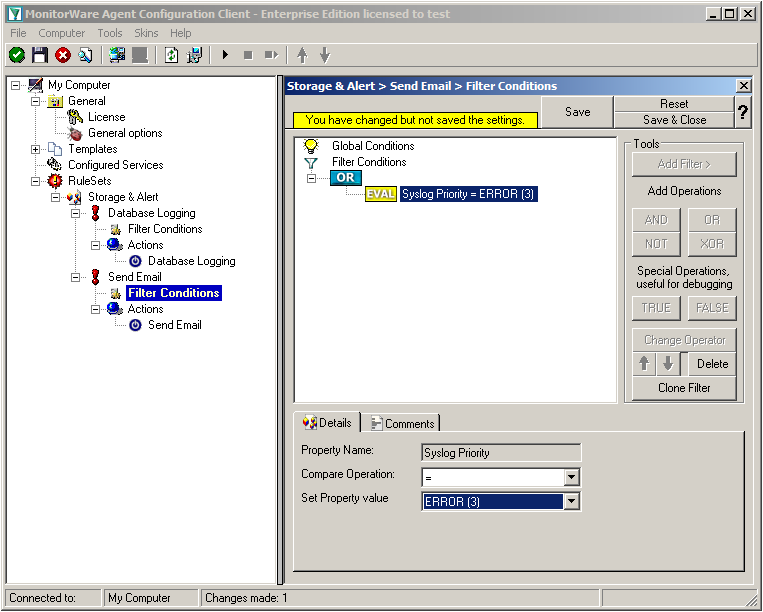
Click on the filter setting and change the property value to “Error (3)”.

centralized_monitoring_1019

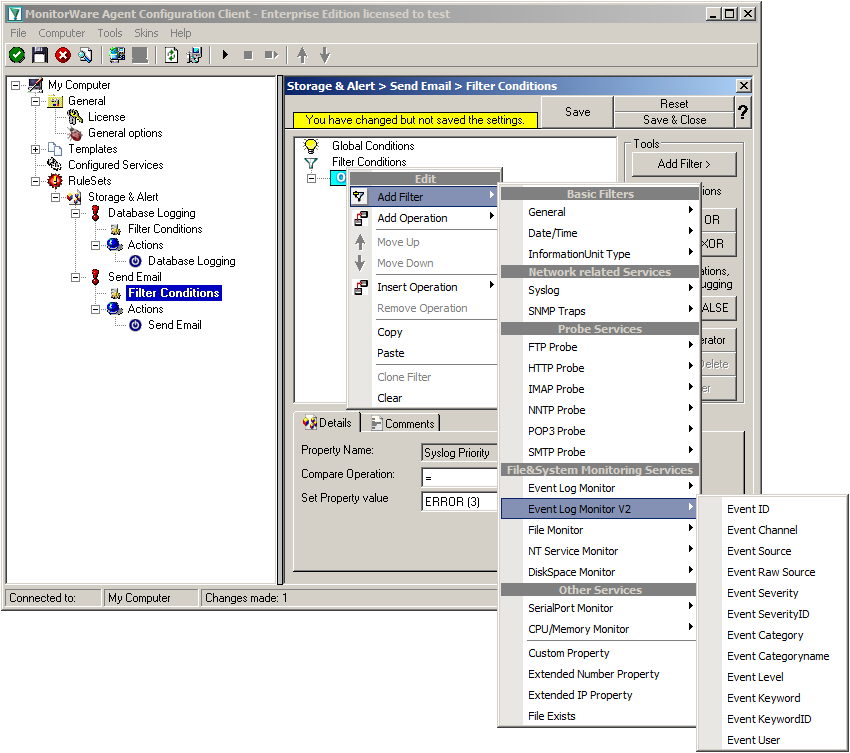
Again click on Add Filter -> EventLog Monitor V2 -> Event Severity.

centralized_monitoring_1020

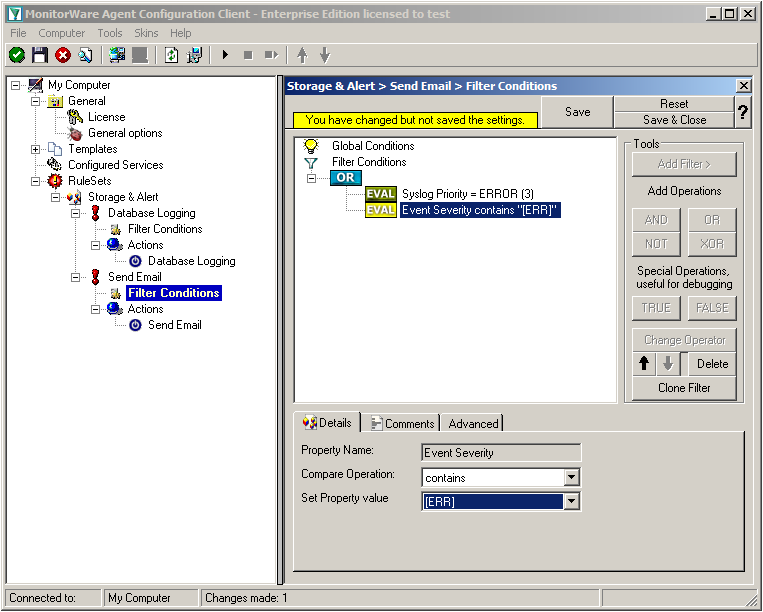
Click on the second filter setting and change the property value to “[ERR]”.

We are now finished with the filter settings. The filter will accept all log messages that are either of syslog proiority error or critical or Windows Event severity error. The OR operator ensures, that every of these cases will be accepted. When the messages are approved of fitting into the filter, the action will process them.

centralized_monitoring_1021

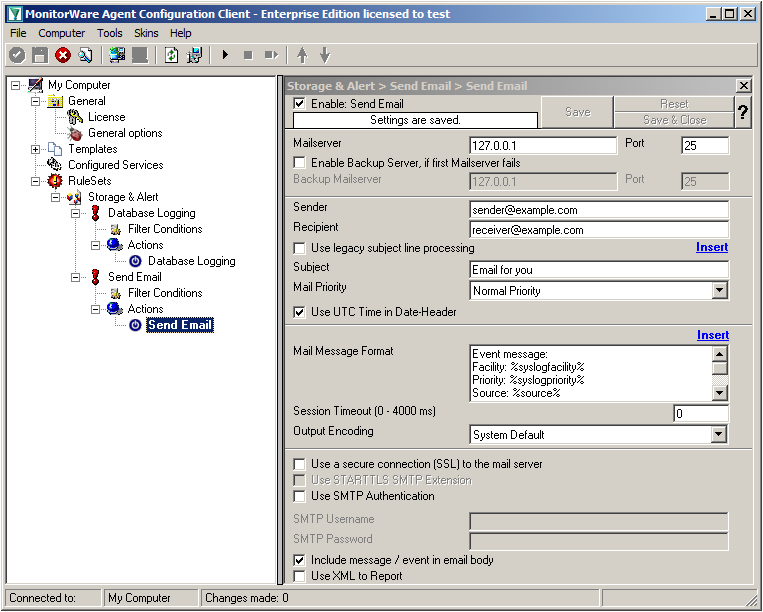
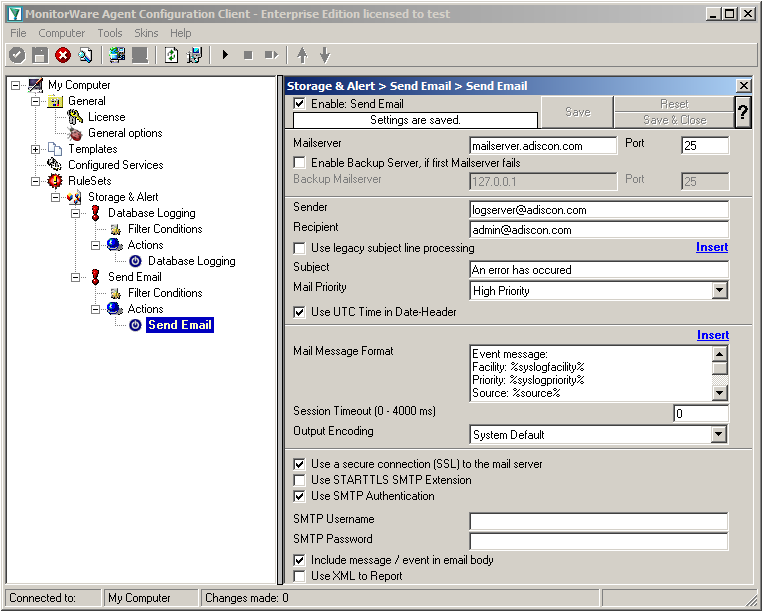
Click on the “Send Email” action now. You will see the configuration window on the right pane. Currently, there are only the default values in there.

centralized_monitoring_1022

We need to change some settings here, like the Mailserver, Sender and Recipient, the subject and the Mail Priority. If necessary for your mail server, you need to change the authentification settings at the bottom as well. in our example we need SMTP Authentication for that. If you want, you could even enable the backup mail server.

Now we have all actions fully configured. It is now time to setup the configured services.

Step 1.4

Currently, when clicking on Configured Services you will not see a thing. But we will configure the services now. Without them, MonitorWare Agent is not able to get any log messages. We will setup 2 Syslog Receiver, 1 EventLog Monitor and 1 File Monitor.

centralized_monitoring_1030

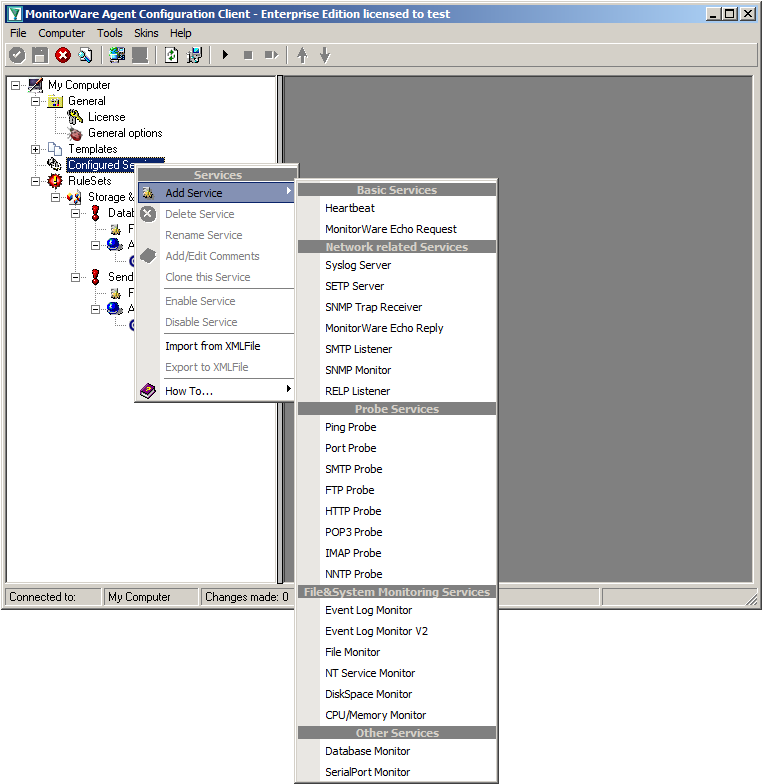
When right clicking on Configured Services a context-menu will open. By moving your cursor to “Add Service” you can see a list of Services, that may be configured. The list seems pretty long, but we basically need 3 services of them.

centralized_monitoring_1024

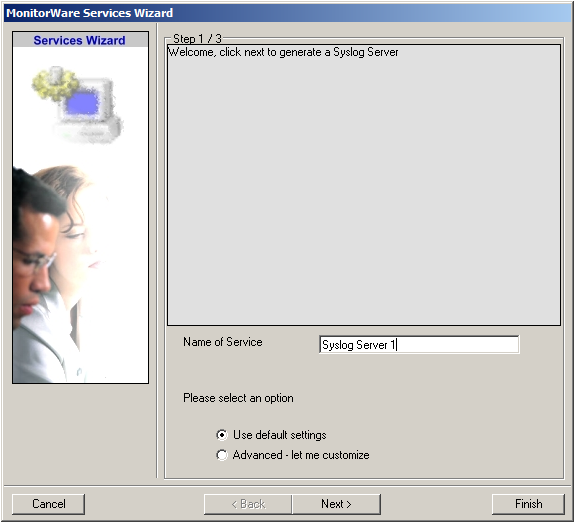
Click on “Syslog Server” first. The Services Wizard will open. Simply click on Finish for now. Repeat this again for Syslog Server, EventLogMonitor V2 and File Monitor.

centralized_monitoring_1025

In the end, you should have a list with 4 Services. For our example I renamed the services by doing a right-click on the Service name I wanted to change and the choosing “Rename Service”. This was mostly to distinct the two Syslog Servers.

Step 1.5

Settings for Syslog Server UDP

centralized_monitoring_1026

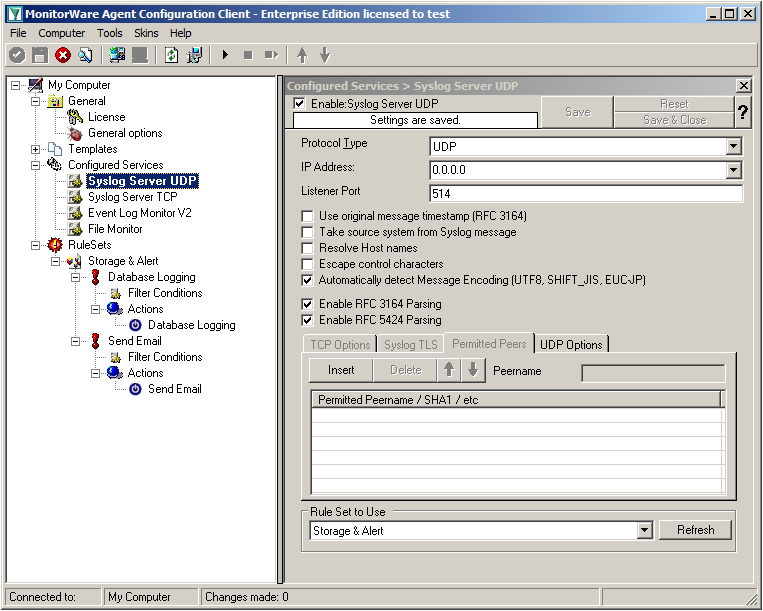
We can leave the “Syslog Server UDP” on default settings. It is already listening to UDP on port 514. The rest of the default settings is just fine.

Step 1.6

Settings for Syslog Server TCP

centralized_monitoring_1027

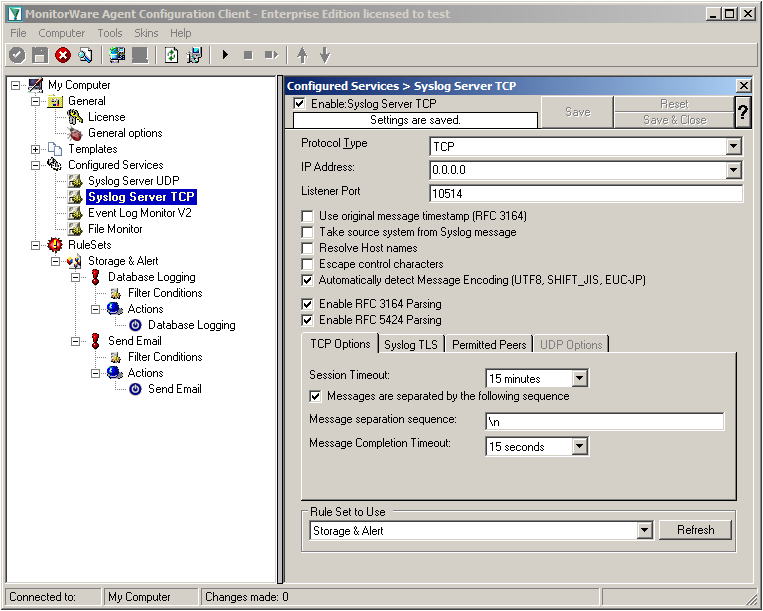
We will now go to the “Syslog Server TCP” now. Here we need to change several settings. Change the protocol type to TCP and the Listener Port to 10514. Further, we need to enable the option “Messages are separated by the following sequence” in the TCP options. It should look like this now:

Step 1.7

Settings for Event Log Monitor V2

centralized_monitoring_1028

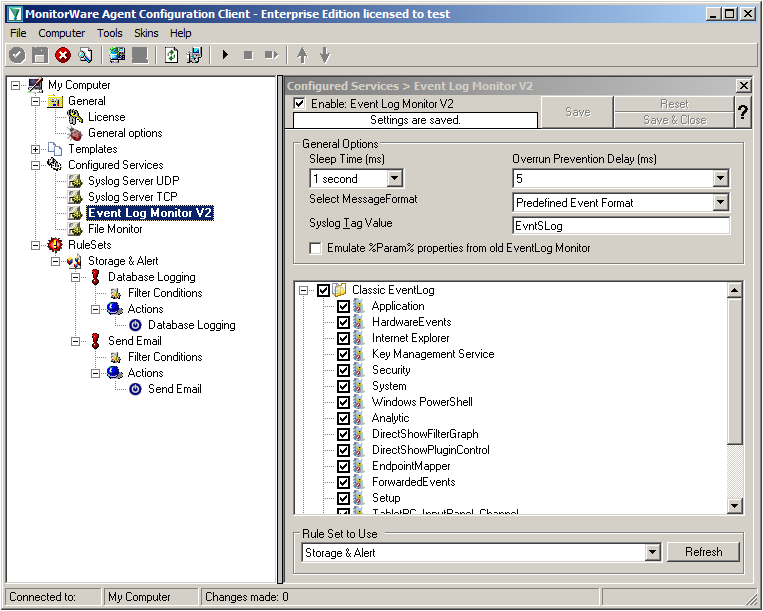
The Event Log Monitor V2 needs no additional setup. Again the default values are ok. If you want specific Event categories not to be stored, you can disable the options. But the basic format is sufficient.

Step 1.8

Settings for File Monitor

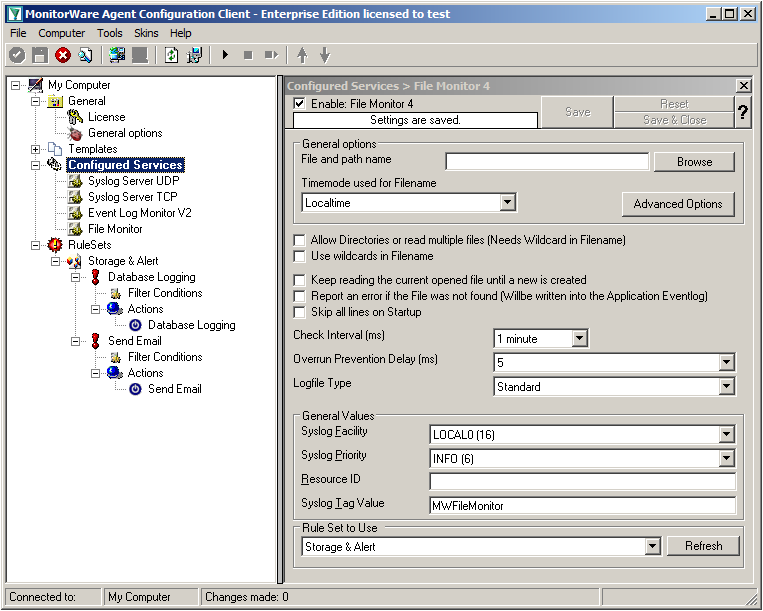
centralized_monitoring_1029

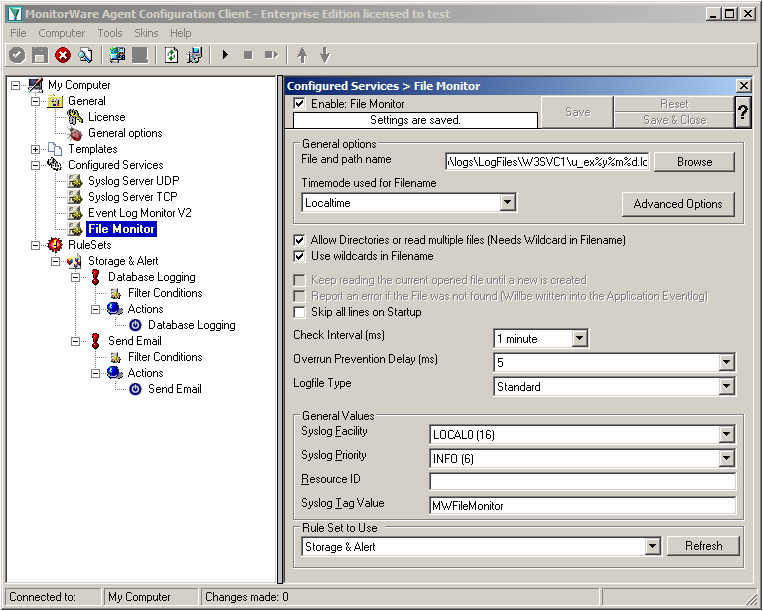
The File Monitor needs some additional settings. First, enable the option “Allow Directories or read multiple files”. You will see, that the use of wildcards will be automatically enabled and some other options completely being disabled.

Then we need to set the source files. For our example, we want to monitor the IIS logfiles. At the top of the File Monitor configuration you can see the option “File and path name”. There is a Browse button right next to it. Click it.

A windows explorer window will open, where you can choose the file you want to monitor. Navigate to the path C:\inetpub\logs\LogFiles\W3SVC1\. This is the location where the log files are stored. Please note, that the file location could be different when using another version of IIS. Choose the first file in the list. (Note: Daily Internet Information Server log files are named “u_exyymmdd.log”, with yy being the 2 digit year, mm the month and dd the day of month. To generate the same name with file monitor, use the following name “u_ex%y%m%d.log”.)
Set the Logfile Type to “W3C WebServer Logfile”.

Please note, that this step can be easily adapted for other log files (e.g. DHCP log files) as well.

Step 1 Finished

We have now finished the configuration for our central server. It will now be able to receive syslog either via TCP (port 10514) or UDP (port 514), monitor the local Event Log as well as the IIS logfiles. Once more click the “Save” button to save the configuration (if not done already) and start the service. All log messages will now be stored into the database as they arrive/occur. Further, administrators will be alerted via email once an error occurs.

<< Go back to the main page

Guide For Applying Filters in MonitorWare Agent, WinSyslog and EventReporter – MonitorWare Agent

How do I apply filters in MonitorWare Agent 4.0?

Article created 2006-06-19 by Timm Herget.

MonitorWare Agent enables you to apply filters to achieve your desired results. This step-by-step guide helps you through creating these filters. You can:

Interactive Logon/Logoff Filter

Interactive Logon/Logoff Filter

Created 2005-10-05 by Timm Herget

Please Note: This article is valid for EventReporter 8.x / MWAgent 4.x and lower and describes, how to set the filters to get only interactive logon’s/logoff’s.

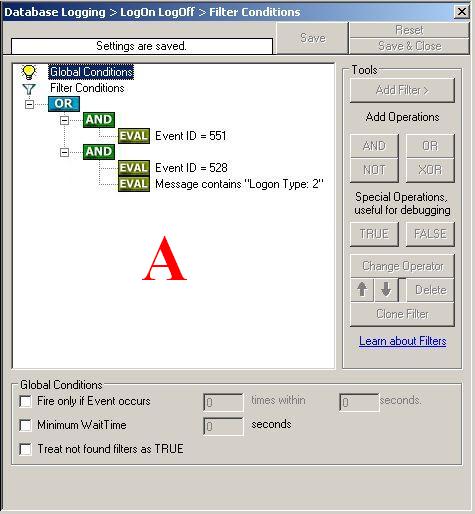
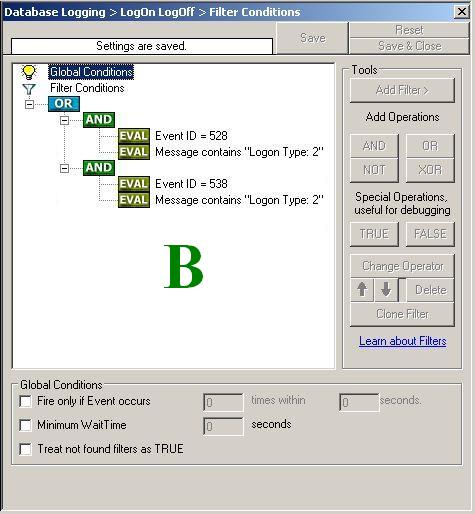
Click on your “Filter Conditions”. Here we have a little problem, because it depends on your operating system. If you work with Windows XP/2003 you should set the filters as shown on “Screenshot A” of our screenshots below. If you are using an older operating system, you should choose “Screenshot B”. This is because of a bug in Windows.

If a user logs on to windows interactive, event 528 with logon type 2 is logged.
Ostensibly, event 538 is logged whenever a user logs off, whether from a network connection, interactive logon, or other logon type. However, this event is not dependably logged, for a variety of reasons. In a nutshell, there is no way to reliably track user logoff events in the Windows environment. An interactive logoff is marked by logon type 2, too.

For further information about the issue with event 538 see this page.

Note: Beginning with Windows Server 2003, logoffs of logon type 2 sessions are logged with event 551.


Screenshot A: Set the Filters for WinXP/2003


Screenshot B: Set the Filters for older Windows
Click here to download a ZIP-Package with the samples as registry files. The ZIP-Package contains 4 files. Two files are version A and B for EventReporter and the other two files are version A and B for MonitorWare Agent.

How do I Update filters for MonitorWare Agent?

How do I Update filters for MonitorWare Agent?

Article created 2005-04-04 by
Hamid Ali Raja
.

2. In order to update a filter it’s necessary that you have a previously saved configuration in
which you had applied filters. Click here
if you wish to learn “How to add filters for MonitorWare Agent?”

Note:String comparison in Filter Conditions are “Case Sensitive”. For example, if the
Source System name is “ws01” and you had written “WS01” while applying the filter, then this filter
condition would “NEVER” evaluate to True! Please double check before proceeding further!

How to Update Filters?

1. Lets say that initially we were interested in getting an e-mail alert in a given time period
for the following filter condition:

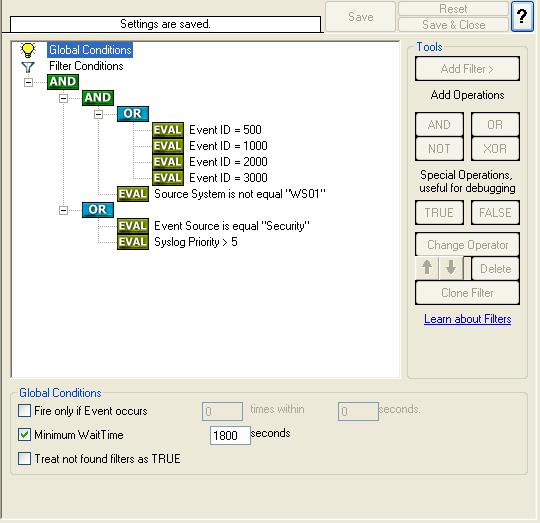
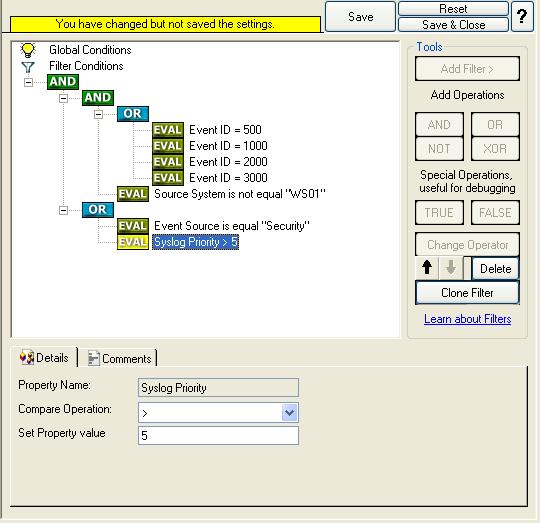
( (Event ID is 500 OR 1000 OR 2000 OR 3000) ) AND ( FromHost is not equal to WS01 ) )

AND

( ( Event Source is equal to Security ) OR ( Priority is greater than 5 ) )

And the filter form looked like this:

2. Lets assume that you wish to update this filter condition string to this now:

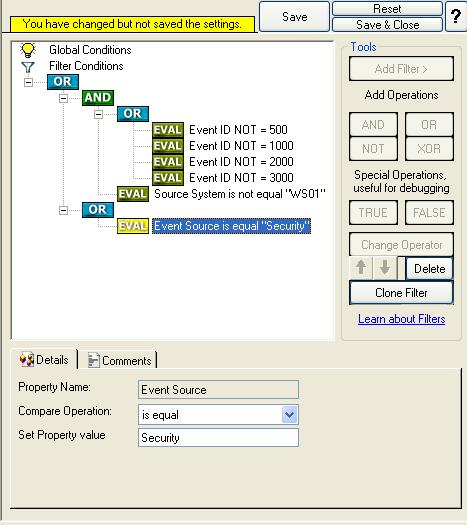
( ( Event ID is not equal 500 OR 1000 OR 2000 OR 3000) ) AND ( FromHost is not equal to WS01 ) )

OR

( ( Event Source is equal to Security ) OR ( Priority is greater than 5 ) )

You would have to follow the following steps in order to accomplish this.

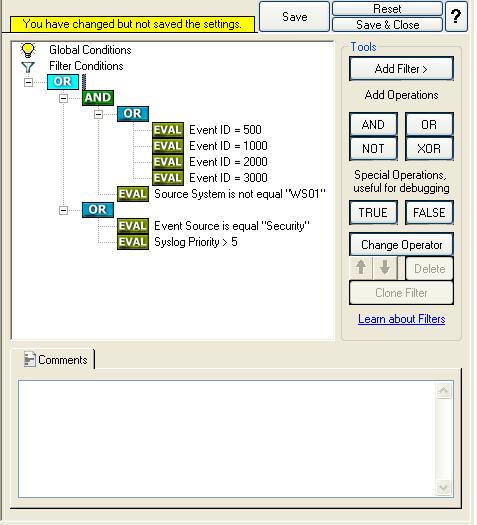
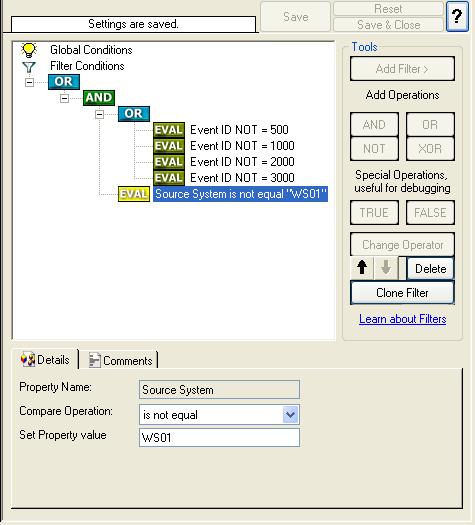
3. We need the Boolean “OR” operator in the top-level node for the above said filter condition,
not the default “AND”. Thus, we need to change the Boolean operator. There are different ways to do
this. Either double-click the “AND” to cycle through the supported operations or select it and
click “Change Operator”. In any way, the Boolean operation should be changed to “OR”. This can be
seen in the screen shot below:

We will be working on this part of the filter condition.

( ( Event ID is not equal 500 OR 1000 OR 2000 OR 3000) ) AND ( FromHost is not equal to WS01 ) )

4. In order to update the actual values of the Event ID, select each of the filter. A small
dialog opens at the bottom of the screen and update the required values. In our sample, these are
Event ID 500, 1000, 2000, and 3000.

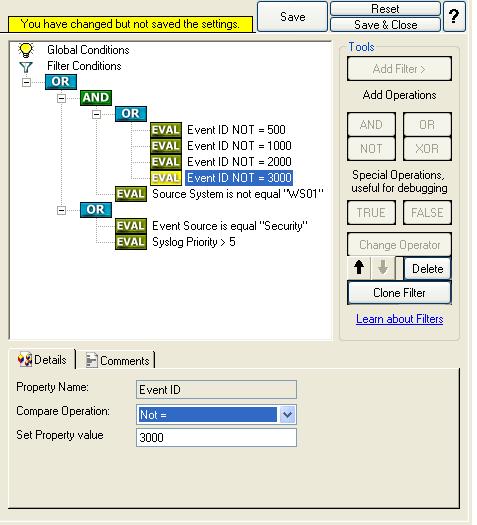
5. Click on the filter property “Event ID”, from the “Compare Operation” combo box, select “is not
equal”. Repeat this step for the next three filters. When you have made the updates, you screen
should look as follows:

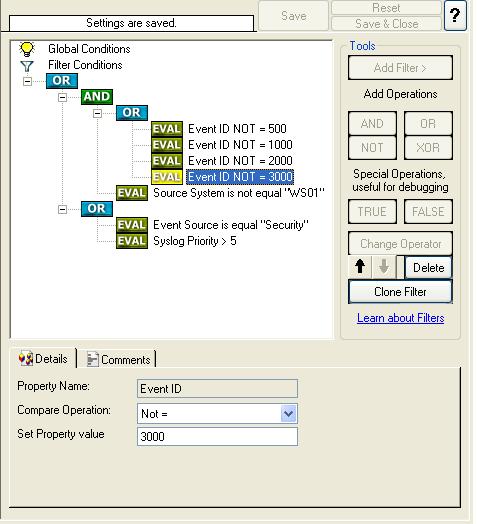
6. Don’t forget to save the settings by clicking the (diskette-like) “Save” button. This procedure
completes the updation of the filter form. Once done your configuration looks like the following:

7. Last, save the changes if you haven’t done it before and then restart the MonitorWare /
WinSyslog or EventReporter service.

MonitorWare / WinSyslog or EventReporter cannot dynamically read changed configurations. As
such,it needs to be restarted after such changes.

How do I Delete filters for MonitorWare Agent 3.0?

How do I Delete filters for MonitorWare Agent 3.0?

Article created 2005-04-04 by
Hamid Ali Raja
.

In order to update a filter it’s necessary that you have a previously saved configuration in
which you had applied filters. Click here
if you wish to learn “How to add filters for MonitorWare Agent?”

Note: String comparison in Filter Conditions are “Case Sensitive”. For example, if the
Source System name is “ws01” and you had written “WS01” while applying the filter, then this filter
condition would “NEVER” evaluate to True! Please double check before proceeding further!

How to Delete Filters?

1. Lets say that initially we were interested in getting an e-mail alert in a given time period
for the following filter condition:

( (Event ID is 500 OR 1000 OR 2000 OR 3000) ) AND ( FromHost is not equal to WS01 ) )

AND

( ( Event Source is equal to Security ) OR ( Priority is greater than 5 ) )

And the filter form looked like this:

2. Lets assume that you wish to delete some filter so the filter condition looks like:

( ( Event ID is not one of (500,1000,2000,3000) ) AND ( FromHost is not equal to WS01 ) )

You would have to follow the following steps in order to accomplish this.

3. There are two ways to accomplish this scenario. You can either delete the filters one-by-one
or you can delete the whole “OR” operator. In this sample we guide you how to do these.

Deleting Filters One by One

4. This approach is recommended when you want to retain some part of the filter condition and to
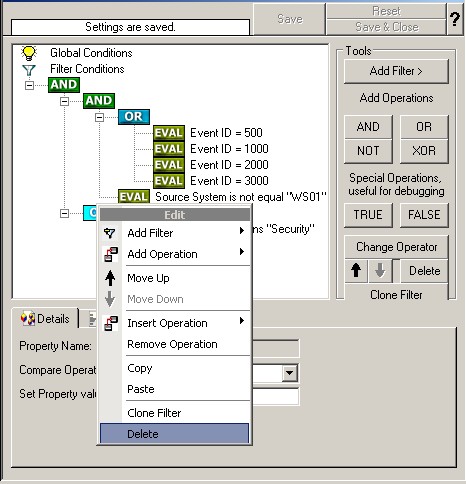
delete some part of the fiter in a more complex filter condition. Right Click on the filter property
“Syslog Priority”, a pop up menu appears. Select delete from the menu.

When you have deleted the filter, your screen should look as follows:

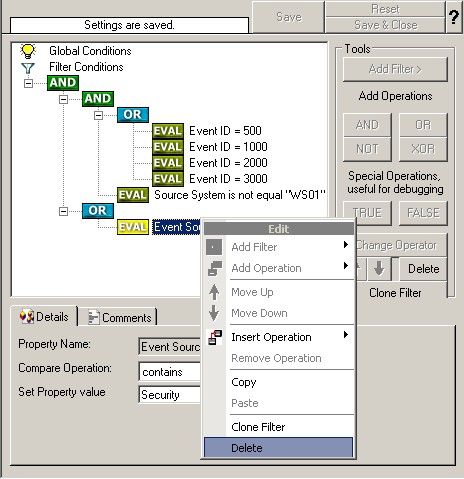
5. Right Click on the filter property “Event Source”, a pop up menu appears. Select delete from
the menu.

When you have deleted the filter, your screen should look as follows:

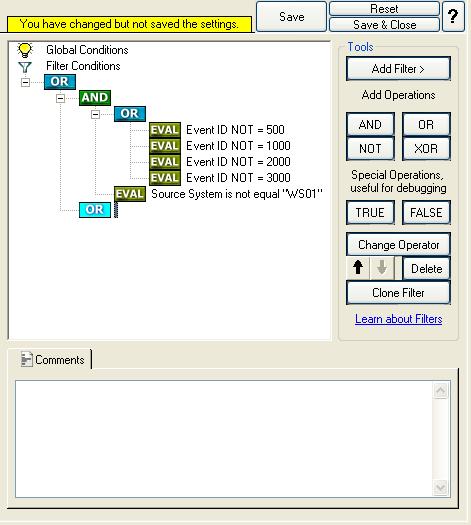
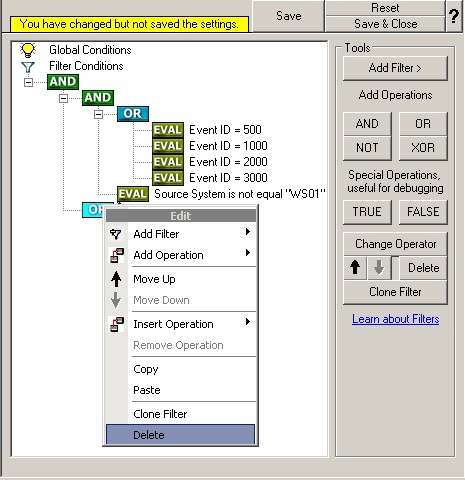
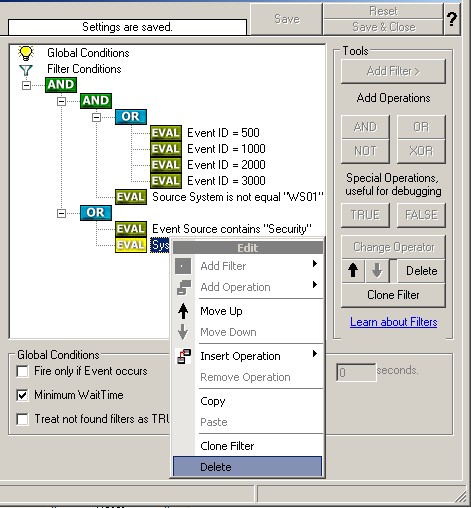
6. Right click on the lower OR. a pop up menu appears. Select delete from the menu.

When you have deleted the OR operation, your screen should look as follows:

Don’t forget to save the settings by clicking the (diskette-like) “Save” button.

Deleting Filters Completely in a Single Selection

7. This approach is recommended when you don’t need the entire part of the filter condition.
Right click on the lower OR. a pop up menu appears. Select delete from the menu.

This process deletes the whole lower “OR” along with the filter conditions. When you have deleted
the OR operation, your screen should look as follows:

Don’t forget to save the settings by clicking the (diskette-like) “Save” button.

8. Last, save the changes if you haven’t done it before and then restart the MonitorWare Agent service.

MonitorWare Agent cannot dynamically read changed configurations. As
such,it needs to be restarted after such changes.

How do I Add filters for MonitorWare Agent?

How do I Add filters for MonitorWare Agent?

Article created 2005-04-04 by
Hamid Ali Raja
.

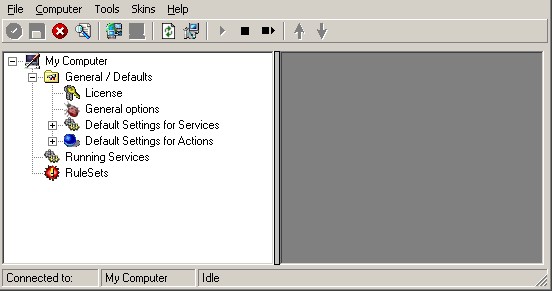
Once you go to start -> programs -> MonitorWare -> MonitorWare Client to run the program, you see a screen-shot similar to the one below:

Facility Required

Email alert

Conditions Applicable

Email Alert should be generated on events with ( (Event ID is 500 OR 1000 OR 2000 OR 3000) ) AND ( FromHost is not equal to WS01 ) )
AND( ( Event Source is equal to Security ) OR ( Priority is greater than 5 ) ), all other messages should be written into a text file.

Filter Processing Steps

  • Rule 1: Looks for the filter conditions stated above and makes sure that they are reported only once within a given period. Later on when the required filter condition(s) is evaluated to true,
    an e-mail alert is generated.
  • Rule 2: Processes all other incoming message and log them into text file.

Important Note: String comparison in Filter Conditions are “Case Sensitive”!. For example, if the
Source System name is “ws01” and you had written “WS01” while applying the filter, then this filter
condition would “NEVER” evaluate to True! Please double check before proceeding further!

Step 1 – Create a Syslog Server

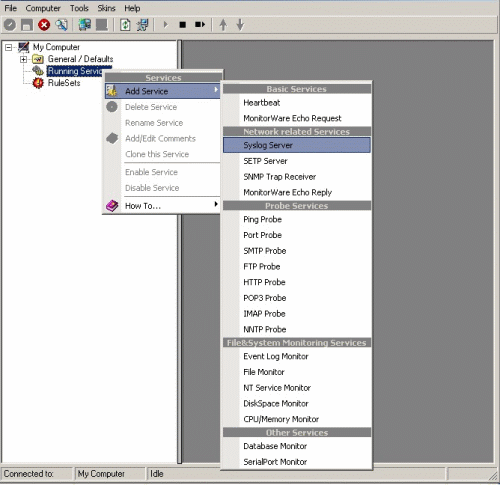
1. In the configuration program, right click on Running Services. A menu is opened up, select
“Add Service”. Choose “Syslog Server”. Once done it looks like as below:

Once you click on the “Syslog Server” a dialog box similar to the one displayed pops up:

In this tutorial first we create the service and then we would make the required Rule Set.
So we choose the “Create Service” option. You can opt for otherwise.

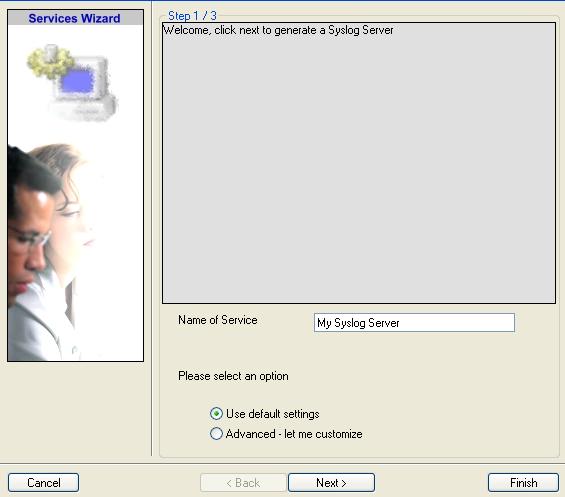
Once you have done so, a new wizard starts.

2. You can use either the default name or any other you like. I use “My Syslog
Server” in this sample. Leave the “Use default settings” selected and
press “Next”.

3. As we have used the default settings, the wizard immediately proceed with step 3, the
confirmation page. Press “Finish” to create the service. The wizard completes and returns
to the configuration client.

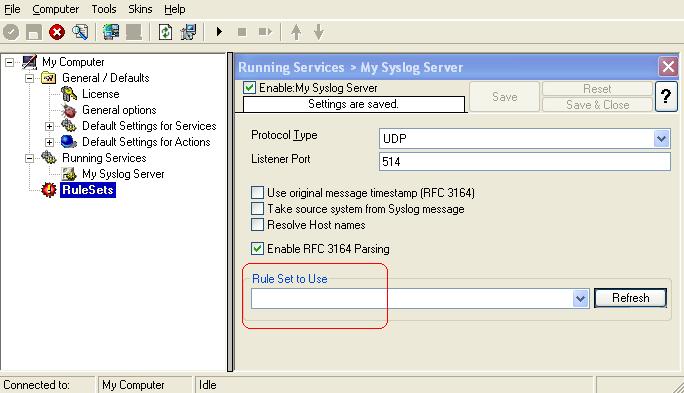
4. You see the newly created service beneath the “Services” part of the tree
view. To check its parameters, select it:

As you can see, the service has been created with the default parameters. Please note that
there is no rule set bound to this service.

Step 2 – Create a Rule Set for Email Alert Generation and File Logging

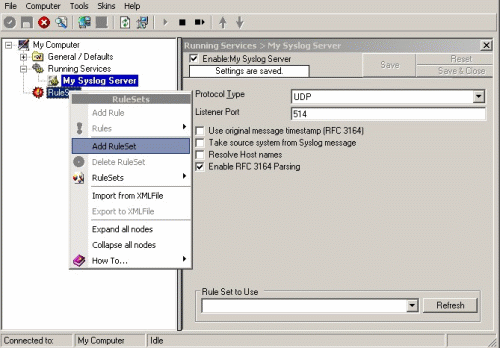
3. Define a new Rule set, right click
“Rule set”. A pop up menu appears. Select “Add Rule set” from this
menu. On screen, it looks as follows:

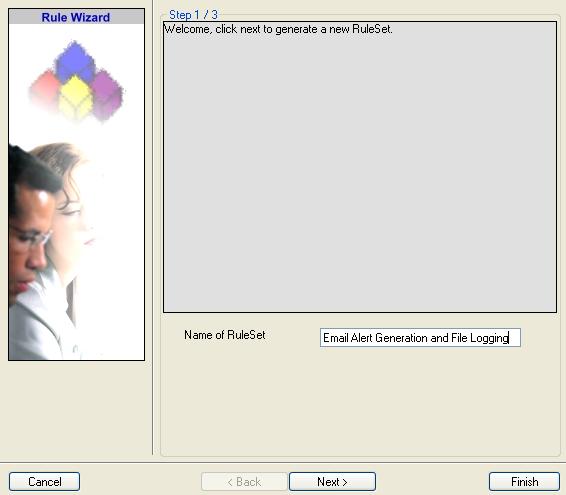
4. Then, a wizard starts. Change the name of the rule to whatever name you like. We use
“Email Alert Generation & File Logging” in this example. The screen looks as follow:

Click “Next”. A new wizard page appears.

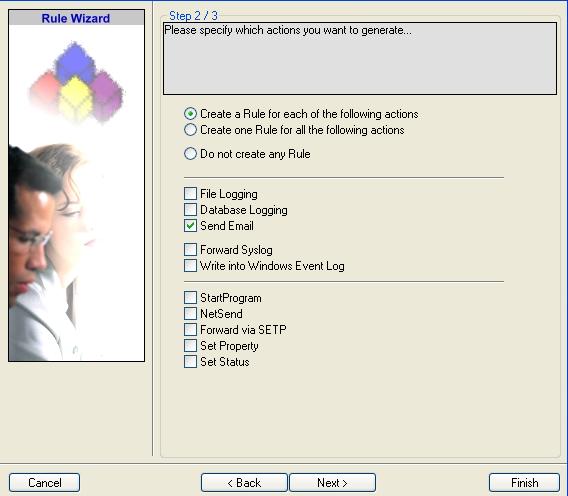
5. Select only “Send Email”. Do not select any other options for this sample. Also, leave the
“Create a Rule for each of the following actions” setting selected. The screen looks as
follow:

6. Click “Next”. You see a confirmation page. Click “Finish” to create
the Rule set.

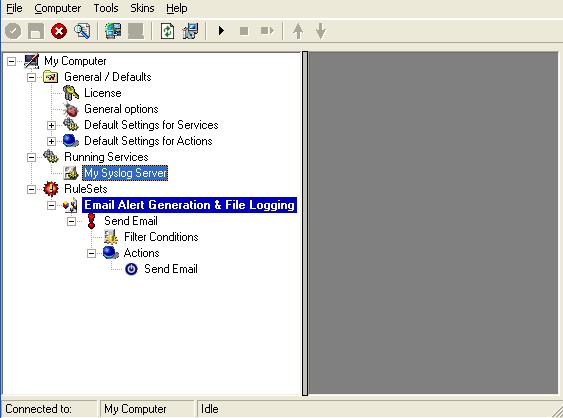
7. As you can see, the new Rule set “Email Alert Generation & File Logging” is
present. We would create the “File Logging” Rule later on. Please expand the Rule Set in the tree
view until the action level of the “Send Email” Rule and select the “Send
Email” action to configure.

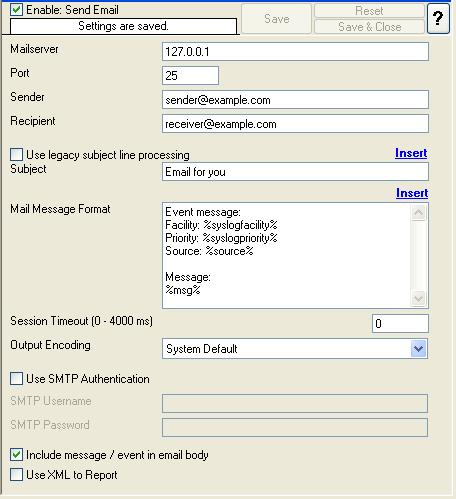
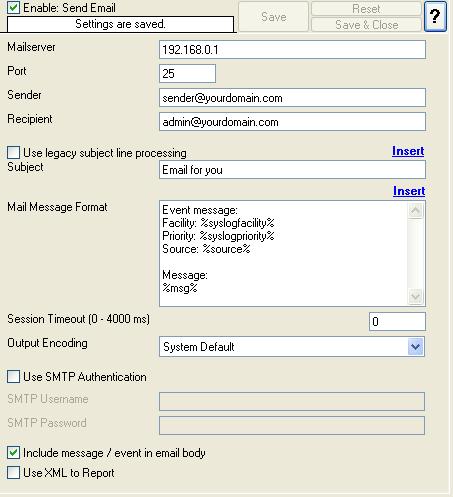
8. I have used factual values in the sample. In this sample I assume that the Mail Server IP
address is 192.168.0.1. The Sender and Recipient email addresses are “sender@yourdomain.com” and
“admin@yourdomain.com” respectively. Please replace these values and configure it according to your
environment.

9. Once the “Send Email” settings are configured, we setup the filter condition. The Filter
Condition would be something like the one below:

( (Event ID is 500 OR 1000 OR 2000 OR 3000) ) AND ( FromHost is not equal to WS01 ) )

AND

( ( Event Source is equal to Security ) OR ( Priority is greater than 5 ) )

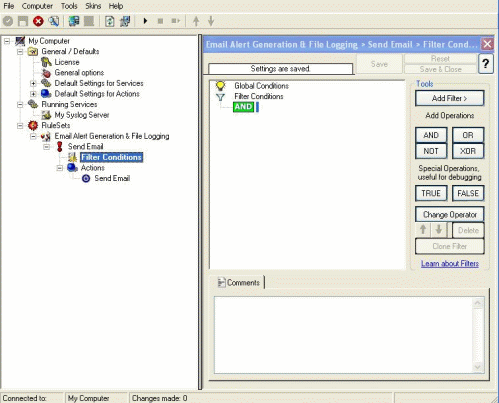
10. Click on the filter condition of the “Send Email” Rule to set up the filter condition.

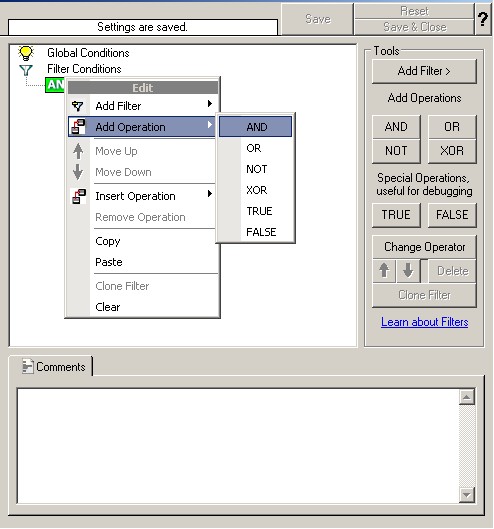
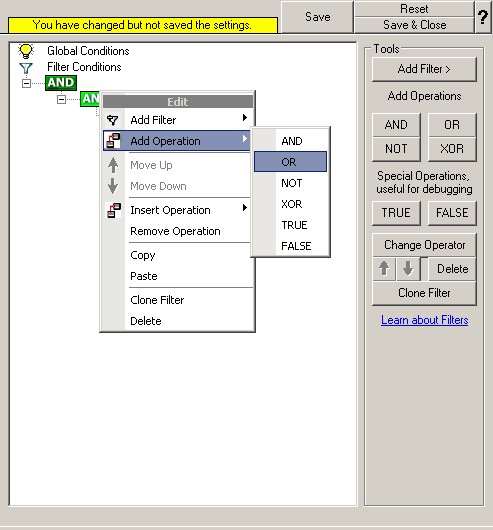
11. Right click on the AND button. A pop up menu appears. Select Add Operation and then choose
the “AND” Operator. Your filter condition look like this:

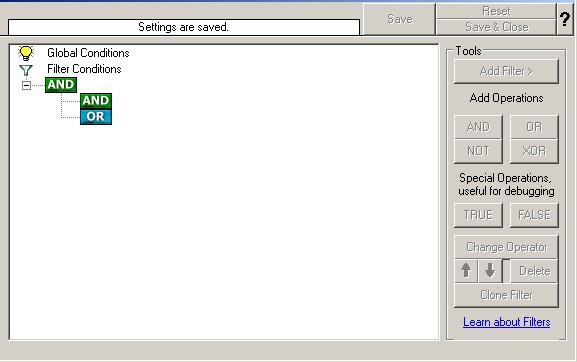
Once done, repeat the same process again. But this time Select the “OR” Operator. “AND” or “OR”
Operator are at the same level. Your filter condition look like this:

12. Select the lower AND from the tree view and right click on the AND button. Choose “Add
Operation” from the pop up menu. Then select the OR operator. This is done to cover this part of the
filter condition “(Event ID is 500 OR 1000 OR 2000 OR 3000)”.

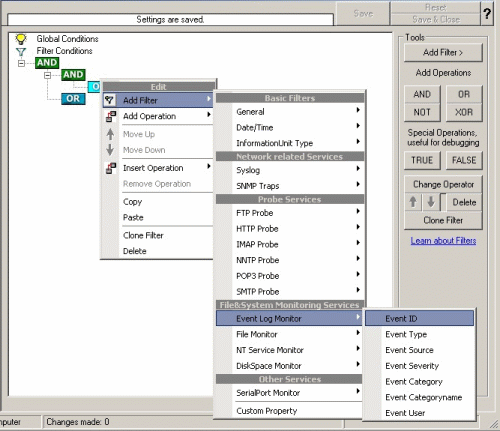
Right Click on the OR button. Click on the “Add Filter” from the pop up menu. Or you can use the
Add Filter Button. Select “Event Log Monitor” and then “Event ID”. This can be seen in the screen
shot below:

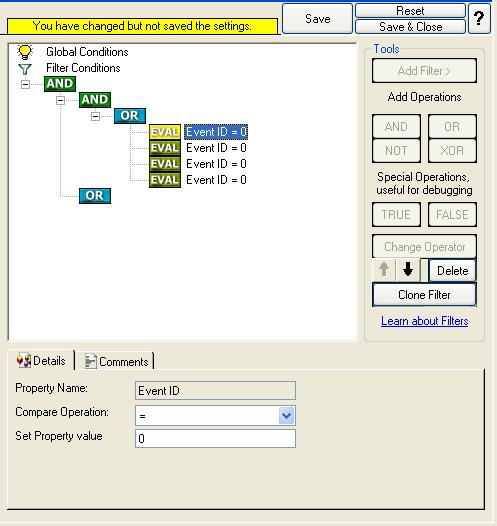
13. I prefer to add all four Event ID’s property filters first and later on change the
Event ID’s to the actual values in the sample. When you have added them, it should look as
follows:

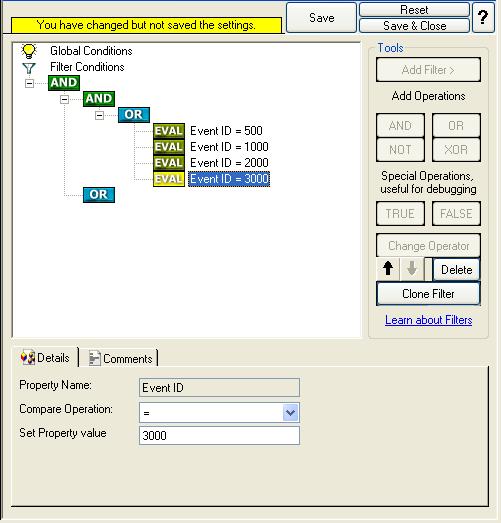
14. In order to enter the actual values, select each of the four filters. A small dialog opens
at the bottom of the screen. There you enter the values you are interested in. In our sample, these
are Event ID 500, 1000, 2000, and 3000. As we are only interested in exactly these values, we do a
comparison for equality, not one of the other supported comparison modes. When you have made the
updates, you screen should look as follows:

15. Right click on the lower AND in the tree view (under which you want to add another condition
now) and click on the “Add Filter” from the pop up menu. Or you can use the Add Filter Button.
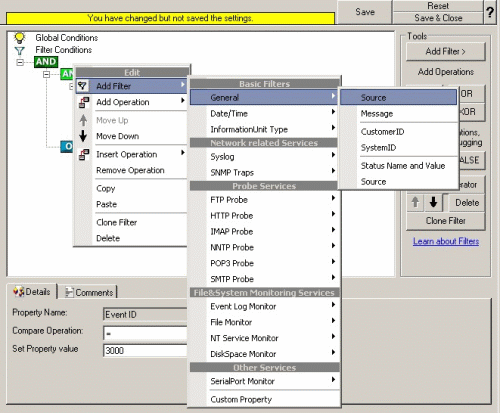
Select “General” and then “Source”.

Once the filter is added, from the “Compare Operation” combo box, select “is not equal” and
then set the value as “WS01”. When you have made the updates, you screen should look as
follows:

16. So far we have accomplished this part of the filter conditions.

( (Event ID is 500 OR 1000 OR 2000 OR 3000) ) AND ( FromHost is not equal to WS01 ) )

AND

We work on the second part of the filter condition in the upcoming step i.e. on the
following filter:

( ( Event Source is equal to Security ) OR ( Priority is greater than 5 ) )

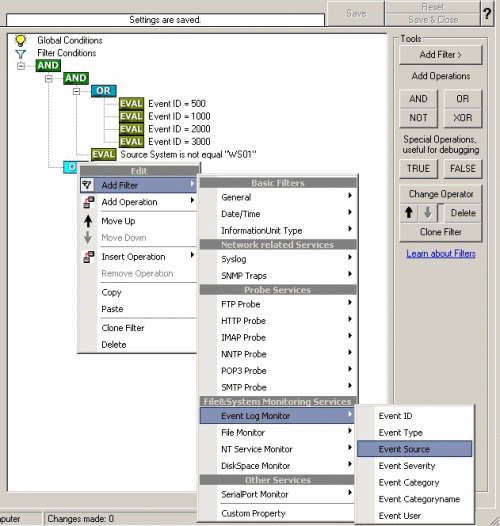
17. Select the lower OR from the tree view and right click on the OR button. Click on the “Add
Filter” from the pop up menu. Or you can use the Add Filter Button. Select “Event Log Monitor” and
then “Event Source”. This can be seen in the screen shot below:

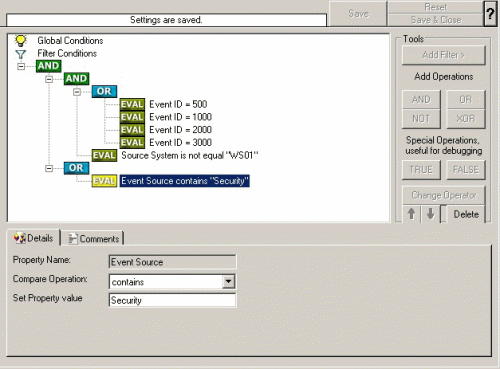
Once the filter is added, from the “Compare Operation” combo box, select “is equal” and
then set the value as “Security”. When you have made the updates, you screen should look as
follows:

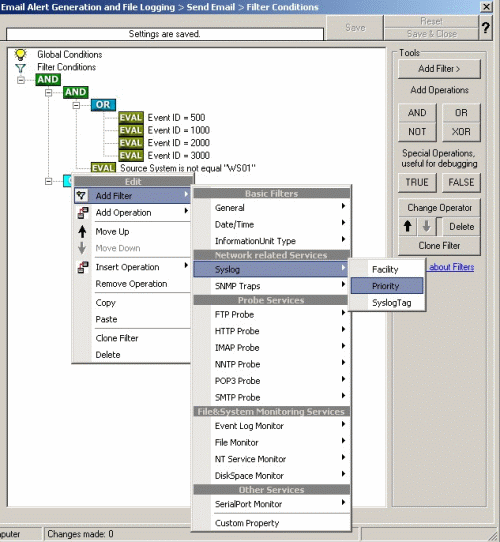
18. Select the lower OR from the tree view and right click on the OR button. Click on the “Add
Filter” from the pop up menu. Or you can use the Add Filter Button. Select “Syslog” and
then “Priority”. This can be seen in the screen shot below:

Once the filter is added, from the “Compare Operation” combo box, select “greater than” and
then set the value as “5”. When you have made the updates, you screen should look as
follows:

Don’t forget to save the settings by clicking the (diskette-like) “Save” button.

19. We have now selected all events that we would like to get email alerts. In order to prevent
this rule from firing too often we would enable “Minimum Wait Time”. This makes sure that (the
Syslog Facilities defined in the filter condition) in “Send Email” Rule are only forwarded once
within a specified period. Click on the Filter Conditions you would see an option called as “Global
Condition”. Select the “Minimum Wait time” and configure it. In this sample I have set the “Minimum
Wait time” to 1800 Seconds (i.e. 30 minutes). Please replace this value as you like it.

Click
here
to know the difference between the Fire only if Event occurs and Minimum Wait Time.

20. We are almost done! Now we have to create a Rule for File Logging. Please note that we
are creating a “Rule” and not a “Rule Set”!
The reason is that each Rule Set can have as many
Rules as you like and only one Rule Set can be associated with any service at a time (i.e My Syslog
Server in this case). Each Rule in turn can have one filter condition but as many actions as you
like. All the Rules that are part of a specific rule set are executed in a sequential manner.

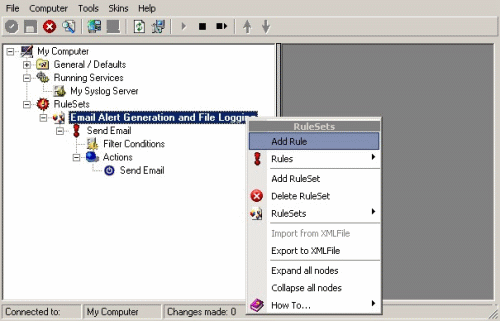
In order to create a new Rule, right click on “Email Alert Generation & File Logging”
RuleSet, and select “Add Rule”. The screen looks as follow:

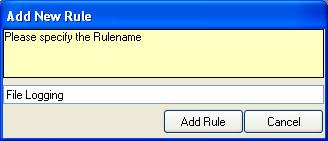
You can use either the default name or any other you like. I use “File Logging” in
this sample.

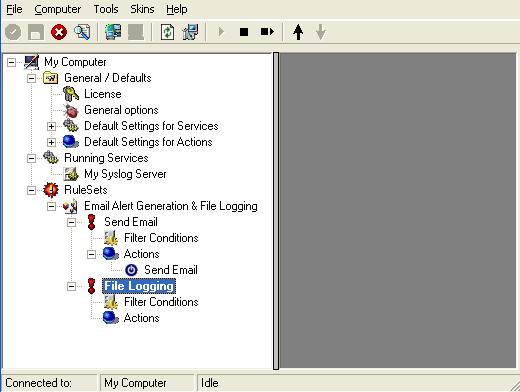
21. You would see that the “File Logging” Rule has been created. If you expand the Rule in the
tree view until the action level of the “File Logging” Rule, you would notice that the
“File Logging Action” is missing. This is by default. We would create this action in the next
coming steps.

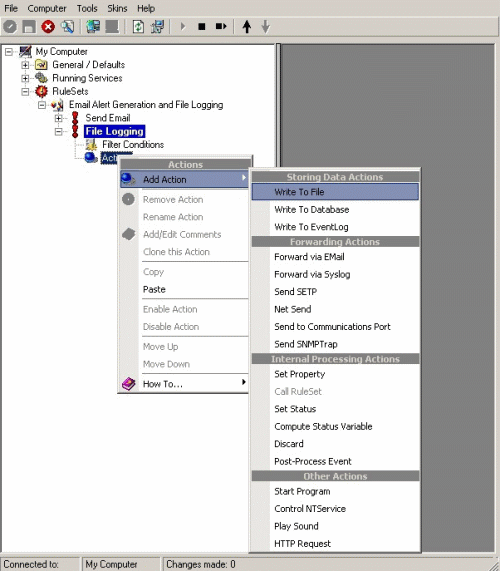
22. In order to create a “File Logging” Action, right click on the Action of the “File Logging”
Rule. A pop up menu appears. Select “Add Action.” Then opt for “Write To File”. The screen looks as
follow:

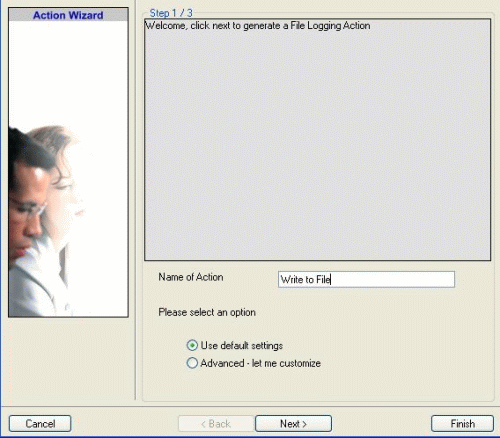
23. Then, a wizard starts. Change the name of the action to whatever name you like. We use
“Write to File” in this example. Leave the default settings. The screen looks as
follow:

Click “Next”. You see a confirmation page. Click “Finish” to create the
action.

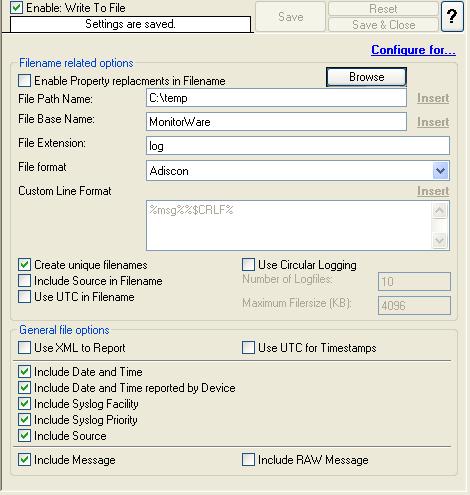
24. Please select the “Write to File” action to configure.

25. The default File Path and File Base Name is “C:\temp” and “MonitorWare”. I am
using these values in this sample. You can configure it according to your environment.

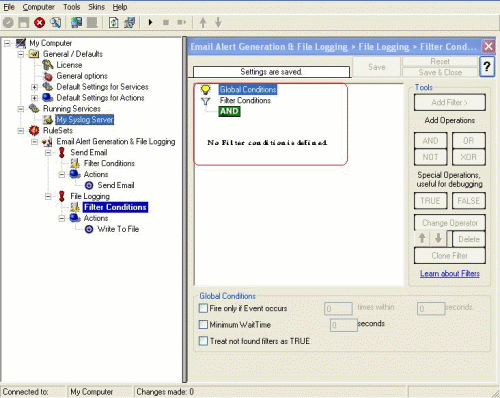
26. Leave the filter condition of “File Logging” Rule as it is. Global Conditions apply to the
rule as whole. They are automatically combined with a logical AND with the conditions in the filter
tree. The reason behind doing this is to processes all other incoming message and getting them
logged into the text file.

27. Last, save the changes if you haven’t done it before and then restart the MonitorWare Agent service. This procedure completes the configuration of the Syslog
server.

MonitorWare Agent cannot dynamically read changed configurations. As
such,it needs to be restarted after such changes.

How do I Add filters for MonitorWare Agent, WinSyslog and EventReporter?

How do I Add filters for MonitorWare Agent, WinSyslog and EventReporter?

Article created 2004-07-15 by
Tamsila-Q-Siddique
.

Article updated 2006-06-19 by Timm Herget.

1. You would at least need the Basic Edition of MonitorWare Agent / WinSyslog / EventReporter for this scenario.

Please Note: We are using MonitorWare Agent in this guide whereas MonitorWare Agent is
superset of WinSyslog and EventReporter. So this guide is also applicable for WinSyslog and
EventReporter.

2. When the Configuration Program client is accessed select your language – in this example, I
use English, so it might be a good idea to choose English even if that is not your preference. You
can change it any time later, but using English makes it much easier to follow this guide here.
Once done you would see a screen-shot similar to the one below:

3. Lets assume that we are interested in getting an e-mail alert in a given time period for the
following filter condition:

( (Event ID is 500 OR 1000 OR 2000 OR 3000) ) AND ( FromHost is not equal to WS01 ) )

AND

( ( Event Source is equal to Security ) OR ( Priority is greater than 5 ) )

And you also want to log the rest of the messages into a text file. The filter process will now
basically work as follow (for details see steps below):

  • Rule 1: Finds the Filter condition stated above and makes sure it is only reported
    once within a given period. Later on when the required filter condition is evaluated to true,
    an e-mail alert is generated.
  • Rule 2: Processes all other incoming message and log them into text file.

Important note about Filter Condition

String comparison in Filter Conditions are “Case Sensitive”! For example, if the
Source System name is “ws01” and you had written “WS01” while applying the filter, then this filter
condition would “NEVER” evaluate to True! Please double check before proceeding further!

Step 1 – Create a Syslog Server

1. In the configuration program, right click on Running Services. A menu is opened up, select
“Add Service”. Choose “Syslog Server”. Once done it will look like as below:

Once you click on the “Syslog Server” a dialog box similar to the one displayed pops up:

In this tutorial first we will create the service and then we would make the required Rule Set.
So we choose the “Create Service” option. You can opt for otherwise.

Once you have done so, a new wizard starts.

2. You can use either the default name or any other you like. I will use “My Syslog
Server” in this sample. Leave the “Use default settings” selected and
press “Next”.

3. As we have used the default settings, the wizard will immediately proceed with step 3, the
confirmation page. Press “Finish” to create the service. The wizard completes and returns
to the configuration client.

4. You will see the newly created service beneath the “Services” part of the tree
view. To check its parameters, select it:

As you can see, the service has been created with the default parameters. Please note that
there is no rule set bound to this service.

Step 2 – Create a Rule Set for Email Alert Generation and File Logging

3. Define a new Rule set, right click
“Rule set”. A pop up menu will appear. Select “Add Rule set” from this
menu. On screen, it looks as follows:

4. Then, a wizard starts. Change the name of the rule to whatever name you like. We will use
“Email Alert Generation & File Logging” in this example. The screen looks as follow:

Click “Next”. A new wizard page appears.

5. Select only “Send Email”. Do not select any other options for this sample. Also, leave the
“Create a Rule for each of the following actions” setting selected. The screen looks as
follow:

6. Click “Next”. You will see a confirmation page. Click “Finish” to create
the Rule set.

7. As you can see, the new Rule set “Email Alert Generation & File Logging” is
present. We would create the “File Logging” Rule later on. Please expand the Rule Set in the tree
view until the action level of the “Send Email” Rule and select the “Send
Email” action to configure.

8. I have used factual values in the sample. In this sample I assume that the Mail Server IP
address is 192.168.0.1. The Sender and Recipient email addresses are “sender@yourdomain.com” and
“admin@yourdomain.com” respectively. Please replace these values and configure it according to your
environment.

9. Once the “Send Email” settings are configured, we will setup the filter condition. The Filter
Condition would be something like the one below:

( (Event ID is 500 OR 1000 OR 2000 OR 3000) ) AND ( FromHost is not equal to WS01 ) )

AND

( ( Event Source is equal to Security ) OR ( Priority is greater than 5 ) )

10. Click on the filter condition of the “Send Email” Rule to set up the filter condition.

11. Right click on the AND button. A pop up menu appears. Select Add Operation and then choose
the “AND” Operator. Your filter condition will look like this:

Once done, repeat the same process again. But this time Select the “OR” Operator. “AND” or “OR”
Operator are at the same level. Your filter condition will look like this:

12. Select the lower AND from the tree view and right click on the AND button. Choose “Add
Operation” from the pop up menu. Then select the OR operator. This is done to cover this part of the
filter condition “(Event ID is 500 OR 1000 OR 2000 OR 3000)”.

Right Click on the OR button. Click on the “Add Filter” from the pop up menu. Or you can use the
Add Filter Button. Select “Event Log Monitor” and then “Event ID”. This can be seen in the screen
shot below:

13. I prefer to add all four Event ID’s property filters first and later on change the
Event ID’s to the actual values in the sample. When you have added them, it should look as
follows:

14. In order to enter the actual values, select each of the four filters. A small dialog opens
at the bottom of the screen. There you enter the values you are interested in. In our sample, these
are Event ID 500, 1000, 2000, and 3000. As we are only interested in exactly these values, we do a
comparison for equality, not one of the other supported comparison modes. When you have made the
updates, you screen should look as follows:

15. Right click on the lower AND in the tree view (under which you want to add another condition
now) and click on the “Add Filter” from the pop up menu. Or you can use the Add Filter Button.
Select “General” and then “Source”.

Once the filter is added, from the “Compare Operation” combo box, select “is not equal” and
then set the value as “WS01”. When you have made the updates, you screen should look as
follows:

16. So far we have accomplished this part of the filter conditions.

( (Event ID is 500 OR 1000 OR 2000 OR 3000) ) AND ( FromHost is not equal to WS01 ) )

AND

We will work on the second part of the filter condition in the upcoming step i.e. on the
following filter:

( ( Event Source is equal to Security ) OR ( Priority is greater than 5 ) )

17. Select the lower OR from the tree view and right click on the OR button. Click on the “Add
Filter” from the pop up menu. Or you can use the Add Filter Button. Select “Event Log Monitor” and
then “Event Source”. This can be seen in the screen shot below:

Once the filter is added, from the “Compare Operation” combo box, select “is equal” and
then set the value as “Security”. When you have made the updates, you screen should look as
follows:

18. Select the lower OR from the tree view and right click on the OR button. Click on the “Add
Filter” from the pop up menu. Or you can use the Add Filter Button. Select “Syslog” and
then “Priority”. This can be seen in the screen shot below:

Once the filter is added, from the “Compare Operation” combo box, select “greater than” and
then set the value as “5”. When you have made the updates, you screen should look as
follows:

Don’t forget to save the settings by clicking the (diskette-like) “Save” button.

19. We have now selected all events that we would like to get email alerts. In order to prevent
this rule from firing too often we would enable “Minimum Wait Time”. This will make sure that (the
Syslog Facilities defined in the filter condition) in “Send Email” Rule are only forwarded once
within a specified period. Click on the Filter Conditions you would see an option called as “Global
Condition”. Select the “Minimum Wait time” and configure it. In this sample I have set the “Minimum
Wait time” to 1800 Seconds (i.e. 30 minutes). Please replace this value as you like it.

Click
here
to know the difference between the Fire only if Event occurs and Minimum Wait Time.

20. We are almost done! Now we have to create a Rule for File Logging. Please note that we
are creating a “Rule” and not a “Rule Set”!
The reason is that each Rule Set can have as many
Rules as you like and only one Rule Set can be associated with any service at a time (i.e My Syslog
Server in this case). Each Rule in turn can have one filter condition but as many actions as you
like. All the Rules that are part of a specific rule set are executed in a sequential manner.

In order to create a new Rule, right click on “Email Alert Generation & File Logging”
RuleSet, and select “Add Rule”. The screen looks as follow:

You can use either the default name or any other you like. I will use “File Logging” in
this sample.

21. You would see that the “File Logging” Rule has been created. If you expand the Rule in the
tree view until the action level of the “File Logging” Rule, you would notice that the
“File Logging Action” is missing. This is by default. We would create this action in the next
coming steps.

22. In order to create a “File Logging” Action, right click on the Action of the “File Logging”
Rule. A pop up menu appears. Select “Add Action.” Then opt for “Write To File”. The screen looks as
follow:

23. Then, a wizard starts. Change the name of the action to whatever name you like. We will use
“Write to File” in this example. Leave the default settings. The screen looks as
follow:

Click “Next”. You will see a confirmation page. Click “Finish” to create the
action.

24. Please select the “Write to File” action to configure.

25. The default File Path and File Base Name is “C:\temp” and “MonitorWare”. I am
using these values in this sample. You can configure it according to your environment.

Please note: If the configured directories is missing then the latest version of the
MonitorWare Agent, WinSyslog and EventReporter have the capability to create the missing
directories.

26. Leave the filter condition of “File Logging” Rule as it is. Global Conditions apply to the
rule as whole. They are automatically combined with a logical AND with the conditions in the filter
tree. The reason behind doing this is to processes all other incoming message and getting them
logged into the text file.

27. Last, save the changes if you haven’t done it before and then restart the MonitorWare /
WinSyslog or EventReporter service. This procedure completes the configuration of the Syslog
server.

MonitorWare / WinSyslog or EventReporter cannot dynamically read changed configurations. As
such,it needs to be restarted after such changes.
How do I apply filters in MonitorWare Agent, WinSyslog and EventReporter?

How do I apply filters in MonitorWare Agent, WinSyslog and EventReporter?

Article created 2004-07-12 by Tamsila-Q-Siddique.

MonitorWare Agent, WinSyslog and EventReporter enables you to apply filters to achieve your desired results. This step-by-step guide will help you through creating these filters. You can:
Please note: WinSyslog and EventReporter are subset of MonitorWare Agent i.e. MonitorWare Agent has all the features supported by WinSyslog and EventReporter (in a single place). So this step-by-step guide do apply on them as well.