How to forward the messages with the original IP in the header instead of sender’s IP address?

How to forward the messages with the original IP in the header instead of sender’s IP address?

Created 2004-06-14 by Tamsila-Q-Siddique

We are forwarding some of Syslog messages using WinSyslog / MonitorWare Agent, but when the message shows up at the other location, it appears with the forwarding servers IP address instead of the originating devices IP address in the header. Is there a way to forward the messages with the original IP in the header instead?

What you experience is actually a shortcoming in the “Syslog Protocol” itself. The address is taken from the sender, so when a message is relayed, the sender’s address changes. However, there are a number of cures, each depending on your needs, configuration and eventually the edition to use.

  1. If your devices are RFC 3164 compliant (many are unfortunately not), you can take the hostname from the Syslog header. There is an option in MonitorWare Agent / WinSyslog “RFC 314 parsing” which you can enable to get hold of this.

    Please note that it is disabled by default because non-compliant devices can really create very strange values in the header fields.

  2. You can use Adiscon’s proprietary SETP protocol, which solves this issue (this may require an edition upgrade). Click here to know the difference between SETP and Syslog!
  3. You can forward the message in “XML Format”. That will make it look strange, but you will receive all information. If you do machine parsing, the strangeness may not be an issue (if you work around it in your parser).
  4. You can also enable the “Include Original Host” option in the Syslog forwarder, which will simply add a tag “FromHost: <ip>” at the beginning of the header.

    Please note that this in itself is not RFC 3164 compliant.

Click on MonitorWare Agent and WinSyslog to see different editions of each product.

How to avoid “file already in use” error in the Online Web Access Viewer?

How to avoid “file already in use” error in the Online Web Access Viewer?

Created 2004-05-27 by Michael Meckelein.

You often get an error “file already in use” if you use the Online Web Access Viewer together with a MS Access database. The message you get look like this one:

AccessMicrosoft OLE DB Provider for ODBC Drivers error ‘80004005’
[Microsoft][ODBC Microsoft Access Driver] Could not use ‘(unknown)’; file already in use.
/winsyslog/EventsOnline.asp, line 388

This is a well-known performance issue of the MS Access database. It is highly recommended not to use this database for production environments. You can switch to either MySQL (which is free) or SQL Server. This will solve the problem of web access too and will enhance the efficiency at the same time.

However, to avoid the error you can try the following:

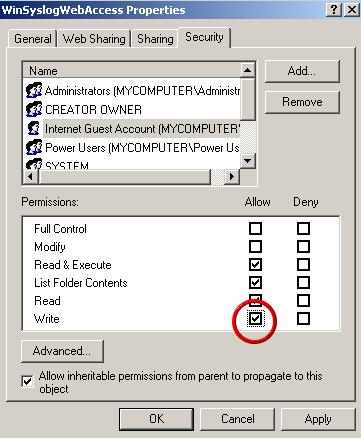
  1. Right click on the folder in which the MS access database is located and select Properties.
  2. Be sure that the Read-only property is unchecked.
  3. Switch to the Security tab in the properties windows.
  4. Click the Add button to open the Select Users or Groups window.
  5. Select the user Internet Guest Account, click Add and confirm your selection with OK. (Note, the Internet Guest Account has typically the name IUSR_COMPUTERNAME)
  6. Now you are back in the Properties window. Be sure that the new user is selected. Give the user Write permissions by activating the checkbox.

If you have any questions on these pages, please email us at support@adiscon.com.

2004-05-12 MonitorWare Agent 2.1 Final released

MonitorWare Agent 2.1 Final Released

Adiscon today announced the immediate availability of MonitorWare Agent 2.1 Final. “I am pleased to announce the new 2.1 version” says president Rainer Gerhards “with this, MonitorWare Agent offers even more capabilities – many of them based on customer requests”. Continue reading “2004-05-12 MonitorWare Agent 2.1 Final released”

2004-05-12 MonitorWare Agent 2.1

MonitorWare Agent 2.1 Final

  • New Services Added– DataBase Monitor Service can read a table out of a database and process each data record like other events within MonitorWare Agent.
    – SerialMonitor Service allows you to capture messages from a Serial Com or from the Printer ports. It is highly configurable and can send a Greeting message. Continue reading “2004-05-12 MonitorWare Agent 2.1”

Why does the Online Web Access Viewer displays wrong page reference?

Why does the Online Web Access Viewer displays wrong page reference?

Created 2004-04-23 by Tamsila-Q-Siddique

I am using MySQL as the underline database. The online web access viewer only displays 1 page of records even though there are 100 or more records. The page reference in the upper right hand corner says “Page 1 of 0”?

Please do the following:
There is a Boolean in the Config file “bUsingMysql” (without quotes). Set this Boolean to “true” (without quotes) as following “bUsingMysql = true” (without quotes).

How To setup MonitorWare Console 2.0

How To setup MonitorWare Console 2.0

Article created 2004-04-22 by
Tamsila-Q-Siddique
.

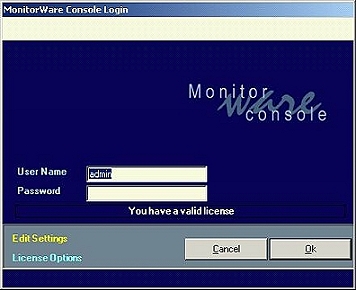
After installation, once MonitorWare Console 2.0 is started, a dialog box similar to the one shown below would be displayed.


Figure 1: MonitorWare Console: Startup Dialog Box

The default user name is “admin” and password is nothing (as shown above).
Please note that the password is not the word “nothing” but actually it is
empty. Once a user enters into the application, this password can be changed.

At the bottom left corner of this dialog box, there are two links “Edit
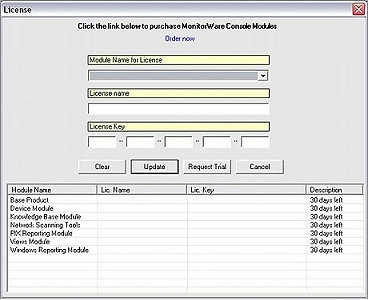
Settings” and “License Options” The latter one is self-explanatory. If you
click on it, a license dialog appears where you can view or change your license
key and license name. There is also a link to order the product directly via
our online ordering system. Please note that MonitorWare Console has Modular
Licensing now. For getting more details on License, please see
License Options
.


Figure 2: License options Dialogue Box

The other link in the login dialog, “Edit Settings” is used if the user wants to
change the database connection or other settings. Currently MonitorWare Console
supports Microsoft Access, SQL Server and MySQL. Once the above mentioned link
is clicked, a dialog box, as shown in figure, will pop up. Using this dialog
box, the user can change the underlying database or other settings.


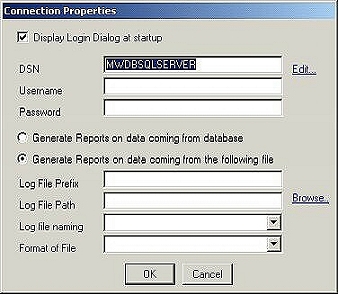
Figure 3: Dialog Box to change the underlying database or log file

Display Login Dialog at Startup

If checked the dialog box in figure 2 appears every time at the startup of the
MonitorWare Console application. If unchecked it will directly take you into
the Monitorware Console main application without displaying Figure 1.

DSN

This field is mandatory. This will point to the DSN of the database which will
store all the settings related to the MontitorWare Console . And later on this
will work as the underlying database to which MonitorWare Console is connected.

Edit

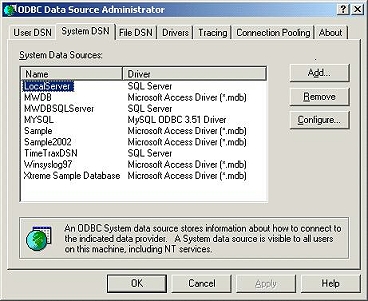
This options opens up a dialog box for creating the DSN. A dialog similar to
the one displayed opens where you can configure the settings according to your
environment.


Figure 4: Dialog Box to create a DSN

Once the provider and the connection has been selected, Test Connection button
can test whether the connection with the specified database has been
established or not.

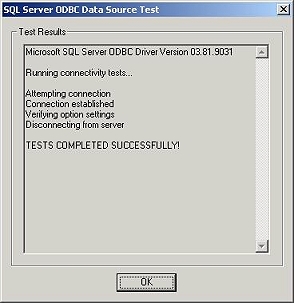
If the dialog box, as shown in figure 5, is displayed, it means that the
connection with the specified database has been set up properly and the user
can proceed further by pressing the OK button.


Figure 5: Success dialog

On the other hand, if a dialog box, as shown in figure 6 is displayed, it means
that there is something wrong and the connection with the mentioned database
has not been established.


Figure 6: Connection Failure Dialog Box

User Name

This option allows you to configure the User Name for connecting to the
database.

Password

This option allows you to configure the Password for connecting to the
database.

Note: If you had created the DSN with the “Windows Integerated Security”, then
you don’t need to give any user name or password.

Generate Reports on data coming from database

If this option is checked then in Windows Reporting Module and Pix Reporting
Module the reports would be generated on the basis of the underlying database.
We have provided this option so that if your main data on which you want to
generate reports is present in some other database, then you can give its DSN
over here.

Generate Reports on data coming from the following file

If this option is checked then in Windows Reporting Module and Pix Reporting
Module the reports would be generated on the basis of the configured log files
and not on any database

Log File Prefix

This option allows you to enter the prefix of the log files that have been
generated by our other products. MonitorWare Console will go in the specified
path and will look for files starting with this prefix.

Log File Path

This option allows you to enter the path of the folder which contain the log
files.

Browse

This option will open a dialog box from where you can select the path of the
log files. A dialog similar to the one below opens up.


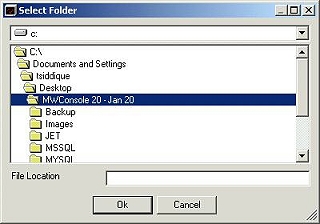
Figure 7: Browse – Select Folder Form

Log File Naming

This option allows you to select the naming convention for your log files.
Options available are:

1). Adiscon(LogPrefix-yyyy-mm-dd.log)

2). Single

Type of Parser

This option allows you to select the type of the parser used for parsing the
log files. Options available are:

1). Adiscon Parser for PIX

2). Adiscon Parser for XML

Note: If you are interested in PIX Reports then choose Adiscon Parser for PIX.
If you are interested in Windows Report then choose Adiscon Parser for XML.

OK

Saves the settings and quits the form.

Cancel

Quits the form without saving the settings.

Note: Please note that the settings for this dialog box are global settings. It
means that whenever you open up any report, it will be opened up with these
settings. You can overwrite these settings for each report on individual basis.

After saving the settings, click on OK. This will take you back to Figure 1.
After setting up the database or the log file, the OK button in the top most
figure will take the user inside the MonitorWare Console application.
There
could be following Six cases that can happen when starting MonitorWare Console.

Case 1: Your login and password is validated and is correct and there is
no update required for the underlying database that you set in Figure 3. If
this is the case, you will enter MonitorWare Console successfully and you will
see a form similar to the one shown below:


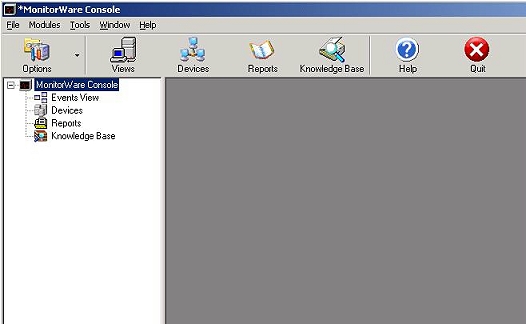
Figure 8: Main Form of MonitorWare Console

Case 2: Your login and password fails because you have either entered
wrong login and wrong password. If this is the case, you will stay on this
dialog box and it will ask you for the correct login and password again.
Following message box will be displayed to you:


Figure 9: Login Fail Dialog

Case 3: Your database to which the DSN in figure 3 is pointing to is not
a valid DSN. By valid DSN, we mean that the DSN is not pointing to the database
that contains SystemEvents table. In this case, you will get the following
message box:


Figure 10: Invalid Database

Case 4: Your database to which the DSN in figure 3 is pointing to is
valid but you don’t have sufficient permissions to query it. In this case, once
again a dialog box similar to the one shown in figure 10 will be displayed.

Case 5: You don’t have sufficient permissions to write something to the
registry. In this case, again a dialog box complaining that you don’t have
sufficient permissions will be displayed to you.

Case 6: Your login and password is valid and your DSN is pointing to the
correct MonitorWare database but the database is old. MonitorWare Console will
display you the following message:


Figure 11: Database Update Required Dialog

If you click on Yes, the database will be updated (because console needs some
additional tables for house keeping). If you click on No or Cancel, the dialog
box will disappear taking you to the main dialog in figure 1.

“A complete step by step guide on setting up Scheduling of Reports with Job Manager

How To Schedule Reports with MonitorWare Console 2.0

Article created 2004-04-14 by
Tamsila-Q-Siddique.

Reports in MonitorWare Console can be scheduled using Job
Manager. Job Manager is a Window Service that runs in the background and
generates the reports according to user-defined schedule. It also has the
capability of sending the generated reports to specified recipients via email.
The settings of this service are done from the MonitorWare Console Client. This
client will only be available to you if you have a valid license for “Windows
Reporting Module” or “PIX Reporting Module” or both. Once you open up Job
Manager Settings form as shown in Figure 1, you will be able to schedule all of
the reports (whether PIX or Windows) but only those reports will be generated whose license is valid. So,
for example, you have PIX Reporting Module license with you, then you will be able to access the screen shown in Figure 1 and
configure all of the reports but Job Manager will only generate those reports that are
PIX and will not generate any of the configured Windows Report since you dont have
the license for it.

Profiles have been introduced in the Job Manager. You can associate different reports to different profiles and they will be generated according to your specified time
and date. You can create as many profiles as you like in Job Manager which
means that now, you can generate the same report as many times as you would
like in one day.

Job Manager can now
also generate those reports that you have saved in the Reporting Module by applying various
filters. The reports that are indented in Figure 1 are those reports that had been
saved using Report Manager.

With Job
Manager you can not only schedule the reports such that they are saved on the
hard disk but also you can schedule the reports such that they are sent via
email to specified recipients.

1. Click “Options” in the main tool bar
of MonitorWare Console and then click on “Job Manager Settings…” You will see a dialog
box as shown below:
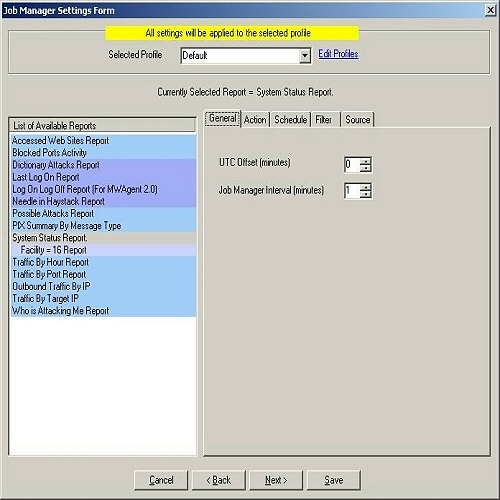


Figure 1: Job Manager Settings Form


2. Click on the report that you want to schedule. In this example I will
illustrate the scheduling of “System Status Report”.

3. Click on “System Status Report” on the left hand side.

4. On the right hand side, in the general tab set the
UTC offset and Job Manager Interval. If you have logged the records in the
database with local time, then you dont need to set this UTC value. It will stay
at 0. The Job Manager Interval can be set over here, by default it is 1
minute. This is the wake up time for Adiscon MWCJobManager. This specifed interval invokes JobManager and it looks for the scheduled report,
if it’s time to run the scheduled report then the report is generated otherwise it goes into the
sleep state until it’s invoked again. The settings are shown in figure 1.

5. Once done click on Action tab or press Next button.You will see as below:
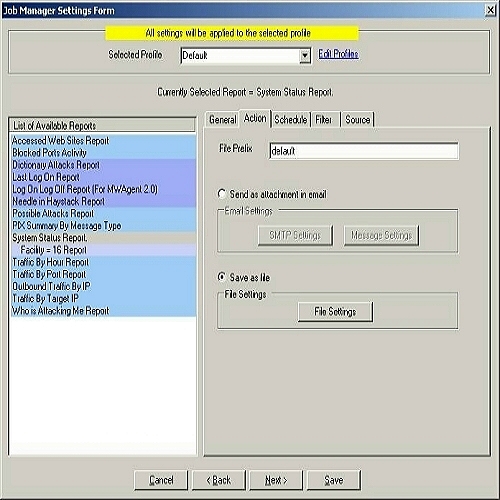


Figure 2: Job Manager Settings Form – Action Tab


6. Set the File Prefix. In this case, I leave it as default.

7. You have got two options over here. Either you can save the report on the hard disk or
you can send an email when the scheduled time is met. If you select “Save as
file” radio button, then the “File Settings” button will be enabled and on the
other hand, if you select “Send as attachment in email” radio button, then both
SMTP
Settings and “Message Settings” buttons will be enabled. You can either
carry on with Step 8 or Step 9 depending upon your requirements.

8. If you want to save the report on the hard disk at the scheduled time then
select “Save as file” radio button and click on “File Settings” button. Once you
do that, you will see the following dialog box:
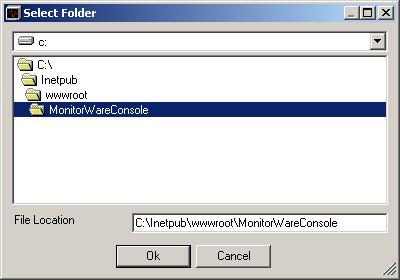


Figure 3: File Settings – Select Folder Form

You can select any path over here that you feel like. But if you want to view this report
on the web, you will have to create a folder under Inetpub -> wwwroot.
In this case, I have created a folder named “MonitorWareConsole” and have
selected the same in the above dialog box. Click OK, once you have done that.

9. If on the other hand, you are interested in the report being emailed to
some specified recipient at the specified time, then you should select the radio
buttion labeled as “Send as attachment in email”. After Selecting it, click on
SMTP Settings. It will show you the following dialog box:


Figure 4: SMTP Settings Form

Enter your SMTP server name. Click OK. Then click on “Message Settings”
button. You will see a dialog box similar to the one shown below:
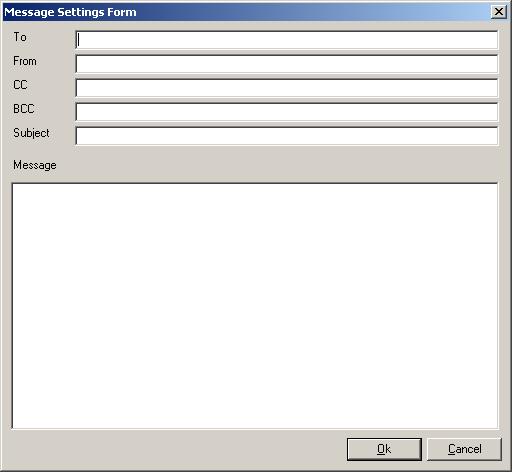


Figure 5: Message Settings Form

Fill in these values and click OK when done.

10. After setting the “Action” tab according to 8 or 9 above, click on Schedule tab or press Next
button. Once done, you will see following dialog box:
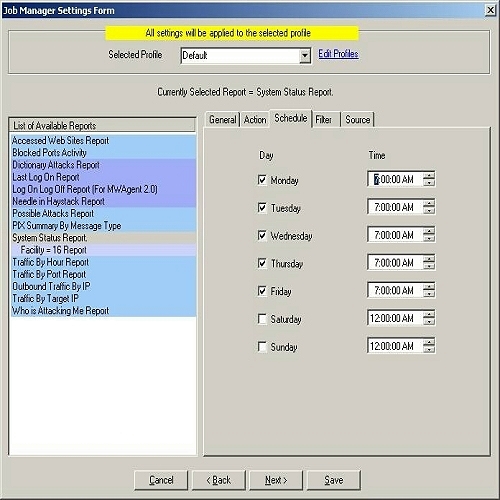


Figure 6: Job Manager Settings Form – Schedule Tab


For example, you can tell Job Manager to generate the System Status report at 7:00 AM
on Monday, Tuesday, Wednesday, thursday and friday. Whenever you come to office, you will see a complete report on your system on the above mentioned days and you can take necessary actions
right away.

11. After setting the “Schedule” tab according to 10, click on Filter tab or press Next
button. Once done, you will see following dialog box:
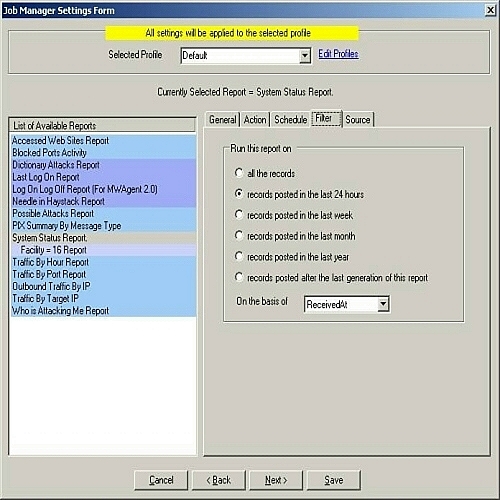


Figure 7: Job Manager Settings Form – Filter Tab


You can select one of the above 6 mentioned filters based on your
requirements.


12. After setting the “Filter” tab according to 11, click on Source tab or press Next button. Once done, you will see following dialog
box:
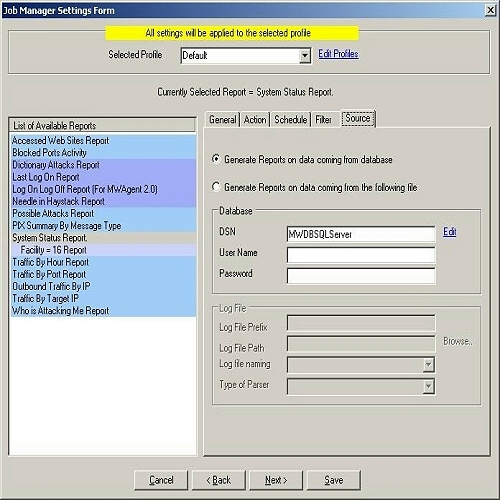


Figure 8: Job Manager Settings Form – Source Tab (Database option checked)


You have two options over here. Either you can generate the report from a database or you can use log files i.e. these
two options are mutually exclusive. If you select “Generate Reports on data coming from database” radio
button, then the schedule reports would be generated on the basis of the
underlying database. We have provided this option so that if your main
data on which you want to generate reports is present in some other database, then
you can give its DSN over here. And If you select “Generate Reports on data
coming from the following file” radio button, then the reports would be generated on
the basis of the configured log files and not on
any database. You can either carry on with Step 13 or Step 14 depending upon
your requirements.


13. If you want to generate the report from the
underlying database or from any other database then you select “Generate Reports on data coming from database”
radio button. Once this option is checked then provide
the DSN, User Name and Password as shown in Figure 8.


Note: If you had
created the DSN with the “Windows Integerated Security”, then you don’t need to
give any User Name or Password. We highly recommend to create a specific account with very limited permissions if
you store a password. This account does only need to have “select” permissions.


14. If you want to generate the report from the log files
then you select “Generate Reports on data coming from the following file” radio button. Once you
do that, provide all the required fields as in the screen-shot shown below:
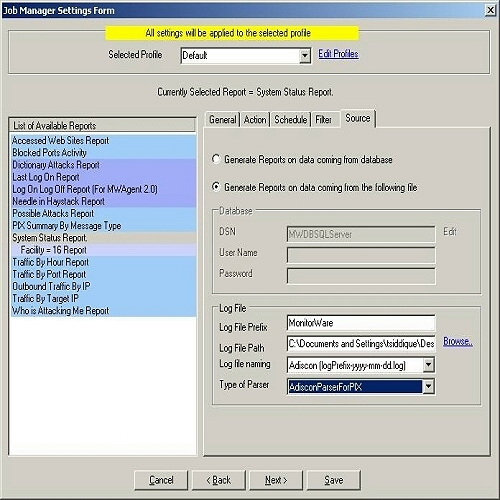


Figure 9: Job Manager Settings Form – Source Tab (Log File option checked)


Note: If you are
interested in Windows Report then choose AdisconParserForXML. And if you are interested in PIX Reports
then choose AdisconParserForPIX. The Specific Logfile Format has been given
below:


Format of the Log File for Window’s Report – If you want to generate the above Windows’ Reports on log files, then
its absolutely necessary that the log files are in a specific format. Only the
following two check boxes in the “Write to File Action” of EventReporter,
MonitorWare Agent or WinSyslog should be checked.
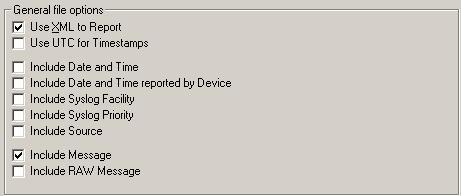


Figure 10: Write to File Action of EventReporter, WinSyslog and MonitorWare Agent.


If any of these check boxes is not checked or any other check box is checked apart from the above shown, then
the report will not be generated. If the log file entries are not in the correct
format, then MonitorWare Console will write error messages for first 50 lines in
Windows Event Log and will ignore them for the generation of report


Note: Do NOT check “Use Legacy Format” in your EventLogMonitor Service. If you check this, the records
can not properly be compressed and you will receive a very large report.


Format of the Log File for PIX Reports – If you want to generate the above PIX Reports on log
files, then its absolutely necessary that the log files are in a specific
format. Only the following check boxes in the “Write to File Action” of
EventReporter, MonitorWare Agent or WinSyslog should be checked.
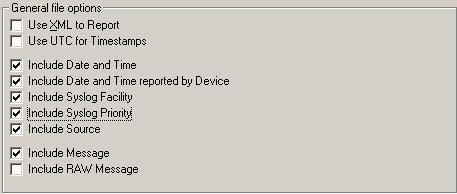


Figure 11: Write to File Action of EventReporter, WinSyslog and MonitorWare Agent


15. Once done, click on “Save” button. All the settings will be saved permanently. If the Job Manager Service is running, it will give you
a message saying that it would restart the service so that new settings could take effect.
If on the other hand, the service in the background is not running, it
would give you a message saying that you have to manually restart the service. You
can start the service manually by going to Control Panel -> Administrative Tools
-> Services and start AdisconMWCJobManager
Service.
Forwarding IIS Logs to a central File

Forwarding IIS Logs to a central File

Created 2004-04-02 by Timm Herget and Rainer Gerhards.

I would like to centralize IIS log files to a central log server. The files on that central server should be in the exact same format they are on the IIS machines.

This can be done with MonitorWare Agent 2.0 and above. Let’s look into the theory first: If you would like to forward IIS log files AND have them in the same format at the receiving machine, you need to make some special settings.

First of all, please note that the file monitor, when set to “W3C log files”, is optimized to extract the properties from each log line, not to forward the log literally. If you would like to forward them literally, you need to make sure that the format is set to “Standard”, which will disable all W3C-log specific handling (that would otherwise disturb the result). The syslog tag is not needed here, so it should be totally removed.

We must ensure that the send syslog action does not alter this message content. As such, we must make sure that the “Add Syslog Source when Forwarding” setting is NOT activated.

Unfortunately, that will not eliminate the tag as such from the syslog message, but we can handle this with the property replacer. As of RFC 3164, the syslog tag will be present in the so-generated message. In fact, the message will be “: <ORIGINAL line W3C>” with <ORIGINAL line W3C> literally being the line taken from the W3C log. Effectively, we end up with two extra characters (“: “) at the beginning of the line. Thankfully, we can eliminate these with the property replacer (it is capable of providing substrings of event properties). The message is in the “msg” property. So “%msg:3%” is everything from the third character position up until the end of the line (end position is not specified and so “end of line” is the default). To use the property replacer, we must just the “Write to File” action with “Custom” file format. Then, we can enter an arbriatary string that shall be written to the file. In our case, we use “%msg:3%%$CRLF%”: this instructs the write to file action to first write the original file line and then a Windows newline sequence. The later is needed because it was stripped out by the file monitor.

This looks in the dialogs as follows:

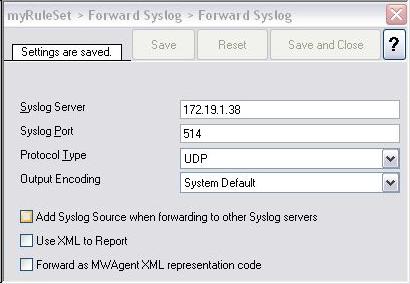
1. Sender : Forward Via Syslog Settings

The “Add Syslog Source when …”-Checkbox MUST be unchecked.

Figure 1: Forward Syslog Action Settings

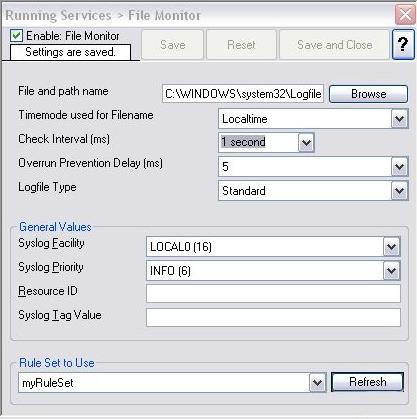
2. Sender : File Monitor Service Settings

Please note that the “Syslog Tag Value” Field MUST be empty (not even a space in it).

Figure 2: File Monitor Service Settings

3. Recipient: Syslog Listener Settings

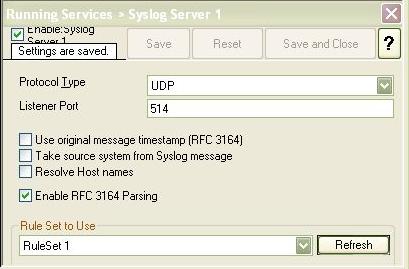
Please note that the “Enable RFC 3164 Parsing” MUST be checked

Figure 3: Syslog Listener Service Settings

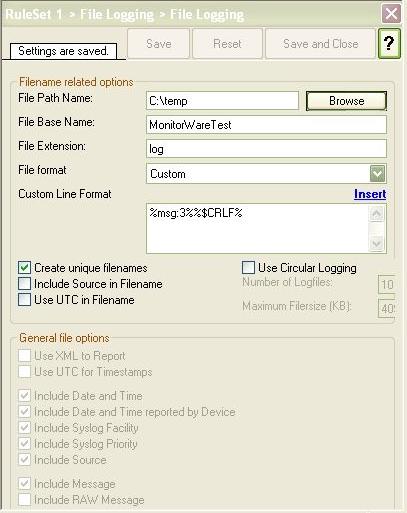
4. Recipient: Write to File Action Settings

The “File Path Name” Directory must be available, MonitorWare Agent will not create it if its not present.

The “File Format” MUST be set to “Custom”. The following custom line format MUST be used:

%msg:3%%$CRLF%

Figure 4: Write to File Action Settings

With the above settings the recipient MonitorWare Agent  will successfully generate exact the same logfiles as the original ones are.

Sample Configurations

We have created some registry files for both the sender and the recipient server. If you download them, simply import them into the registry on the machine in question (if you system is a default-install, double-clicking the file is sufficient to do this). Be sure that the MonitorWare Agent client is closed while you do this. Please note that the sample configurations MUST be customized in order to make them work for you.

Sample configuration for MonitorWare Agent 2.0

Please note: samples may not work with versions other than the one specified in the download link!

How can I use a second sound card with the Play Sound Action?

How can I use a second sound card with the Play Sound Action?

Created 2004-03-25 by Tamsila-Q-Siddique

I have got a second sound card on my machine, how can I use it with the Play Sound Action?

PlaySounds action plays a sound on the local machine. It is possible to play wave files and some other “system” supported soundfiles. This does “NOT” include mp3 files. As MonitorWare Agent is usually running “as a” System service, there are some things which needed to be noted!

On machines with more then ONE sound card, the MonitorWare Agent Service will take the “first active installed soundcard as output device regardless what is configured”. This behaviour is further explained by Microsoft Q255584 (PlaySound API).

If there is a need to play the sound on another sound card instead of the first active installed one, then there are two workarounds:

  1. Specify a “User Account” for the Service which has a local profile where the sound card you want to use configured as primary playback device.
  2. Run the MonitorWare Agent Service in console mode using the “-r” switch under a user account which has the sound card you want to use configured as primary playback device.

By following the above mentioned work around, you would be able to use second sound card (even x sound cards where x is user configurable) with the Play Sound Action.

Please Note: The following things are user configurable in the Play Sound Action.

Filename of the Soundfile – A full path and filename to the wave file which will be played. If the sound file specified here cannot be found or is not a valid wave file, a simple system beep will be played.

Playcount: Default is 1 – can be configured up to 100 times.

Delay between the sound plays – Only useful if the sound is played more then once.Between each play, MonitorWare Agent will wait for this time until it plays the sound again.

Note: A prior running sound will be aborted when this action is executed.