MonitorWare Agent 6.0a Released
Build-IDs: Service 6.0.363, Client 6.0.1236
Continue reading “2008-12-08 MonitorWare Agent 6.0a Final (Build Service 6.0.363/Client 6.0.1236)”
Log Consolidator and Alerter
Build-IDs: Service 6.0.363, Client 6.0.1236
Continue reading “2008-12-08 MonitorWare Agent 6.0a Final (Build Service 6.0.363/Client 6.0.1236)”
Article created 2008-11-27 by Andre Lorbach.
This article was written by using the MonitorWare Agent, but it can also be applied to EventReporter and WinSyslog.
By default the log files generated by MonitorWare Agent using the WriteFile Action are written on a daily basis, so you have one log file for each day. Over time this can become a huge number uncompressed log files, so you properly want to archive them automatically to save disk space. There is no inbuilt method in MonitorWare Agent yet to do so, but this article will describe how you can archive this goal by using the Windows Task Scheduler and WinRar.
1. Installing and Configuring MonitorWare Agent
1.1 Download and Install MonitorWare Agent
1.2 Setup up basic MonitorWare Agent configuration
1.3 Configure the Write File Action.
1.4 Start MonitorWare Agent
2. Configure log file archiving
2.1 Download and Install WinRar
2.2 Create VBScript which utilizes WinRar to create archives.
2.3 Create Task in Windows Task Scheduler
Final Thoughts
| So if you haven’t done so already, go to www.mwagent.com and download the latest MonitorWare Agent version. It is always recommended to use the latest Version of MonitorWare Agent. Once the download is done, go ahead and install it. You may have to restart after installation, this depends on your system. |
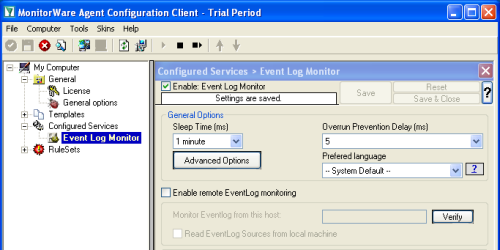 Start the MonitorWare Agent client and skip the wizard on startup. In this article, we will use an EventLog Monitor as source for our File logging, but you can use any other kind of source. Create a new “EventLog Monitor” service and just name it “EventLog Monitor”. You can leave all configuration settings as they are in the screenshot on the right. Start the MonitorWare Agent client and skip the wizard on startup. In this article, we will use an EventLog Monitor as source for our File logging, but you can use any other kind of source. Create a new “EventLog Monitor” service and just name it “EventLog Monitor”. You can leave all configuration settings as they are in the screenshot on the right. |
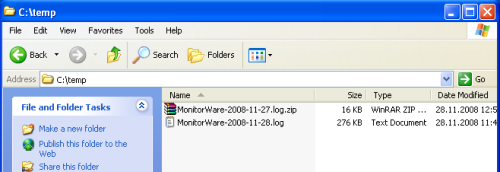
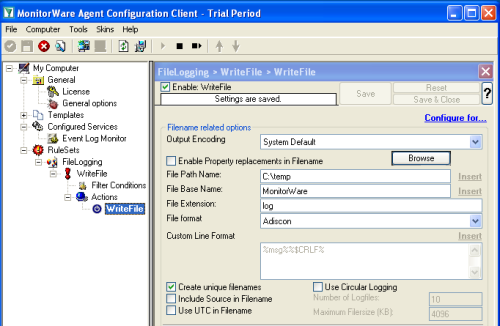 In order to create log files we need a Write File Action. Create a new Write File Action like in the screenshot on the right. The default settings will create daily log files automatically. You may customize the log format by using the custom “File format” option. It is important to have the “Create unique filenames” Option enabled, this will enable the daily written log files. The log file name for 2008-11-28 would be MonitorWare-2008-11-28.log, and for the next day MonitorWare-2008-11-29.log and so on. |
 After you configured MonitorWare Agent, you can start the Service and verify that the daily log files are successfully written. |
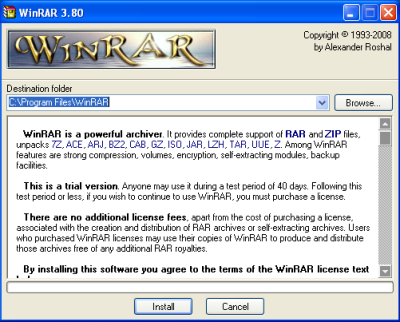 Visit the RarSoft website to download the latest Version of WinRar, if you haven’t installed it already. There are plenty of other packer applications out there and this article may also be used with them. However I will focus on using WinRar. Once you downloaded WinRar, start it’s installation, and remember the exact path it was installed to. Usually this is “C:\Program Files\WinRAR” or “C:\Program Files (x86)\WinRAR”. |
| This script will actually do the work for you. It is designed to automatically generate the filename of the log file from yesterday, and create an archive with the same name. If the archive is successfully created, the log file will automatically be deleted. The script is also in the script package which you can download at the top. You can also copy the script content from the textbox below, and create a new file archive_logs.vbs yourself. By default the script will create zip files, if you rather want to create rar files, just remove the -afzip parameter from the variable szCommand at the end of the script.
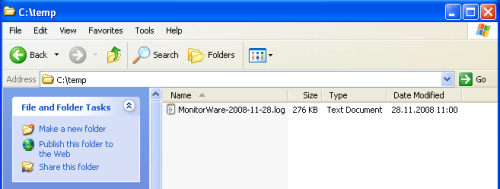
The next thing to do is to edit this script to your needs. There are 4 parameters at the top which you may need to customize, so the script fits into your environment. szWinRardirectory – contains the full installation of your WinRar installation Once you have done this, you should run the script at least once manually by double clicking it to see if it works. You may only notice a short popup of the WinRar Windows, depending if a log file to archive can be found, and archiving takes some time. If it works, you should see a zip-packed log file in your logs directory, like in this screenshot. |
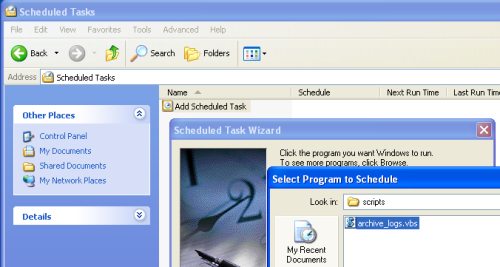 Open the Control Panel, and go to the scheduled tasks. From there you can create a new scheduled task using a wizard. Once the wizard is opened, click on browse to manually select the “archive_logs.vbs” script. Then proceed to the next step of the wizard. |
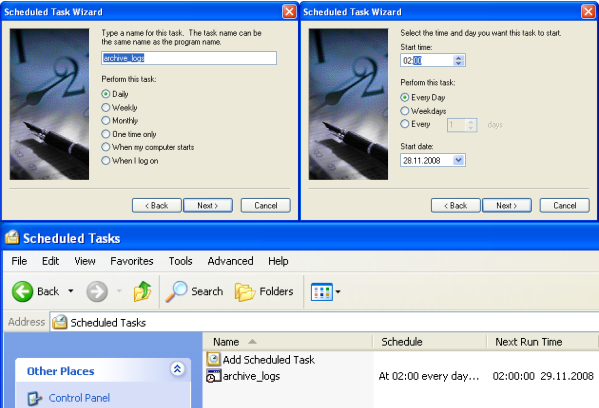 Choose “Daily”, and set the start time in the next wizard step. I have chosen 02:00 am in this article, but you can also chose 04:00am or 01:00am. It should not be 00:00am, because the script might archive the log file too early. In the next step you have to configure the Username and Password, the task is going to run under. Once you finished creating the scheduled task, right click it in the task list and select “Run” in order to test that the task is working. |
I hope this article will help you solving your tasks and shows you the potential of MonitorWare Agent, and what you can archive with it. Feel free to email me for recommendations or questions.
Continue reading “Automatically archiving logfiles written by MonitorWare Agent.”
Adiscon is proud to announce the 6.0 release of MonitorWare Agent. This is a major release including new features and minor bugfixes. The most important changes are: Continue reading “2008-11-24 MonitorWare Agent 6.0 Final Released”
Build-IDs: Service 6.0.362, Client 6.0.1230
New Additions |
|
Adiscon is proud to announce the 6.0b release of MonitorWare Agent.
This is a maintenance release which you only needed on Windows 2008 or VISTA. And Support for Windows 2000 is back as well. The Event priority and facility handling in the EventLog Monitor V2 has been fixed, and does now work correctly. Continue reading “2008-12-23 MonitorWare Agent 6.0b Final Released”
As our customers expect, all Adiscon Windows based products run under Windows 2008. Among others, this includes EventReporter, WinSyslog and MonitorWare Agent. Continue reading “2008-10-23 Adiscon Products run under Windows Server 2008”
Created 2008-10-16 by Florian Riedl
Please Note: This article is valid for EventReporter 9.x / MWAgent 5.x and lower and describes, how to set the filters to get only logon, failed logon and lockout events.
The scenario is, that we need to monitor the behavior of users logging into machines, as well as failing or being locked out, due to bad inserted passwords. All those events should be written into a text file with a unique message that indicates to us what has happened. We need only one ruleset and one service for this. The service would be the EventLog Monitor. In the ruleset, we need 3 separate rules with each having one Action, the Write to File Action. The basic setup should look like this:
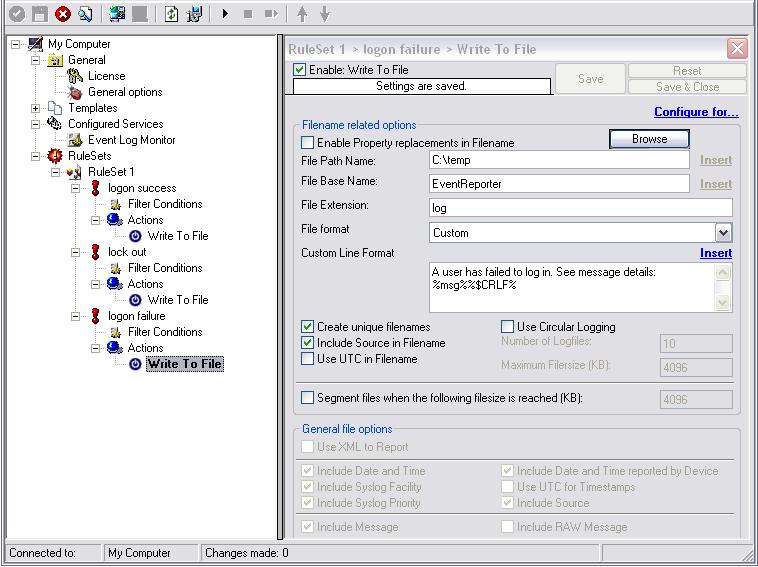
Image 1: Basic Setup
Now we will get to the core part of this setup. The filters. This will be a little bit complex, as there are a lot of possibilities when it comes to monitoring logon events. We need to monitor the events with the following IDs:
We need to split up these events for the different rules we created before. To summarize it, we need the following packages:
There are a lot of Events available for logon failure. So we have to consider all the events that would fit. If some events do not fit for your account policy auditing, then simply leave them out. With this information in mind, we set up the filters. The first two filter will be for “Successful Logon” and “Account Lockout”. We use the “AND”-Operator and filter for the Event ID. This looks as follows:
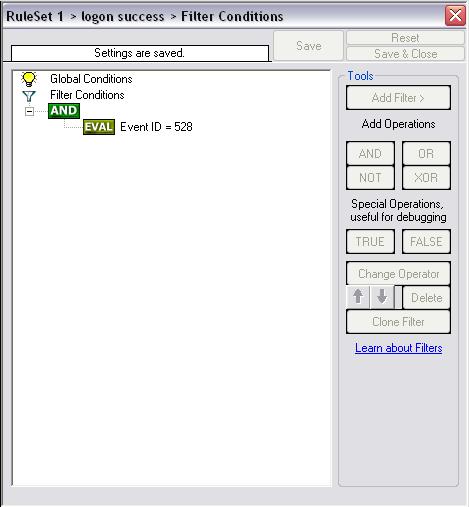
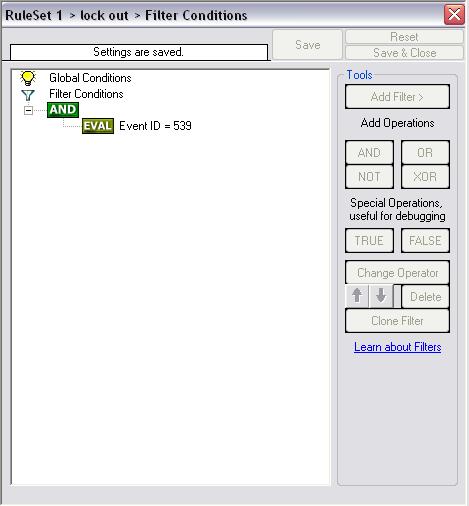
Image 2 and 3: Filter for “Successful Logon” and “Account Lockout”
The last filter for “Logon Failure” looks a bit different, as we have multiple conditions that we need to check. Therefore we need a different Operator. We will take the “OR”-Operator as this is the most suitable. It will evaluate to true once one of the multiple conditions is true. So the same Action (writing a message to a textfile that tells us, that a login has failed) can be performed for multiple events. In contrary, the “AND”-Operator needs all conditions to be true to process the Event, else the Action will not be carried out. The filter should look like this:
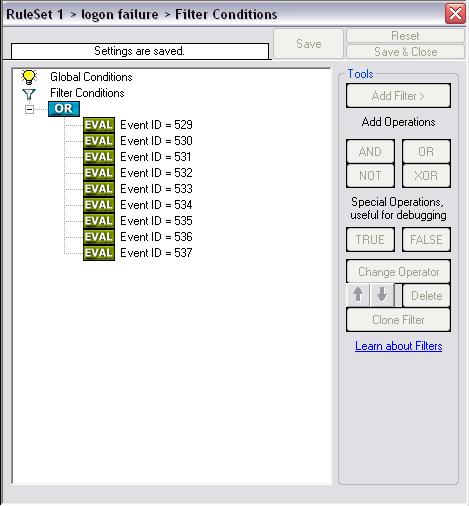
Image 4: Filter for “Logon Failure”
The last thing we have to do is to set the messages that should be written into the textfile. Therefore go to each “Write to File”-Action and set the “File Format” to “Custom”. Then you can edit the message to whatever you like. I chose these messages for my example:
These messages give you directly a comment about the event that happened and show you the original message, which holds the information about the user, machine and message details. The configuration for one of those Actions could look like this:
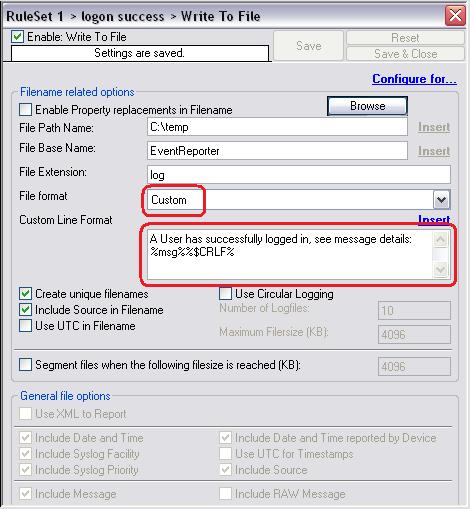
Image 5: Settings for “Write to File”-Action
Please Note: Every “Write to File”-Action needs to write its messages into the same file. Else, you will have separate files for all three kinds of messages. If writing to the same file, a message will be written one after another, so there will not be any overlapping with the messages.
You could also make this message a bit more detailed by including the timestamp and the name of the machine on which the Event happened. Then it could look like this:
This would result in the following message:
2008-10-14 09:24:33, Username, Domain, Workstation, Logon Failure
The message now contains the complete timestamp with date and time, the name of the Domain for which the Event applies, the Workstation name from which the message originates and “Logon Failure” as comment to what happened. We have to do this in a fixed way, as we do not have this information automatically parsed from the Event message. If you want to have the detailed description for the Event you can either add the complete message with %msg% or parse out the information before writing it and put it into a custom property with the “Post-Processing”-Action (only available in MonitorWare Agent Professional and Enterprise).
This is all that needs to be done for having all events for Successful Logon, Logon Failure and Account Lockout written into a textfile. If you have any remarks, suggestions or questions to this article, please send a email to our Support Team.
Article created 2008-10-14 by Tom Bergfeld.
In this paper, I describe how to install phpLogCon with IIS6.0. It is intentionally a brief step-by-step guide, targeted to those who want to quickly get it up and running. For more elaborate information about phpLogCon, please consult the phpLogCon manual set.
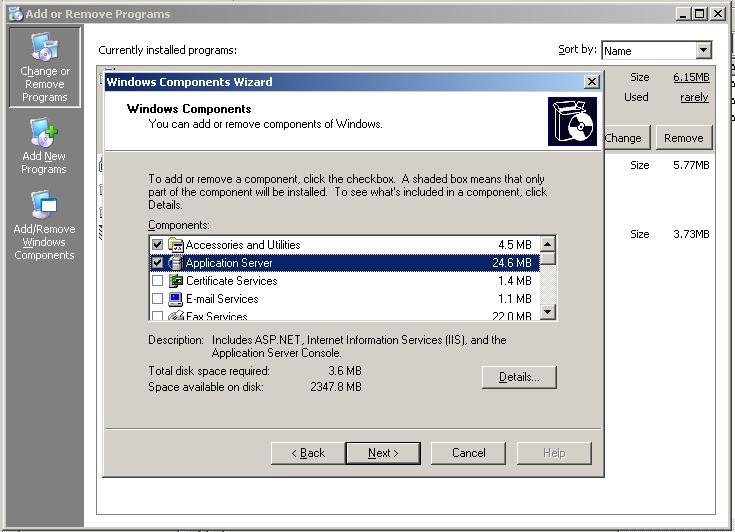
If you don’t use IIS so far, you have to install it now. You just need your Windows-Installation-CD. Go to “Add or Remove Programs” in your Control Panel. There you will find IIS by clicking “Add or Remove Windows Components” (in some cases like Windows Server 2003 IIS is in “Application Server”).
Choose it and follow the install instructions.
To check if the install was correct open your browser and type “localhost” in your navigation bar. You should see the following screen (it’s the default startscreen of the IIS).

Here you will find the PHP installer. Download it and follow the instructions of the installer. A simple test should show if the install was correct. Create a simple test.php-file in your webbrowser folder (default IIS folder c:\Inetpub\wwwroot) and try to open it via your browser. I created a simple test.php for you, that you can use to test your PHP by clicking here or download it.
For obvious reasons, you need to download phpLogCon.
Load the most recent build from here.
Perhaps you will need to download and install third party software like WinRAR to unpack the downloaded phpLogCon tar.gz file.
Open the windows explorer and go to the Inetpub\wwwroot folder of your IIS web server, which is the folder where you can place html/php files. Create a new folder called phplogcon there.
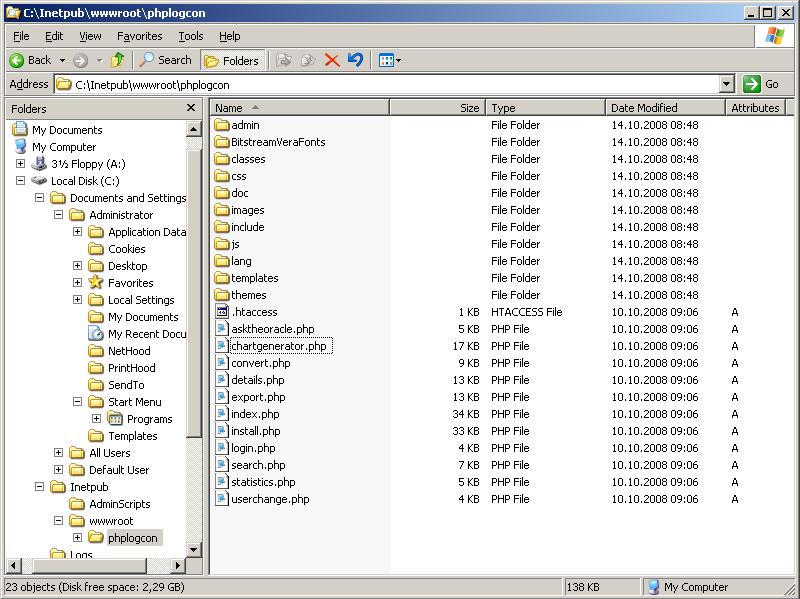
If you downloaded and unpacked phpLogCon, copy or move the content of the src folder into the C:\Inetpub\wwwroot\phplogcon folder.
The explorer window should be like in the screenshot now.
Before you can start the real install you have to set write permissions in the settings of the IIS like in the screenshot. Right click on the wwwroot folder -> properties -> security

Now open your phplogcon installation in your favourite webbrowser (localhost/phplogcon), you will see an error, and you will be pointed to the installation script. The install script will guide you through the phplogcon installation, just follow the instructions.

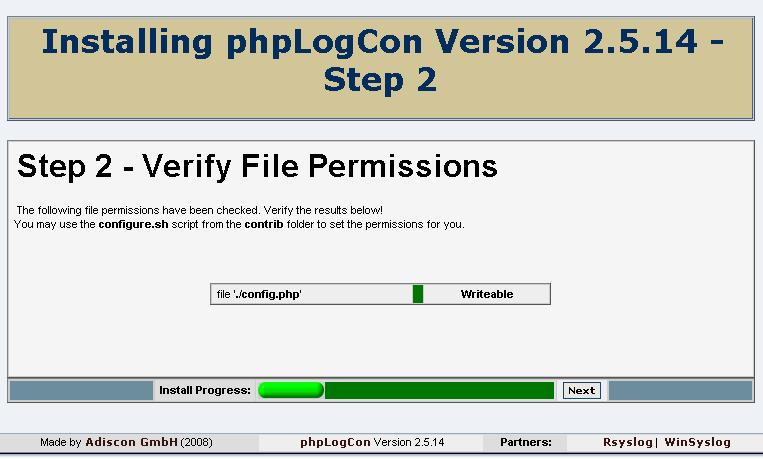
In the first step phpLogCon creates the config.php file in your created phplogcon folder and checks the permissions, if the config.php can be written or not.
In the next steps you can set several basic options.
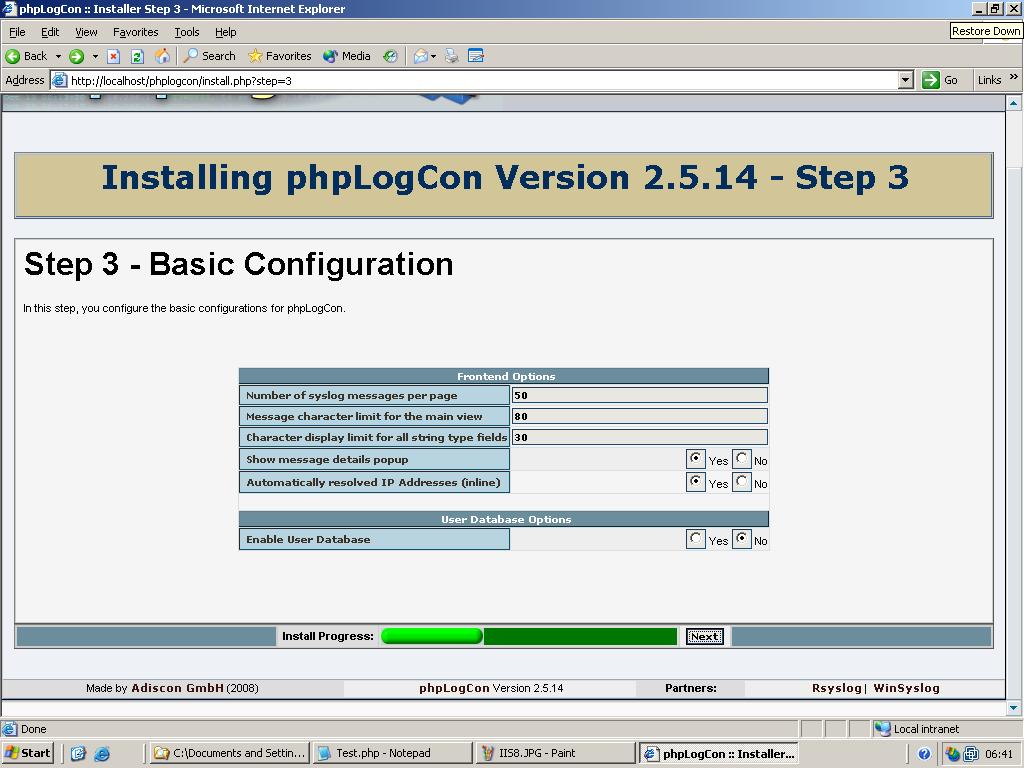
Number of syslog messages per page = 50 (default)
This is the number of syslog messages displayed on each page. You can increase the value (makes phpLogCon slower) or decrease the value (makes it faster).
Message character limit for the main view = 80 (default)
Set the number of characters per message which will be shown in the last column of the main view. Full messages can be reviewed by hovering the mouse over it.
Show message details popup (default yes) = yes (default)
Here you can set, if you want the small window with the complete message to pop up if you are hovering over a event with the cursor. If you choose “No”, then you have to click on the message to see the details.
Create the first source for syslog messages.
Step 7 is the most important. Here, you will configure your first data source, which holds all your syslog data. Mainly, you have to choose a “Name of the Source” and a “Source Type”. The name will be displayed later in a drop-down menu with which you choose your active syslog source. The “Source Type” can be a file, a MySQL database or the PHP PDO which supports different database types like mssql, PostgreSQL, odbc, oracle or even ibm db2.
If you choose the diskfile,like in our case, you have to provide the following information:
Logline Type = Syslog / Rsyslog (default) or Adiscon WinSyslog
This tells phpLogCon, how the lines look like. This is necessary for showing the log messages properly.
Syslog File = /var/log/syslog (default)
This is the position of the logfile in your file system.
The only thing we have to change is the Syslog File into the folder of your choice. I created a file called Webserver.log in the folder c:\Logs, therefore my screen looks like this.

In the next step you finish your install. The last thing you have to do is to delete or rename your install.php in your
c:\Inetpub\wwwroot\phplogcon folder to avoid a reinstall everytime you start your phpLogCon.
Created 2008-10-10 by Florian Riedl
A mass rollout in the scope of this topic is any case where the product is rolled out to more than 5 to 10 machines and this rollout is to be automated. This is described in detail in the Article How to perform a mass rollout?. We now want to take a look at the procedure that needs to be done after you have done a mass rollout before and now want to update MonitorWare Agent to the current version.
The basic idea behind a mass rollout is to create the intended configuration on a master (or baseline) system. This system holds the complete configuration that is later to be applied to all other systems. Once that system is fully configured, the configuration will be transferred to all others. For this case, it means you have to update this system first, alter the configuration there if necessary and then export it.
The actual transfer is done with simple operating system tools. The complete configuration is stored in the the registry. Thus, it can be exported to a file. This can be done with the client. In the menu, select “Computer”, then select “Export Settings to Registry File”. A new dialog comes up where the file name can be specified. Once this is done, the specified file contains an exact snapshot of that machine’s configuration.
This snapshot can then be copied to all other machines and put into their registries with the help of regedit.exe.
An example batch file to update, configure and run the service on “other” servers might be:
net stop "AdisconMonitoreWareAgent"

copy /Y \\server\share\mwagent.exe c:\some-local-dir
copy /Y \\server\share\mwagent.pem c:\some-local-dir
regedit /s \\server\share\update.reg
net start "AdisconMonitoreWareAgent"
The file “update.reg” would be the registry file that had been exported with the configuration client. Copying this file is optional, but recommended. In this configuration file, the new license key could be included as well as configuration changes.
Of course, the batch file could also operate off a CD – a good example for DMZ systems which might not have Windows networking connectivity to a home server.
Please note that the above batch file fully installs the product – there is no need to run the setup program at all. All that is needed to distribute the service i.e. mwagent.exe and its helper dlls, which are the core service. For a locked-down environment, this also means there is no need to allow incoming connections over Windows RPC or NETBIOS for an engine only install.
Please note that, in the example above, “c:\some-local-dir” actually is the directory where the product is being installed. The commands “net stop” and “net start” do first STOP the service before copying the new files and then START it again after everything is finished.
Created 2008-10-06 by Florian Riedl
For storing IIS logs into a database you need MWAgent. With the help of this guide, we will show you, how to create a proper configuration for storing IIS logs into a given database structure. The main goal of this guide is to achieve, that the logs will be parsed after a given time of the day, when the database isn’t very busy anymore and then again stopping later to prevent the service from idling all the day.
Please Note: With this setup you are not able to constantly monitor the Windows Eventlog or receive syslog messages at all times.
First, create a new RuleSet for storing data into the database. You can simply follow this guide: Creating a Rule Set for Database Logging. Use your own settings of the database for this part.
Then create your Filemonitor and point it to the location of your IIS Logfile which you want to monitor. For the basic setup follow this guide: How To setup File Monitor Service. For in-depth configuration, please go on.
(Note: Daily Internet Information Server log files are named “exyymmdd.log”, with yy being the 2 digit year, mm the month and dd the day of month. To generate the same name with file monitor, use the following name “ex%y%m%d.log”.)
Set the Logfile Type to “W3C WebServer Logfile”, set the Check Interval to “1 day” and assign it to your newly created RuleSet.
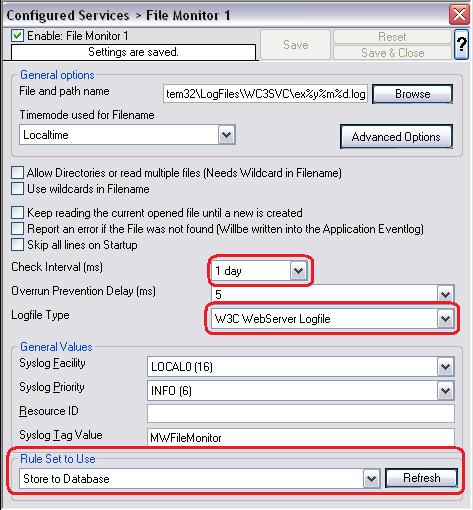
Figure 1: Configuring the Filemonitor
We have now already created the configuration we need for our goal to be achieved. We now need to determine the correct time to start the service and again to stop it.
We will start and stop the service via Scheduled Tasks. But before we create the tasks, we have to do a little bit configuration to the service itself. Therefore, go to the services panel. Press the Windows-button + R and type services.msc into the field and hit enter.
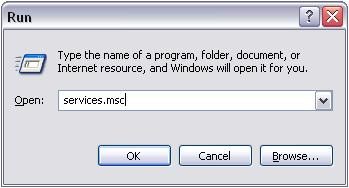
Figure 2: Type services.msc into the Run-Windows
After this, the services panel will open. Double-click on the service AdisconMonitoreWareAgent to open up it’s properties and change the Startup Type to “Manual”.
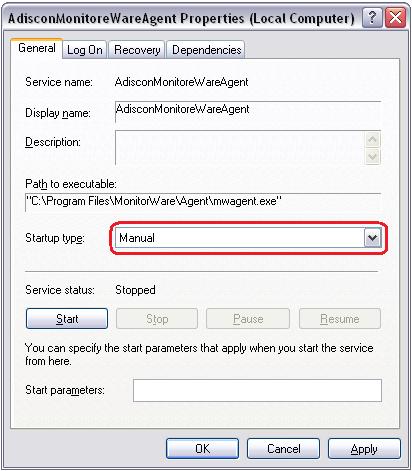
Figure 3: Change Service Properties
After you have done this, confirm the changes and close the Service Properties as well as the Service Panel.
Now we can create the Scheduled Task to start the service. Go to the Control Panel and select Scheduled Tasks. You can create a new Task by double-clicking on “Add Scheduled Task”. Simply follow the wizard as I show it.
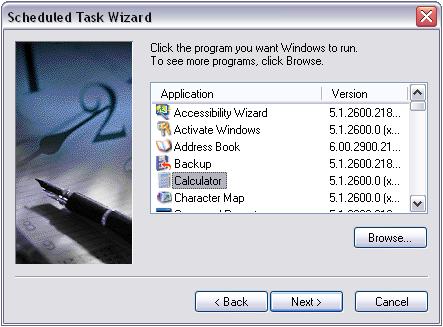
Figure 4: Select Application
The first screen of the wizard is of no concern. Simply hit “Next”. Then we shall choose an application. We could browse for any .exe file, but this does not matter, as we have to change all details later anyway. Because of this, I chose the Calculator.
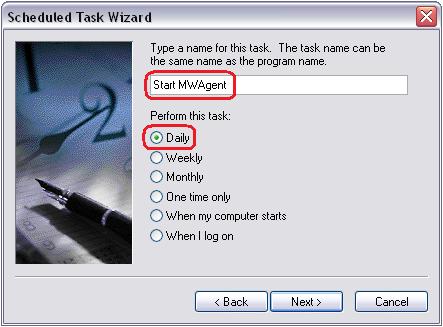
Figure 5: Select Name and Interval
The second Step is to choose a name with which the Task will be stored and an interval in which it should be run. For this example, I chose to run it daily. The reason for this is, that we want to submit the log data to the database on a daily basis. This can be changed later if necessary.

Figure 6: Detailed Startup Setup
On the next screen we can be a more precise with the interval configuration. I set the starting time to 5:00 AM. This will start the Task each day at the same time.
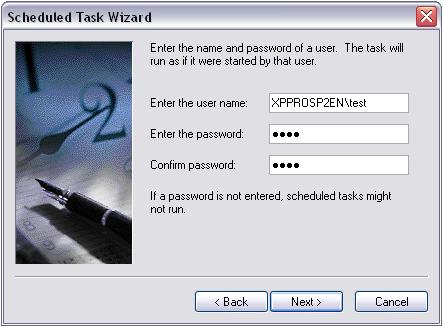
Figure 7: Account details
Here we have to insert the account details with which the Task needs to be run. Please note, that this has to be an account with administrative privileges. Else the service won’t start.
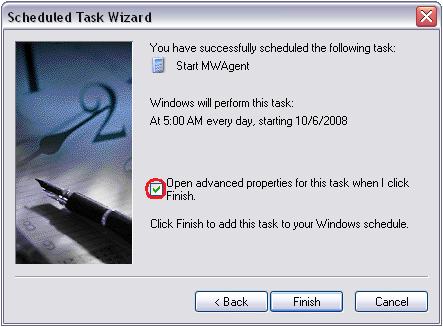
Figure 8: Finish the Configuration Wizard
Finally, we have reached the end of the configuration wizard. Please check the box to open the advanced properties for this task right after finishing the wizard. Then we can complete the setup. If you missed to check the box, simply double-click on the newly created Task in the list to open the properties.
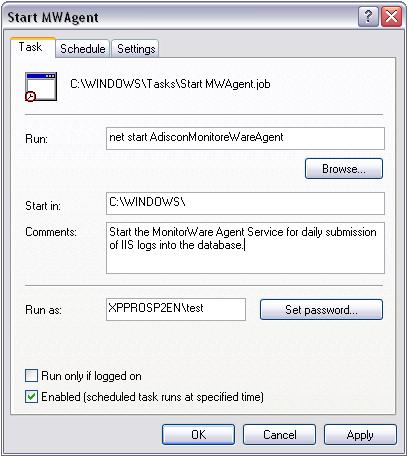
Figure 9: Detail Configuration
Now we only have to finish the last step for this Task. We need to change the run command. Instead of calling the calculator.exe we now insert “net start AdisconMonitoreWareAgent” (without the quotes). This command will start the service. Please Note: Check and see if you wrote the Service name correctly, as shown in the screenshot. If you are unsure, check the name in the Services Panel.
Now that we have created a Task for starting the MonitorWare Agent service, we need a task to stop it as well. Please note: This Step is only necessary if you do NOT want the service to idle all day. If you do not care about this, it doesn’t matter, because MonitorWare Agent is configured to check the log files every 24h anyway.
Please repeat the Steps 4.1 to 4.6 with the following changes:

Figure 10: Select Name and Interval
In the second Step, you need to choose a different name of course. This will help you to keep an eye over those Tasks and not mix them up.
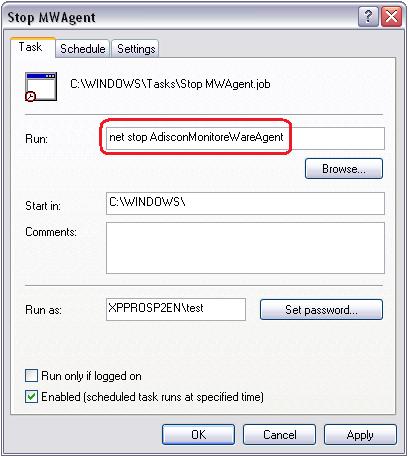
Figure 11: Detail Configuration
In the detail configuration, the command has to be different as well. Instead of the parameter “start” we need to use “stop”. Very self-explanatory.
This concludes this guide. If you have any remarks or suggestions, feel free to contact us. Your feedback is very welcome.